
The X Window System provides a framework for applications to run and display their graphical interfaces on a computer, typically over a network connection. It is the foundation for many desktop environments, such as GNOME and KDE.
x11vnc is a VNC (Virtual Network Computing) server that allows remote access to the graphical interface (desktop) of an X Window System running on a Unix-based system. It adopts a server-client architecture where the X11vnc program is installed on the X windows computer, while the client software is installed on a remote device. It uses RFB (Remote Framebuffer) protocol to communicate between server and client. The client is able to receive input events such as mouse clicks and keyboard presses and feel as user were physically present at the X Window System computer.
In this tutorial, we learn how to set up x11vnc on Ubuntu 22.04.
Prerequisites
- Server - A ubuntu machine with a non-root user with sudo privileges.
- Client - Any Linux machine having vnc client.
Step 1. Installing x11vnc on Ubuntu
For demonstration purposes, we are using Ubuntu 22.04 as our environment. The X11vnc server package is available on Ubuntu repositories and can be installed using the APT package manager.
To get started, first, update the package lists.
sudo apt updateNext, install the lightdm display manager. Later in this guide, we will show you how to configure it as the default display manager.
sudo apt install lightdmNote: For users using GDM make sure to disable Wayland by uncomment line #WaylandEnable=false setting in /etc/gdm/custom.conf file. This is because Wayland doesn't allow to display x11vnc (only works with X11).
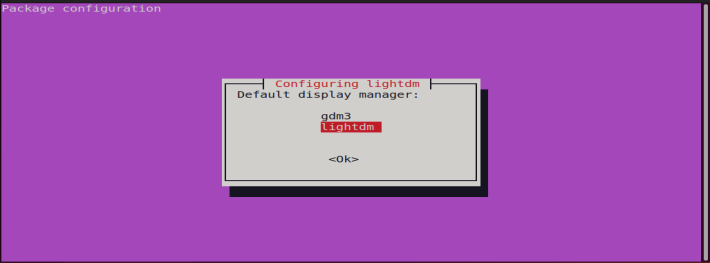
During the installation process, you will be prompted to choose a default display manager. This is a program that provides graphical login capabilities. By default, this is set to gdm (GNOME Display Manager) for Ubuntu systems. Change and select the 'lightdm' option and hit ENTER.
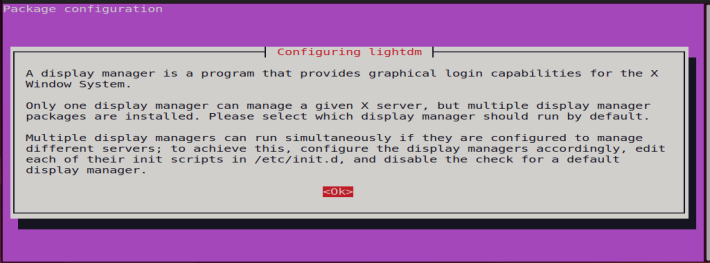
In the next step, hit ENTER to exit the prompt.
Once the installation is complete. reboot your system.
sudo rebootTo install the x11vnc server on ubuntu 20.04/22.04 on the command line, run the command.
sudo apt install x11vncThis installs the X11VNC server alongside other additional packages and dependencies.
Step 2. Configuring x11vnc settings on Ubuntu
Once the X11VNC server is installed, the next step is to create a systemd service file. We will use the nano text editor to create the service file as shown.
sudo nano /lib/systemd/system/x11vnc.serviceNext, paste the following lines. The service file will start the x11vnc server and make it easy to seamlessly manage the service. In addition, it will force the server to restart automatically in case of any failure.
[Unit]
Description=x11vnc service
After=display-manager.service network.target syslog.target

[Service]
Type=simple
ExecStart=/usr/bin/x11vnc -forever -display :0 -auth guess -passwd my-password
ExecStop=/usr/bin/killall x11vnc
Restart=on-failure

[Install]
WantedBy=multi-user.target
Note: The my-password attribute represents the VNC server password for providing VNC client access to the server. Be sure to set a strong password for security reasons and to prevent other users from accessing the system.
Save the changes and exit the configuration file.
Step 3. Starting x11vnc server
With the service config file in place, notify the systemd service of the change made as follows.
sudo systemctl daemon-reloadNext, enable the X11vnc service in order to auto-start on boot time. This will include the x11vnc server in the list of startup applications.
sudo systemctl enable x11vnc.serviceOnce enabled, start the service using the following command:
sudo systemctl start x11vnc.serviceTo verify if the X11 VNC server is running, execute the command.
sudo systemctl status x11vnc.service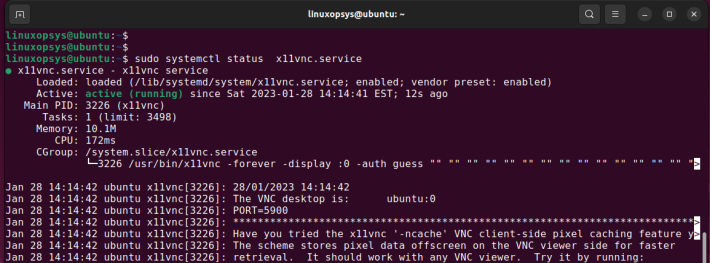
From the above output, you can see that the VNC server is up and running and listening on port 5900.
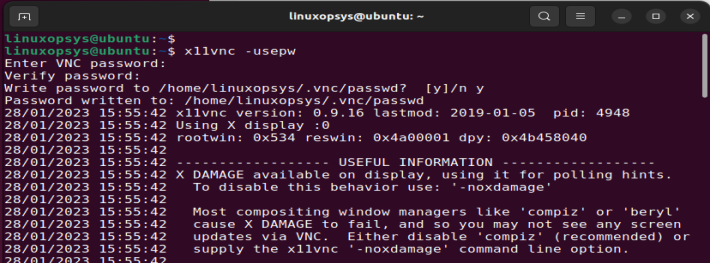
If you have not yet set the VNC password from the previous step, you can generate a password-written file which will be saved in your home directory.
To do this, run the following command.
x11vnc -usepwYou will be prompted to enter and verify the password. The password will be saved in the /.vnc/passwd password file located in your home directory.
At this point, the x11vnc server is installed. If you have UFW firewall running, be sure to open port 5900.
sudo ufw allow 5900/tcpsudo ufw reloadStep 4. Connect Remote Ubuntu Server using x11vnc client
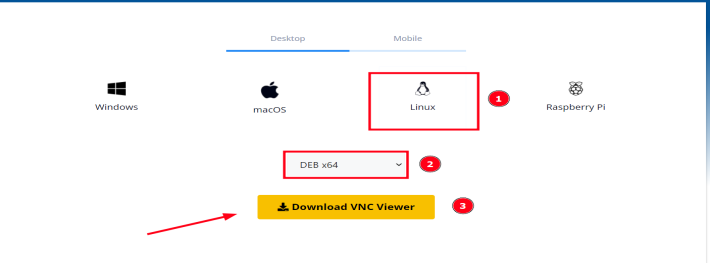
To connect to the VNC server, you need a client installed on a remote system. For this guide, we will use the RealVNC viewer on our system. Therefore, head over to the download section and download your operating system's binary file. In this case, we downloaded the DEB package.
Alternatively, you can download and install x11vnc on the command line as follows.
Ubuntu/ Debian/ Mint
Download the binary file using the wget command.
wget https://downloads.realvnc.com/download/file/viewer.files/VNC-Viewer-6.22.826-Linux-x64.deb
Then install the client as shown.
sudo apt install ./VNC-Viewer-*-Linux-x64.deb
Red Hat based Distributions
Download the binary file
wget https://downloads.realvnc.com/download/file/viewer.files/VNC-Viewer-6.22.826-Linux-x64.rpm
Then install the client
sudo rpm -Uvh VNC-Viewer-*-Linux-x64.rpm
Next, launch the RealVNC viewer application and Sign In, or create an account if you don't have one already.
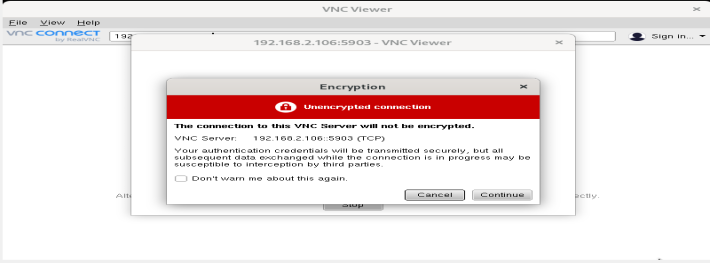
Then provide the IP address for the VNC server. By default, the VNC connection is not encrypted. However, this should not be a deterrent to initiating a connection, and therefore, simply press 'Continue'.
On the login screen, enter the VNC password and click 'Ok'

You should be able to see the graphical user interface for the remote VNC server as shown below. With remote access, you can seamlessly interact with the remote VNC server and manage it just as you would using the Remote Desktop Protocol on Windows.

Video demonstration on Setting up x11vnc on Ubuntu
Conclusion
In this tutorial, we have learned how to install the x11vnc server on Ubuntu 22.04.
Remember x11vnc server works only with X Window System. On Wayland enabled system you need to perform some workaround to fix x11vnc start issues.
Thanks for reading, please leave your feedback and suggestions in the below comment section.


About The Author
James Kiarie

James Kiarie is a skilled and certified LPIC Linux administrator with a strong passion for technical writing, specializing in the Linux domain. With over four years of experience, he has crafted numerous technical guides, helping a wide audience navigate through various Linux distributions.
Probably shouldn’t enter your password into the x11vnc.service file. Do this right after installing x11vnc, run this:
x11vnc -storepasswd
which saves the PW to ~/.vnc/passwd encrypted with a known algorithm, but then if you can restrict its permissions with this:
chmod 600 ~/.vnc/passwd
which should be enough to be better than a plaintext password in a service config file.
Also, I had to disable Wayland on Debian for this to work for me. I imagine that Ubuntu and other Debian derivatives would have to have similar configurations to work properly.