
MySQL is an open-source relational database management system. You can freely use and modify it. MySQL database server has been around for a while since 1995. It was acquired by Sun Microsystems and later on by Oracle corporation in 2010 which is still its parent company to date.
The name MySQL came from "My" - the name of the co-founder’s daughter and SQL stands for Structured Query Language which is used to manage data in a relational database.
MySQL is a critical component of the LAMP and LEMP stack which is a popular web hosting stack for WordPress.
In this guide, we will learn how to install MySQL on Ubuntu 22.04. The same steps you can follow in the previous version of Ubuntu 20.04.
Prerequisites
- An instance of Ubuntu 22.04 server with SSH access
- A sudo user account configured for running elevated tasks as a root user.
Key Features of MySQL
Let us take a sneak peek at some of the notable features of MySQL 8.0:
- Enhanced JSON support.
- Transactional Data Dictionary. Dictionary is now installed in InnoDB tables.
- Persistent runtime configuration.
- Improved handling of hot rows and Unicode 9.0 update.
- SQL roles.
- Windows Functions and Common Table Expressions ( CTE ).
- Auto_increment counter persistence over restart.
- Document Store.
- Optimizer hints.
- Character sets and collations.
Step 1: Update the system
First, update or refresh the repositories of your server using the following command:
sudo apt updateStep 2: Install MySQL on Ubuntu
The MySQL server package is officially hosted on Ubuntu 22.04 repositories. So we can use the APT package manager to install the MySQL server.
To install MySQL package on Ubuntu, type:
sudo apt install mysql-serverThis will start installing the MySQL community server and will prompt you to press "Y" to confirm.
The mysql-server installs all the MySQL server packages and dependencies including the client.
MySQL client is used to communicate with the server to manage the databases. It also comes with packages to easily backup and restore the data.
Once installed, the MySQL server should autostart. You can verify this by running the command:
sudo systemctl status mysql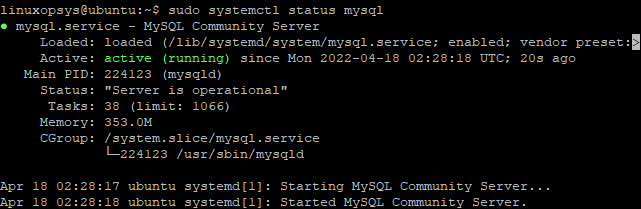
The output shows active(running) that confirms the MySQL service is up and running. Mysql installation is complete. The next step after installing mysql is to configure the MySQL server.
You can check the MySQL version directly from the terminal using:
mysql --versionOutput
mysql Ver 8.0.29-0ubuntu0.22.04.2 for Linux on x86_64 ((Ubuntu))
At the time of this writing, the version of MySQL available in the default Ubuntu repository is version 8.0.28.
After the fresh installation you can log in to the MySQL shell from the terminal without a password using the root or sudo user:
sudo mysql -u rootOutput
Welcome to the MySQL monitor. Commands end with ; or \g.
Your MySQL connection id is 17
Server version: 8.0.29-0ubuntu0.22.04.2 (Ubuntu)
Copyright (c) 2000, 2022, Oracle and/or its affiliates.
Oracle is a registered trademark of Oracle Corporation and/or its
affiliates. Other names may be trademarks of their respective
owners.
Type 'help;' or '\h' for help. Type '\c' to clear the current input statement.
mysql>
Step 3: Securing MySQL server on Ubuntu
The default settings of MySQL are considered weak and vulnerable to intrusions and breaches. We, therefore need to take an extra step to secure the mysql server.
The basic installation provides a security script that is used to improve the security of MySQL. To run the script, run the following command:
sudo mysql_secure_installationA series of prompts will follow that will guide you on how you can tweak the MySQL server to the best security practices.
To begin with, you need to set up the password validation policy which tests the password strength of the new mysql user.
We recommend setting the strongest policy level by typing '2'.
Securing the MySQL server deployment.

Connecting to MySQL using a blank password.

VALIDATE PASSWORD COMPONENT can be used to test passwords
and improve security. It checks the strength of password
and allows the users to set only those passwords which are
secure enough. Would you like to setup VALIDATE PASSWORD component?

Press y|Y for Yes, any other key for No: Y

There are three levels of password validation policy:

LOW    Length >= 8
MEDIUM Length >= 8, numeric, mixed case, and special characters
STRONG Length >= 8, numeric, mixed case, special characters and dictionary file

Please enter 0 = LOW, 1 = MEDIUM and 2 = STRONG: 2
Next, provide the root password for the MySQL root user and confirm it. Alternatively, you can set the root password by altering the root user in the default database named mysql.
Please set the password for root here.


New password:

Re-enter new password
Having set the password for the root user, the user is not yet configured to authenticate using the password and access the MySQL shell. You will get some feedback on the password strength configured when you were setting up the password validation policy.
The maximum value is 100 if you chose 'STRONG length' from the dictionary file. If you are okay with this, simply press 'Y' to continue.
Estimated strength of the password: 100
Do you wish to continue with the password provided? (Press y|Y for Yes, any other key for No_) :y
For the remaining MySQL installation's security options, simply press 'Y' to configure mysql to the best practices. This removes anonymous users, disallows remote root logins, and removes the test database. Finally, reload privilege tables for the changes to take place immediately.
Step 4: Verify that the MySQL service is running
As stated earlier, the MySQL server automatically starts when installed. You can verify that the MySQL service is running, run the following command:
sudo systemctl status mysqlIf, for any reason, the MySQL service has not started, start it as follows:
sudo systemctl start mysqlStep 5: Add a Dedicated MySQL User and Granting Privileges
When installed, MySQl creates a root account that has absolute privileges for managing your database. The implication is that the user has full privileges on the MySQL server and has complete control over just about any database, table, users, and so forth. Just like we have the root user in the Linux system, it's not a good idea to use this user for administrative purposes.
For this reason, it is recommended to create a non-root administrative user account.
To achieve this, first log in to the MySQL server using the MySQL client as follows:
sudo mysql -u root -pThis grants you access to the MySQL shell prompt and allows you to run SQL commands.
To create a new MySQL user, use the create user statement.
CREATE USER 'user'@'host' IDENTIFIED WITH authentication_plugin BY 'password';After issuing the CREATE USER statement, specify a username follows by the @ sign which, in turn, is followed by the hostname of the server from which the user will connect. If you will be accessing the server locally on your Ubuntu server, simply specify localhost as the hostname. It's recommended to enclose the username and host in single quotes to avert any errors.
For the authentication plugin, you have a number of options. You can leverage the auth_socket plugin. This provides robust security without requiring valid MySQL users to provide a password for accessing the database. The downside to it is that it blocks remote connections which causes problems for external apps that need to connect to the MySQL server.
A better option is to leave out the 'WITH authentication_plugin' part and make the user authenticate with the caching_sha2_password plugin which is MySQL’s default plugin.
Be sure to replace 'linuxopsys' with your preferred username and the 'password' by a strong password
CREATE USER 'linuxopsys'@'localhost' IDENTIFIED BY 'password';PLEASE NOTE:
Some versions of PHP have been reported to have issues with the caching_sha2_password plugin. If you wish to use the MySQL database with a PHP application such as phpMyAdmin, you might want to consider creating a user that authenticates with the much older, but secure mysql_native_password plugin as follows.
CREATE USER 'linuxopsys'@'localhost' IDENTIFIED WITH mysql_native_password BY 'password';Alternatively, you can create a user that authenticates with caching_sha2_plugin and later ALTER it with the following command:
ALTER USER 'linuxopsys'@'localhost' IDENTIFIED WITH mysql_native_password BY 'password';Once a user is created, you can grant them appropriate privileges using the following command:
GRANT PRIVILEGE ON database.table TO 'username'@'host';The PRIVILEGE keyword specifies the actions or permissions that a user can perform on the specified database and table. You can grant privileges to the MySQL user in one command by separating each privilege with a coma as we shall see shortly. In addition, you can use the asterisk symbol ( * ) to grant user privileges globally, instead of specifying the database and table names. When the asterisk symbol is used, this represents all the databases and tables contained in the database.
Consider the following MySQL command:
GRANT CREATE, DROP, INSERT, UPDATE, ALTER, DELETE, SELECT on *.* TO 'linuxopsys'@'localhost' WITH GRANT OPTION;The command grants the MySQL user global privileges to CREATE, and DROP all databases, tables, and users, as well as INSERT, UPDATE, ALTER, and DELETE records on a table. You can also query data using the SELECT keyword.
As a reminder, only grant users the privileges or the permissions they need. For a complete list of all the privileges, head over to the Official MySQL documentation.
To grant all the privileges, use the ALL PRIVILEGES option as shown
GRANT ALL PRIVILEGES ON *.* TO 'linuxopsys'@'localhost' WITH GRANT OPTION;CAUTION:
Granting broad privileges should be done with great caution as this provides the user with broad superuser privileges just like the root user account. Anyone with access to the MySQL user with such privileges will have absolute control over any mysql databases or users.
Once you are done creating the user, it's recommended to reload privilege tables using the FLUSH privileges command.
FLUSH PRIVILEGES;Then finally, exit the MySQL prompt as shown.
exitStep 6: Log in to your MySQL Server
To log in as the new mysql user, use the following command.
mysql -u linuxopsys -pThe -u flag specifies the user account and the -p flag triggers the MySQL client to prompt for the user's password.
To check the mysql version, you can use the mysqladmin client which enables you to run administrative commands.
sudo mysqladmin -p -u linuxopsys versionConclusion
In this guide, we have learned how to install MySQL on Ubuntu 22.04 LTS. We went further and illustrated how to improve the security using the inbuilt script, some basic operations such as user creation, and granting privileges.


Comments