
Nginx is a free, open source, and high performance web server that is hugely popular due to its wide array of features and functionalities. Apart from serving web content, Nginx can also be configured to act as a reverse proxy server, load balancer, HTTP cache.
In comparison to Apache, Nginx is twice as fast and can handle more requests per second thanks to its robust module system and architecture. For this reason, it is widely used by organizations to host high-traffic websites. Popular companies whose websites run on Nginx include Twitter, Intel, Uber, Shopify, WordPress, and Quora just to mention a few.
In this guide, we will demonstrate how you can install Nginx on Ubuntu 22.04. You can use the same guide for Ubuntu 20.04 Version.
Prerequisites
Ensure you have the following before installing Nginx:
- An instance on Ubuntu 22.04.
- SSH access to the instance.
- A non-root user configured with sudo privileges.
Step 1: Update the system
Generally, it is always recommended to refresh repositories or update the package lists before installing new software on your system.
As such, refresh the repositories as follows:
sudo apt update Step 2: Install Nginx on Ubuntu from default Repositories
Nginx web server is hosted on the default Ubuntu repositories and, hence, can be installed using the APT package manager as follows:
sudo apt install nginx -yThis installs Nginx packages and other dependencies required by the Nginx open source web server.
Step 3: Check Nginx version
When the installation of Nginx is complete, verify the version of Nginx installed using the following command.
nginx -vOutput
nginx version: nginx/1.18.0 (Ubuntu)
At the time of this writing, the version of Nginx available in the default Ubuntu repository is version 1.18.0.
Step 4: Check Nginx Service status
By default, Nginx starts automatically upon installation on Ubuntu. To verify this, run the command:
sudo systemctl status nginxFrom the output, we can see that active (running) that means the Nginx is up and running.
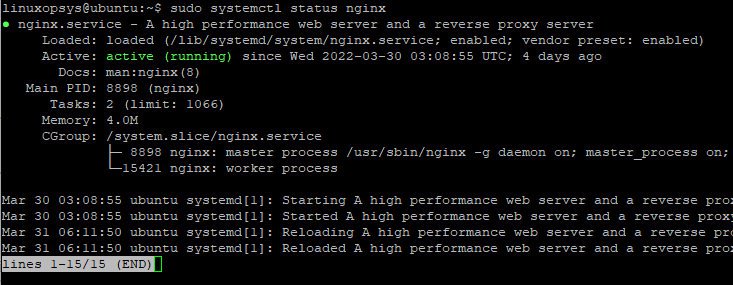
Press q from the keyboard to return back to the terminal.
To enable Nginx to start automatically on system startup, enable the service as follows.
sudo systemctl enable nginxIf you so wish, you can prevent Nginx from loading on boot time by running:
sudo systemctl disable nginxTo stop Nginx, run the command:
sudo systemctl stop nginxTo start Nginx, execute the command:
sudo systemctl start nginxTo restart the Nginx ( especially after configuration changes ) reload Nginx web server.
sudo systemctl reload nginxTo perform an aggressive restart, run the command:
sudo systemctl restart nginxStep 5: Allow Nginx Traffic on Firewall
By default, Ubuntu ships with the UFW firewall as the default firewall. Nginx installs a number of profiles for the UFW firewall. To view the profiles, run the command:
sudo ufw app listOutput
Available applications:
Nginx Full
Nginx HTTP
Nginx HTTPS
OpenSSH
You can grant Nginx access through the firewall using any of the listed Nginx profiles. For example, to allow only the HTTP ( unencrypted web traffic ) protocol, run the command:
sudo ufw allow 'nginx http'For the changes to take effect, reload the firewall.
sudo ufw reloadTo allow HTTPS protocol, run the command:
sudo ufw allow 'nginx https'Then reload the firewall for the changes to take effect
sudo ufw reloadTo allow both profiles and avoid running multiple commands, simply run the following command.
sudo ufw allow 'nginx full'As always, reload the firewall to apply the changes.
sudo ufw reloadStep 6: Check Web server by IP or Domain
To confirm that Nginx is running and is reachable by external users, launch your browser and browser your server’s IP address or domain name.
In this example, we are accessing the web server using the server’s public IP address. To get your server’s public IP address, run the following command on the terminal.
curl ifconfig.meor
curl checkip.amazonaws.comCopy and paste the public IP to the URL bar and press ENTER.
http://server-ipThis displays the default Nginx page, an indicator that the Nginx web server is functioning as expected.
http://domain-name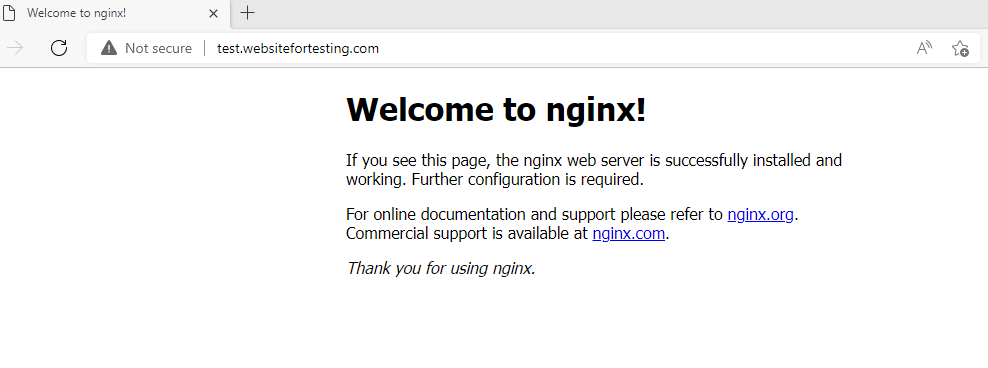
Alternatively, use the server’s fully qualified domain name to access the server.
The default document root for a fresh installation of Nginx is located at /var/www/html. You can add or create new document roots as per your needs.
Step 7: Setup Nginx Server Block ( Optional )
A server block file is a feature in Nginx that allows you to host more than one domain or website on a single server. You can configure Nginx server blocks and specify each site’s document root ( path to the website files ) and assign different permissions and security policies to the document root.
To illustrate how you can create one server block, we will use the domain test.websitefortesting.com. For this section, make sure to use your own domain name pointed to your server's ip address.
1. Create document Root directory structure
First, create the Document root or directory for serving the domain's website files.
sudo mkdir -p /var/www/test-websitefortesting.com/htmlNext, configure the following directory ownership and permissions. Here we use chown command to set ownership of the file and chmod command to set permissions.
sudo chown –R $USER:$USER /var/www/test-websitefortesting.com
sudo chmod –R 755 /var/www/test-websitefortesting.com
Next, create a test HTML page for the server block.
sudo vim /var/www/test-websitefortesting.com/html/index.htmlInside the file, paste the following lines of code.
<html>

   <head>

      <title>test-websitefortesting.com!</title>

   </head>

   <body>

      <h1>This is a confirmation that the Nginx server block is working. Perfect!</h1>

   </body>

</html>
Save the changes and exit.
2. Create an Nginx Server block file
Now, create a server block file as follows.
sudo vim /etc/nginx/sites-available/test-websitefortesting.comPaste the following lines of code.
server    {

listen 80;


root /var/www/test-websitefortesting.com/html;

index index.html index.htm index.nginx.debian.html;


server_name test-websitefortesting.com www.test-websitefortesting.com;

location /          {

try_files $uri $uri/ =404;

      }

}
Save and exit.
3. Create a link to the sites-enabled directory
Be sure to create a symbolic link from the server block to the /etc/nginx/sites-enabled file as follows.
sudo ln -s /etc/nginx/sites-available/test-websitefortesting.com /etc/nginx/sites-enabledThe site-available and sites-enabled are not really required if you can properly configure Nginx blocks in nginx.conf file. This adds the advantage of easily adding and disabling sites.
4. Restart Nginx Service
Finally, to apply all the changes, restart the Nginx service.
sudo systemctl restart nginxBefore checking out if the Server block is working as intended, check if all the Nginx configurations are okay.
sudo nginx -tIf the server block configuration is okay, you should have the output showing that the syntax is okay and that the test was successful
5. Test the Nginx server block
To test if your server block is working, once again, open your browser and head over to your domain. You should get this displayed on the browser. This shows that the server block is hosting your website files without a problem.
http://test.websitefortesting.com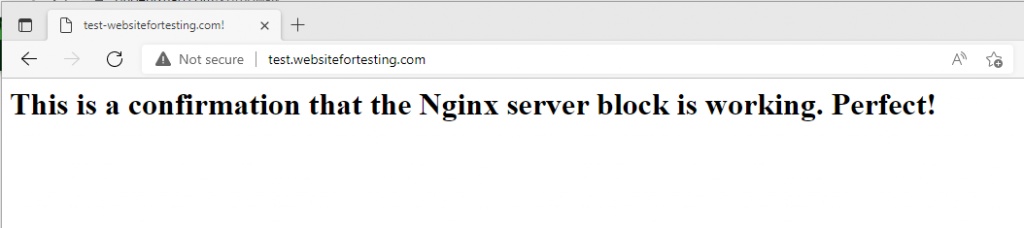
Important Nginx Files and Directories Location
Before we wrap up, here is an overview of the main Nginx configuration files & directories.
| Important Nginx files | Description |
|---|---|
/etc/nginx | The location of the main Nginx application files. |
/etc/nginx/nginx.conf | This is the main Nginx configuration file. |
/var/www/html | Default Document Root where website content is usually placed. |
/etc/nginx/sites-available | This directory contains all domains/websites configured through Nginx. |
/etc/nginx/sites-enabled | This directory contains shortcuts to actively served websites/domains. |
/var/log/nginx/access.log | This is the access log file that logs every request made to the webserver. |
/var/log/nginx/error.log | This is the error log file that contains errors generated in Nginx |
Conclusion
At this point, you should have your Nginx installed and configured to serve your website or domain. In this guide, you have learned how to install and configure Nginx on Ubuntu 22.04.


Comments