If your business has multiple personal computers in the network which need to print, then we need a device called a print server. Print server act intermediate between PC and printers which accept print jobs from PC and send them to respective printers.
CUPS is the primary mechanism in the Unix-like operating system for printing and print services. It can allow a computer to act as a Print server.
In this tutorial, we learn how to set up CUPS print server on Ubuntu 22.04.
Prerequisites
- A Ubuntu server 22.04 machine that has a network connection to the Printer
- A client Ubuntu desktop or server edition to access the printer
1. Install CUPS on Ubuntu
CUPS is the standard printing system in Most Linux Distributions including Ubuntu. It supports print jobs, queues, network printing (using IPP), supports a large range of printers, auto-detection of network printers, web administration, and more.
First, get your Ubuntu system update:
sudo apt updateCUPS is installed by default in the Ubuntu Desktop edition. To Install cups on Ubuntu server edition enter the following command on your terminal:
sudo apt install cupsStart the cups daemon:
sudo systemctl start cupsVerify that the daemon is running:
sudo systemctl status cupsOutput:
● cups.service - CUPS Scheduler
      Loaded: loaded (/lib/systemd/system/cups.service; enabled; vendor preset: enabled)
      Active: active (running) since Sun 2022-08-12 01:31:30 WAT; 53min ago
 TriggeredBy: ● cups.socket
              ● cups.path
        Docs: man:cupsd(8)
    Main PID: 971 (cupsd)
      Status: "Scheduler is running…"
       Tasks: 1 (limit: 18958)
      Memory: 26.3M
      ...
sudo systemctl enable cups2. Configure CUPS on Ubuntu
CUPS can be configured using the Web interface (available at http://localhost:631/admin) or by the directives contained in the file /etc/cups/cupsd.conf. Let's check how to configure the CUPS configuration file to set up a printer server.
First, back up the configuration file by saving a copy of the default configuration. This is in case something goes wrong and you want to undo things.
sudo cp /etc/cups/cupsd.conf /etc/cups/cupsd.conf.copyOpen the original file with your favorite editor and change the following.
For CUPS to listen on all network interfaces, disable the line showing Listen localhost:631 (under the section 'Only listen for connections from the local machine') and add the line Port 631 as follows:
#Listen localhost:631
Port 631
Make sure the directive Browsing On is enabled to show the shared printers on the local network (in the section 'Show shared printers on the local network'):
Browsing OnSet BrowseLocalProtocols to dnsd protocol (that supports Bonjour), by default it is enabled.
BrowseLocalProtocols dnssdUnder the 'Restrict access to the server' section add Allow @LOCAL to allow access from the other computers from the network.
#Restrict access to the server
<Location />
 Order allow,deny
Allow @LOCAL
<Location>
Under the 'Restrict access to the admin pages' add /admin directory to allow access from the other computer to access admin pages.
#Restrict access to the admin pages.
<Location /admin>
Order allow,deny
Allow @LOCAL
<Location>
Save and close the file. Then restart the cups daemon to make the changes effective:
sudo systemctl restart cupsIf you prefer to configure using CUPS web interface, it's recommended to use either root or a user authenticated in the lpadmin group.
To add a user to lpadmin group, type:
sudo usermod -aG lpadmin username3. Install Your Printer Driver
Most of the HP printers work by default on Linux. HP drivers are called hplip and are already installed on most Linux distributions.
Note: Before installing the driver try starting the CUPS service to see if it automatically detects the printer.
In case not installed, use the following command to install HP driver:
sudo apt install hplipYou can find more printer drivers on openprinting.org.
4. Install Bonjour to Share CUPS Printer
We already instructed the cups daemon to make printing a discoverable service on the network using the Bonjour (DNSSD) protocol.
For printer service discovery you need to install avahi-daemon which has mDNS/DNS-SD service discovery. avahi-daemon is a Bonjour server that will broadcast your computer’s information on the network. It allows CUPS to publish/discover services and hosts running on a local network with no specific configuration.
To install avahi-daemon on Ubuntu, type:
sudo apt install avahi-daemonTo start the avahi-daemon, type:
sudo systemctl start avahi-daemonNow you can enable avahi-daemon on boot:
sudo systemctl enable avahi-daemonVerify the running avahi-daemon:
sudo systemctl status avahi-daemonOutput showing 192.168.43.105 as one of the service endpoints on the network:
● avahi-daemon.service - Avahi mDNS/DNS-SD Stack
      Loaded: loaded (/lib/systemd/system/avahi-daemon.service; enabled; vendor preset: enabled)
      Active: active (running) since Sun 2022-08-12 09:45:44 WAT; 11s ago
 TriggeredBy: ● avahi-daemon.socket
    Main PID: 11518 (avahi-daemon)
      Status: "avahi-daemon 0.8 starting up."
       Tasks: 2 (limit: 18958)
      Memory: 1.0M
...
Aug 15 09:45:44 user-HP-EliteBook-Folio-9470m avahi-daemon[11518]: Registering new address record for 192.168.43.105 on wlo1.IPv4.
...
 Aug 15 09:45:45 user-HP-EliteBook-Folio-9470m avahi-daemon[11518]: Server startup complete. Host name is user-HP-EliteBook-Folio-9470m.local.
Unblock port
If you have enabled a firewall make sure to allow the client's machines to talk to CUPS port 631.
Assuming ufw is your firewall program:
sudo ufw allow 631/tcpAs well as UDP port 5353 for avahi-daemon:
sudo ufw allow 5353/udpAdd Printer on Cleint Computer
Let's check how to add the remote printer on a client Ubuntu machine which is shared using the CUPS print server.
To interpret Bonjour broadcasts from the CUPS print server, the clients can use cups-browsed ( which is a component of CUPS - support IPP) or avahi-client (which is installed by default). IPP is needed for print management and helps client computers to use shared printers without installing any drivers.
The cups-browsed daemon will automatically find the shared printer in the network, normally you don't have to add the printer.
If your client is a Ubuntu server edition, make sure to install (most Linux distributions CUPS is preinstalled), enable, start cups.
sudo apt install cups
sudo systemctl start cups && sudo systemctl enable cups
In case the remote printer didn't discover automatically, then added manually.
Press your window key and go to Settings > Printers.
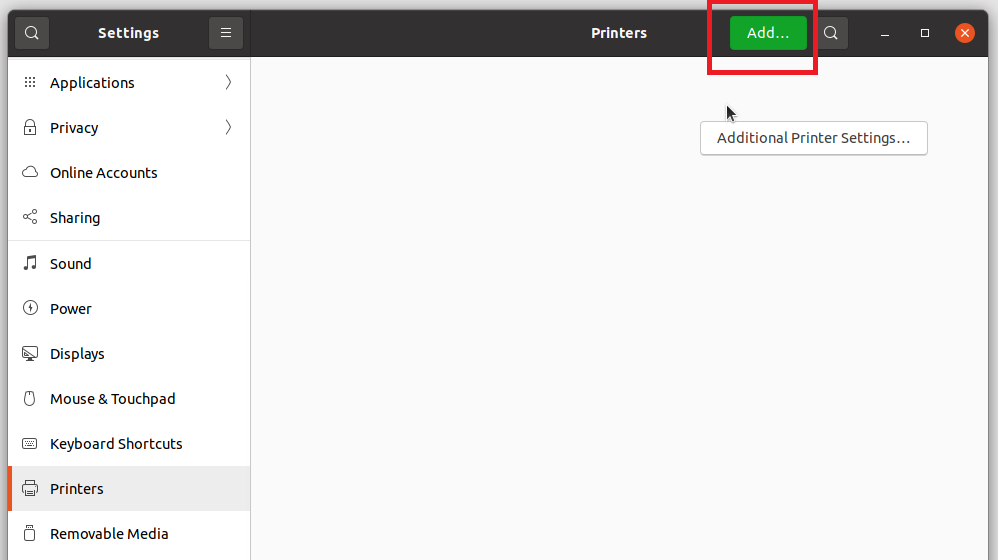
Click the Add button. Add the IP address or name of the Print server and click the Find button.
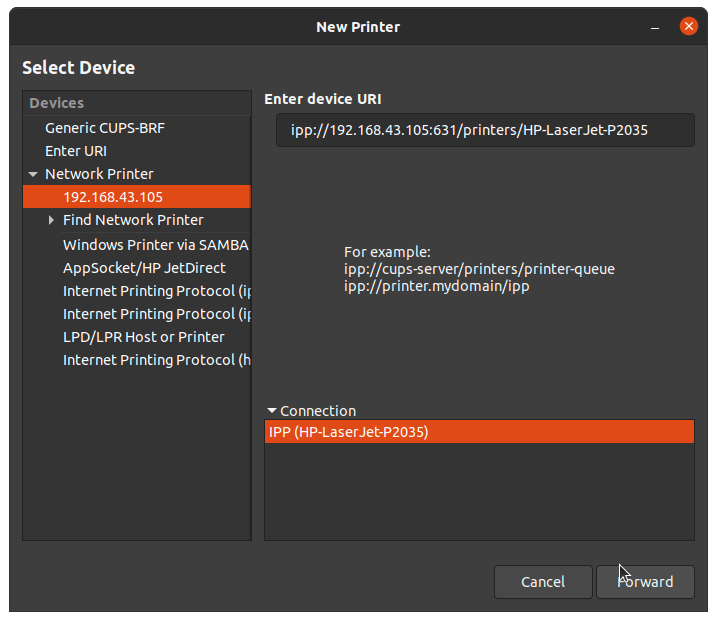
Select the printer from the list and click the Forward button.
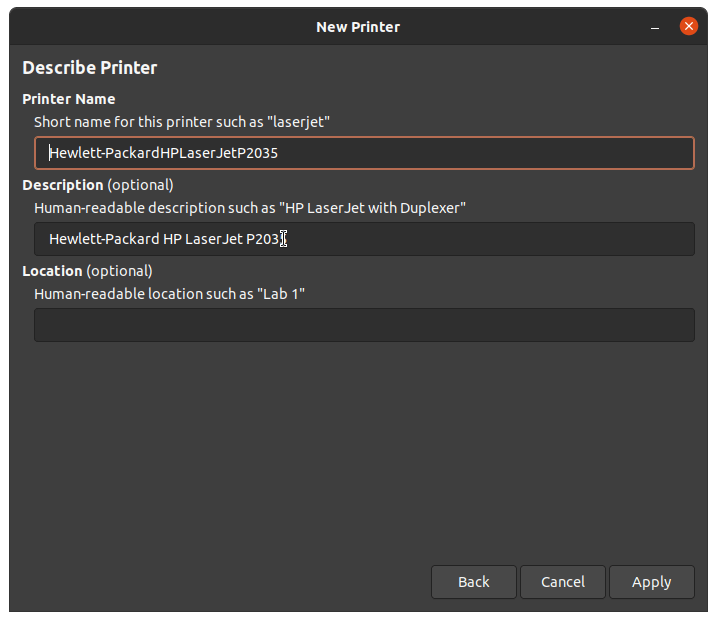
Give a short description for your printer and click Apply button.
You can run a test print from the command line using the lp command and watch the magic:
lp document.txtConclusion
In this tutorial, we learned how to set up a CUPS print server on Ubuntu 22.04. Please let us know your feedback and suggestion in the comment section.


About The Author
Bobbin Zachariah

Bobbin Zachariah is an experienced Linux engineer who has been supporting infrastructure for many companies. He specializes in Shell scripting, AWS Cloud, JavaScript, and Nodejs. He has qualified Master’s degree in computer science. He holds Red Hat Certified Engineer (RHCE) certification and RedHat Enable Sysadmin.
Comments