
The Apache HTTP server is a free and open source web server that is used to serve both static and dynamic web content. It is hugely popular and widely used especially by hosting companies. According to research conducted by W3techs.com, Apache powers 31% of websites.
It is one of the oldest web servers which is actively maintained by Apache Software Foundation. It is used by many high-profile companies and cPanel hosts servers. It is supported on Operating systems such as Linux, Windows, macOS, and more.
In this tutorial, we will learn how to install Apache on Ubuntu 22.04 LTS. The steps you can follow for the previous version 20.04 LTS.
Prerequisites
Before everything else, be sure to have the following requirements in check:
- A running instance of Ubuntu 22.04 with SSH access.
- A sudo user or root account access.
Step 1: Update the system
Usually, it is advised to refresh package repositories before installing any new software packages.
Therefore, to refresh the repositories or local package index, run the command:
sudo apt update When the system update is complete proceed to the next step.
Step 2: Install Apache on Ubuntu from default Repositories
The Apache package is hosted on Ubuntu repositories by default. As such, you can easily install the Apache2 web server using the APT package manager as follows.
sudo apt install apache2 -y The command installs the Apache server alongside other new packages and dependencies required by Apache.
Once Apache is installed, you may find all configuration files located in /etc/apache2 directory.
Step 3: Check Apache version
Once the installation is complete, you can verify the version installed using the command:
apache2 -vOutput
Server version: Apache/2.4.52 (Ubuntu)
Server built: 2022-03-25T00:35:40
At the time of this writing, the version of Apache available in the default Ubuntu repository is version 2.4.41.
Step 4: Check Apache Service Status
By default, once installed, Apache service starts without any intervention. You can verify this by running the command:
sudo systemctl status apache2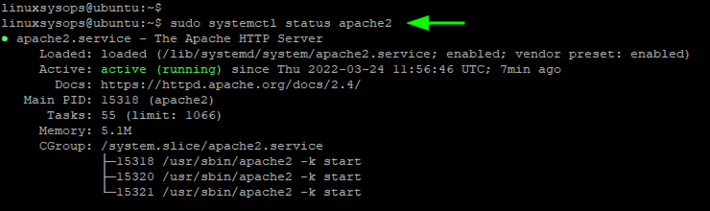
Ubuntu 22.04 version uses systemd as its init system. You can easily manage the Apache service such as start, stop, and restart service using systemctl command.
To enable Apache to start automatically on boot time, run the following command.
sudo systemctl enable apache2You can also disable it from loading on system startup as follows
sudo systemctl disable apache2To stop Apache from running, run the command:
sudo systemctl stop apache2To start Apache when it is in the stopped state, run the following command:
sudo systemctl start apache2 After making a configuration change you can reload Apache to apply the changes. This won't cause any downtime and the site keeps running.
sudo systemctl reload apache2Alternatively, you can perform an aggressive restart, that will kill all threads and start it again.
sudo systemctl restart apache2These are some of the basic management commands that you can use to manage Apache.
Step 5: Allow Apache Traffic on Firewall
Apache webserver is now installed and we can access it from a web browser. However, we need to go a step further and configure the firewall settings to allow Apache. UFW firewall is the default Ubuntu firewall.
By default, Apache registers three profiles for the UFW firewall. You can view these profiles using the command:
sudo ufw app list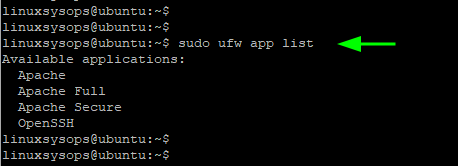
The Apache profile only opens port 80 ( http or unencrypted web traffic )
The Apache Secure profile only opens port 443 ( SSL/TLS traffic)
The Apache Full profile opens both port 80 and port 443.
To allow normal web traffic, run the command:
sudo ufw allow 'Apache' Then reload the firewall for changes to take effect.
sudo ufw reloadTo allow encrypted web traffic, run the command:
sudo ufw allow 'Apache Secure' Then reload the firewall for changes to take effect.
sudo ufw reloadTo allow both profiles, run the command:
sudo ufw allow 'Apache Full'Again, reload the firewall to apply the changes.
sudo ufw reloadUFW firewall is now configured.
Step 6: Check web server by IP or domain
To verify that Apache was correctly installed and is running without any issue, launch your browser and browse your server’s IP address. If you are running a cloud server or VPS, you can get the public IP by running the command:
dig +short txt ch whoami.cloudflare @1.0.0.1Upon browsing your server’s IP, you should get the default Apache landing page.
http://server-ipYou can also use your server’s registered domain name to test your web server.
http://domain-name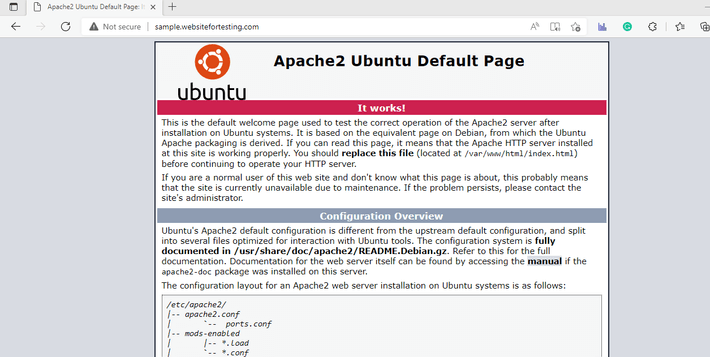
The default apache page confirms that Apache software is running properly on the IP or domain name.
So far, the apache installation is complete. However, you can perform additional configurations to your webserver to accommodate multiple domains. Let us check out how to configure the apache web server to achieve this.
Step 7: Setup Apache Virtual Hosts ( Optional )
Apache virtual hosts - similar to Nginx server blocks - are directives that allow hosting multiple sites and help add configuration on a single server. You can create multiple virtual hosts and configure them accordingly to serve web content for multiple sites.
For this section, ensure that you have a registered domain or server's fully qualified domain pointing to your server’s public IP. Here, we will use the domain sample.websitefortesting.com which is pointed to our server’s public IP.
Let us now configure the apache web server.
Setup Apache Virtual Host
Apache’s default document root directory is /var/www/html. This is the default directory where the website files are stored. However, we need to create a separate directory to host the website files for our domain.
We will create a separate document root for our site as follows:
sudo mkdir -p /var/www/sample.websitefortesting.com/htmlNext, we will assign the appropriate directory permissions to the document root directory. We will use chown command to set ownership and chmod command to set file permissions.
sudo chown –R $USER:$USER var/www/sample.websitefortesting.com/htmlsudo chmod –R 755 /var/www/sample.websitefortesting.com/htmlNext, we will create a virtual host configuration file for our domain in the /etc/apache2/sites-available directory using the following command.
sudo vim /etc/apache2/sites-available/sample-websitefortesting.confPaste the following lines of code and be sure to replace sample.websitefortesting.com domain with your own domain name
<VirtualHost *:80>
    ServerAdmin [email protected]
    DocumentRoot /var/www/html-websitefortesting.com/html
    ErrorLog ${APACHE_LOG_DIR}/error.log
    CustomLog ${APACHE_LOG_DIR}/access.log combined
</VirtualHost>
Save and exit the conf file.
Enable the Apache Virtual Host
To enable the Apache virtual host, run the a2ensite command as follows:
sudo a2ensite sample.websitefortesting.comNext, disable the default virtual host file using the a2dissite command. This disables the default site for Apache.
sudo a2dissite 000-default.confFor the configuration changes to apply, restart Apache.
sudo systemctl restart apache2Create a sample HTML file
To test our virtual host, we are going to create an HTML file that will be displayed on the browser.
sudo vim /var/www/sample.websitefortesting.com/index.htmlPaste the code shown below. Feel free to change the body content as you wish.
<!DOCTYPE html>
  <html>
  <head>
    <title>sample.websitefortesting.com</title>
  </head>
  <body>
    <h1>Hey guys !! Our Apache Virtual host is successfully configured !!</h1>
  </body>
</html>
Save and exit. Finally, head back to your browser and access the browse using your registered domain.
http://domain-nameThis time around, instead of the default welcome page, the HTML file will be displayed. This is proof that the Apache Host is working!

Important Apache Files and Directories Location
Here is a table that shows important Apache web server configuration files, directories, and logs files you need to understand.
| File Location | Description |
|---|---|
/etc/apache2/apache2.conf | The main Apache configuration file. Any change made to the default configuration file affects all your domains or websites |
/etc/apache2/sites-available | This is the directory that contains the virtual host files including the default Apache virtual host file. |
/etc/apache2/sites-enabled | The directory contains symlinks from the /etc/apache2/sites-available directory. |
/etc/apache2/ports.conf | This is the configuration file that specifies the default web ports. Here, you can customize the ports that Apache listens to. If you make any change in this file, you also need to edit the VirtualHost statement for the symlinked virtual host in the /etc/apache2/sites-enabled directory. |
/var/log/apache2/error.log | Contains errors encountered by the Apache webserver when processing requests. |
/var/apache2/access.log | Contains information about requests coming to the webserver. |
Conclusion
Apache webserver continues to remain a formidable web server in hosting websites, especially by web hosting companies. In this tutorial, we have shown how to install Apache web server on Ubuntu 22.04. We also went further and demonstrated how you can host multiple websites on the same web server by creating and configuring virtual host files.


Comments