
If you need to securely transfer files between computers, SFTP is an excellent choice. SFTP is safer and often preferred over SCP (secure copy) because SCP is deprecated and has multiple security risks and issues with no simple solutions.
This tutorial will walk you through the steps of installing an OpenSSH SFTP server on a Ubuntu machine.
SFTP
SFTP stands for SSH File Transfer Protocol. It is an SSH-based protocol used to securely transfer files between computers. SFTP operates on a single port, 22, which also serves as the default port for SSH.
SFTP is not the same as File Transfer Protocol over SSH or FTPS (File Transfer Protocol over SSL), but rather a different protocol that uses SSH for encryption, authentication and performs the same functions as FTP but with greater compatibility and flexibility.
To know if the SFTP server is running on your Ubuntu machine, use the following command:
sudo service ssh statusNote: If you are still using SCP protocol, would recommend switching to SFTP protocol. This is because SCP is less secure than SFTP. The future release of many Linux distributions would eliminate decades-old SCP protocol.
Prerequisites
Before you start setting up the SFTP server on your Ubuntu instance, make sure you have the following prerequisites:
- A running Ubuntu instance to set up as an SFTP server
- A client to connect to the SFTP server
- A user account with root privileges or a non-root user account with sudo privileges
Setup SFTP Server on Ubuntu
With all the prerequisites met, let's now look at how we can actually to set up an SFTP server on an Ubuntu machine using the steps provided below.
Step 1. Install OpenSSH Server
The first step is to install the OpenSSH server on your Ubuntu machine. OpenSSH (also known as OpenBSD Secure Shell) is a free and open-source implementation of the SSH protocol. The SSH server will provide the encryption and authentication services required by SFTP.
If you do not have it installed, you can install it by running the following command:
sudo apt install openssh-server
Step 2. Create Group and User for SFTP
The next step is to create an SFTP group to grant SFTP access to users and an SFTP user account which is a member of the sftp group with only file transfer access permissions. Use the following commands to do so:
sudo addgroup sftpaccesssudo useradd -G sftpaccess -d /var/sftp/ -s /sbin/nologin datauser
In the preceding command, we used the useradd command to create the user datauser, assign the user to the sftpaccess group, and finally set the user home directory to /var/sftp/.
Once you are done configure the password for the user by running the following command:
sudo passwd datauser
Step 3. Create SFTP Directory
By default, SFTP's settings allows users to access directories and files outside of their home directory. Access control must be enforced to restrict access and prevent unauthorized usage, especially when multiple users have access to SFTP resources.
To restrict SFTP access to a single directory, it is necessary to ensure that the directory meet the SSH server's permissions requirements. Specifically, the directory and all of its parent directories in the filesystem hierarchy must be owned by root and must not be writable by other users.
Various methods can be used to circumvent this ownership restriction. As a solution, we will create a new directory, namely /var/sftp/uploads, as the designated upload directory. The parent directory of the uploads directory (/var/sftp) will be owned by root and will not be writable by other users, whereas the subdirectory uploads/ will be owned by the user " datauser" giving the user access to the directory to upload files.
First, make a directory in which files can be uploaded and downloaded.
sudo mkdir -p /var/sftp/uploads
For sftp servers, you may require some directories as incoming (users can write content to it) and outgoing directories. Create the incoming directory in /var/sftp/uploads/incoming:
sudo mkdir /var/sftp/uploads/incoming
Set the owner of /var/sftp directory to root and give set its permissions to 755, so that the root has full access and other users can only read and execute.
sudo chown root:root /var/sftp
sudo chmod 755 /var/sftp
Next, we need to give users in the sftpaccess group access to the /var/sftp/uploads and its sub-directories:
sudo chown root:sftpaccess -R /var/sftp/uploads
We must still enable our SFTP users to write to the incoming directory.
sudo chown <username>:sftpaccess -R //var/sftp/uploads/incoming
We need to configure sftp now that we've finished setting up sftp server directories.
Step 4. Configure SFTP
In this section, we'll change the SSH server configuration to enable the SFTP server on OpenSSH - allow sftp group access, as well as limit sftp access to files outside of /var/sftp/ by configuring chroot jail.
To do so open the SSH configuration file (/etc/ssh/sshd_config) using any text editor of your choice. In this example I will use nano as it is simple and straightforward to use:
sudo nano /etc/ssh/sshd_configIn the SSH server configuration file, scroll to the end of the file and add the following lines:
Match Group sftpaccess
ForceCommand internal-sftp
PasswordAuthentication yes
ChrootDirectory /var/sftp
PermitTunnel no
AllowAgentForwarding no
AllowTcpForwarding no
X11Forwarding no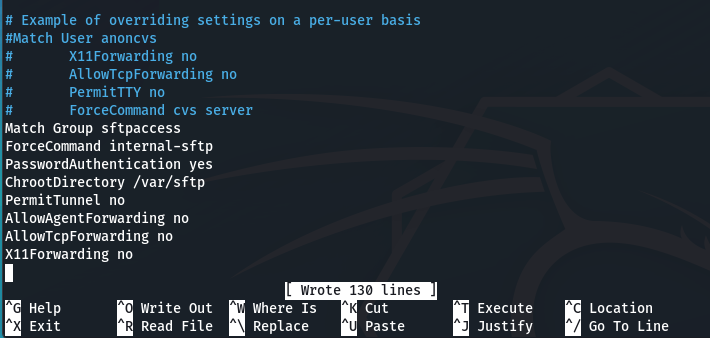
Once you are done, save and exit the file. If you are using nano editor use CTRL + O to save and CTRL + X to exit.
Here’s an explanation of what each of those entries do:
- Match Group sftpaccess - specifies that the following settings will only apply to the users in the sftpacess group.
- ForceCommand internal-sftp - forces the SSH server to use the SFTP (Secure File Transfer Protocol) subsystem only when the user "datauser" logs in, disallowing shell access.
- PasswordAuthentication yes - allows password-based authentication for the user "datauser".
- ChrootDirectory /var/sftp - restricts the user "datauser" to the /var/sftp directory and its subdirectories, preventing them from accessing other directories in the file system.
- PermitTunnel no - prohibits tunneling (i.e., creating a secure network connection through an SSH connection) for the user "datauser".
- AllowAgentForwarding no - disables agent forwarding, which allows users to use their ssh keys to log into servers without having to type in their password .
- AllowTcpForwarding no - disables port forwarding, which enables users to forward network connections over SSH.
- X11Forwarding no - disables X11 forwarding, which allows for remote graphical connections over SSH.
Step 5. Restart ssh service
Restart the SSH service to apply the changes in the ssh configuration file (/etc/ssh/sshd_config) by running the following command:
sudo systemctl restart sshd
Step 6. Connect sftp server from Ubuntu
Once you are done configuring the ssh configuration file, you can now connect to the SFTP server from your Ubuntu client the same way you connect to ssh but using the sftp client using password authentication or using your preferred SFTP client.
Here is an example of using an sftp client that comes pre-installed in most linux distros
sftp datauser@sftpserver01-ip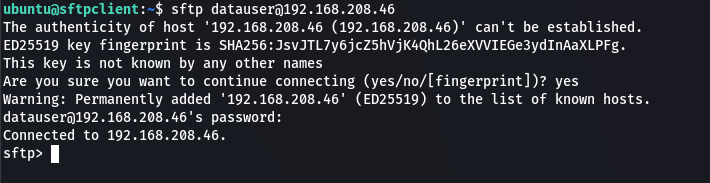
When you log in to the sftp server, you will be presented with a prompt that allows you to run various commands for uploading files, downloading files, listing files, and so on. Here's an example of a file listing in the current working directory of the sftp server:

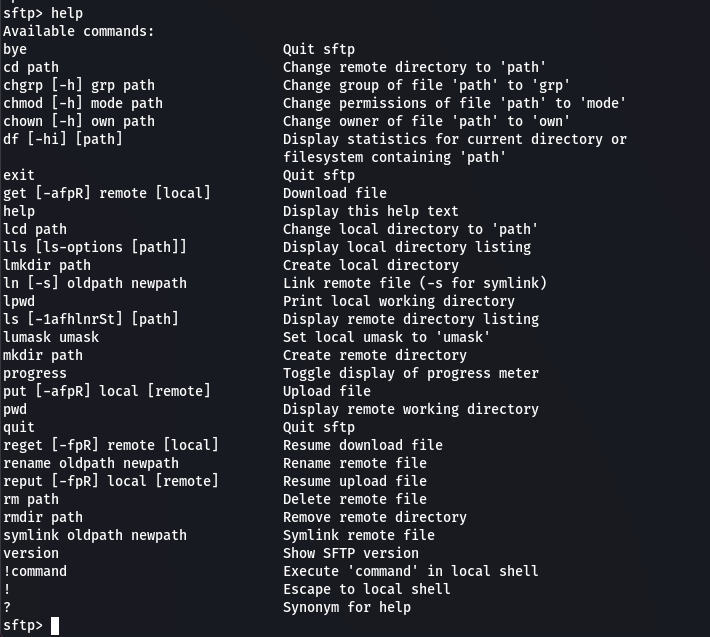
Simply run the help command to see what commands are available for use with the sftp shell:
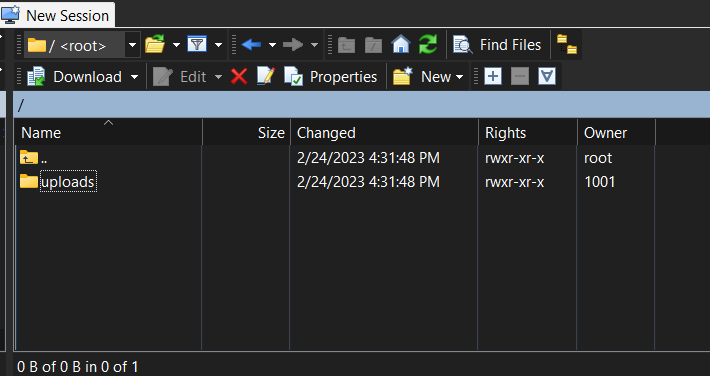
Another excellent option for connecting to sftp is to use a GUI SFTP client tool such as WinSCP.
Conclusion
This tutorial demonstrated how to set up a sftp server on Ubuntu and provided an example of how to connect to the sftp server once it has been configured using a sftp client.


Comments