
PHP, short for PHP hypertext preprocessor, is one of the server-side programming languages. It is widely used in web development for supporting and running PHP applications on a web server. It first appeared in 1995 but is now currently maintained by Zend technologies. Many content management systems (CMS) such as WordPress and Lavaravel are written in PHP.
In this tutorial, we will demonstrate how to install PHP on Ubuntu 22.04 and combine it with Apache and Nginx.
Prerequisites
To get started, here is what you need:
- An instance of Ubuntu 22.04 with SSH access.
- A sudo user configured on the instance for carrying out root user tasks.
Enabling PHP Repository on Ubuntu
At the time of writing this guide, the default PHP version that is currently hosted or provided by Ubuntu repositories is PHP 8.1.
To install PHP using the APT package manager from the default Ubuntu repository, type:
sudo apt install phpTo take advantage of these latest PHP versions, you need to enable the Ondrej PPA repository which provides the latest versions of PHP. This is a PPA that is maintained by Ondrej Sury, a Debian developer who has been packaging PHP since PHP 5.
To accomplish this, first, install the prerequisites
sudo apt install software-properties-common -yThen enable the Ondrej PPA using the following command.
sudo add-apt-repository ppa:ondrej/phpThen update the local package index to start using the newly added PHP repository.
sudo apt updateInstall PHP 8.0 with Apache
With the PPA installed, you can now install your preferred PHP version. In case you have Apache as your web server, you have the option of running PHP as an Apache PHP module or PHP-FPM.
To install PHP 8.0 on Ubuntu as an Apache module, run the following commands:
sudo apt update
sudo apt install php8.0 libapache2-mod-php8.0
Once installed, reload Apache for the changes to take effect:
sudo systemctl restart apacheTo confirm PHP 8.0 is installed, run the following command:
php -vInstall PHP 8.1 with Apache
PHP 8.1 is the latest version of PHP at this time of writing. As it comes default in the repository you simply install PHP and Apache PHP module as follows:
sudo apt update
sudo apt install php libapache2-mod-php
Once again, restart Apache to reload the PHP module.
sudo systemctl restart apacheTo verify PHP 8.1 is installed, run the following command:
php -vConfigure Apache with PHP-FPM
PHP-FPM ( FastCGI Process Manager ) is a tool for speeding up the performance of a web server and is a better alternative to PHP.
By default, PHP-FPM is not enabled in Apache, and we need to go an extra step and enable it. But first, run the following commands.
sudo apt update
sudo apt install php8.0-fpm libapache2-mod-fcgid
To enable PHP-FPM, run:
sudo a2enmod proxy_fcgi setenvif
sudo a2enconf php8.0-fpm
For the changes to come to effect, restart the Apache web server.
systemctl restart apache2Install PHP 8.0 with Nginx
Nginx web server, by default, does not provide built-in support for processing PHP files. PHP-FPM will, therefore, be used to process php files.
To make this possible, execute the following commands to install PHP and PHP-FPM
sudo apt update
sudo apt install php8.0-fpm
Upon installation, PHP-FPM should start automatically without any intervention. To confirm that the PHP-FPM is running, run the following command.
sudo systemctl status php8.0-fpmThe status active (running) will indicate that the service is up and running
Install PHP 8.1 with Nginx
Similarly, you can install PHP 8.1 with FPM for Nginx on Ubuntu as follows:
sudo apt update
sudo apt install php-fpm
Once installed, confirm the status of the php fpm service using the following command.
sudo systemctl status php8.1-fpmConfigure Nginx with PHP-FPM
Nginx lacks the ability to natively process php scripts and applications. As such. we need to configure Nginx to work with PHP-FPM.
On your Nginx server block, append the following lines to enable Nginx process php files.
server {
# . . . rest of the code
    location ~ \.php$ {
        include snippets/fastcgi-php.conf;
        fastcgi_pass unix:/run/php/php8.0-fpm.sock;
    }
}
To apply the changes, restart Nginx.
sudo systemctl restart nginxInstall PHP 7.4 with Apache
To install PHP 7.4 use the PPA mentioned earlier. Then you can install this version using the APT package manager as follows.
sudo apt update
sudo apt install php7.4 libapache2-mod-php
This installs php alongside additional php modules.
Install PHP 7.4 with Nginx
If you are running Nginx, PHP-FPM is required to process php files. So, install PHP-FPM on Ubuntu using the following command.
sudo apt update
sudo apt install php7.4-fpm
With PHP-FPM installed, the next step is to configure Nginx to work with PHP-FPM.
In your virtual host configuration, add the following code
location ~ \.php$ {
        include snippets/fastcgi-php.conf;
        fastcgi_pass unix:/run/php/php7.4-fpm.sock;
    }
}
To apply the changes, restart the webserver
sudo systemctl restart nginxHow to Install PHP extensions
PHP extensions are plugins or special libraries that extend the functionality of PHP. Extensions can easily be installed using the syntax.
sudo apt install php-[extname]For example, to install php-dg, php-zip, php-mbstring, php-opcache, php-pear, and php-mysqli extensions, run the command:
sudo apt install php-{gd,zip,mbstring,opcache,pear,mysqli}Don't forget to restart the Apache webserver of PHP-FPM after the installation of PHP extensions.
Switch Between PHP Versions
Suppose you have installed different versions of PHP. How do you switch from one version to another?
First, you might want to have a peek at the multiple PHP versions installed on your system. To do this, run the following command:
sudo update-alternatives --config phpThis is the output that you will get.
There are 3 choices for the alternative php (providing /usr/bin/php).

  Selection    Path             Priority   Status
------------------------------------------------------------
  0            /usr/bin/php8.1   81        auto mode
* 1            /usr/bin/php7.4   74        manual mode
  2            /usr/bin/php8.0   80        manual mode
  3            /usr/bin/php8.1   81        manual mode

Press <enter> to keep the current choice[*], or type selection number:
To switch from, PHP 7.4 to PHP 8.1, run the following commands:
sudo a2dismod php7.4
sudo a2enmod php8.1
The above commands simply disable PHP 7.4 and enable PHP 8.0 on ubuntu. You can switch from one version to another simply by interchanging the versions. To apply the changes made, restart your Apache webserver.
sudo systemctl apache2 restartCheck PHP Version
To verify the default installed PHP version, run the command
php -vYou should get output similar to what we have here:
PHP 8.1.2 (cli) (built: Apr  7 2022 17:46:26) (NTS)
Copyright (c) The PHP Group
Zend Engine v4.1.2, Copyright (c) Zend Technologies
    with Zend OPcache v8.1.2, Copyright (c), by Zend Technologies
Another way to test if PHP works is by creating a file called info.php file in the Document root. The info.php file is a file that provides details of the default PHP version installed and other details of php modules.
So, create the file in the /var/www/html directory as follows.
sudo vim /var/www/html/info.phpNext, add the following code
<?php
phpinfo();
?>
Save the file. Now open your browser and visit the URL
http://server-ip/info.php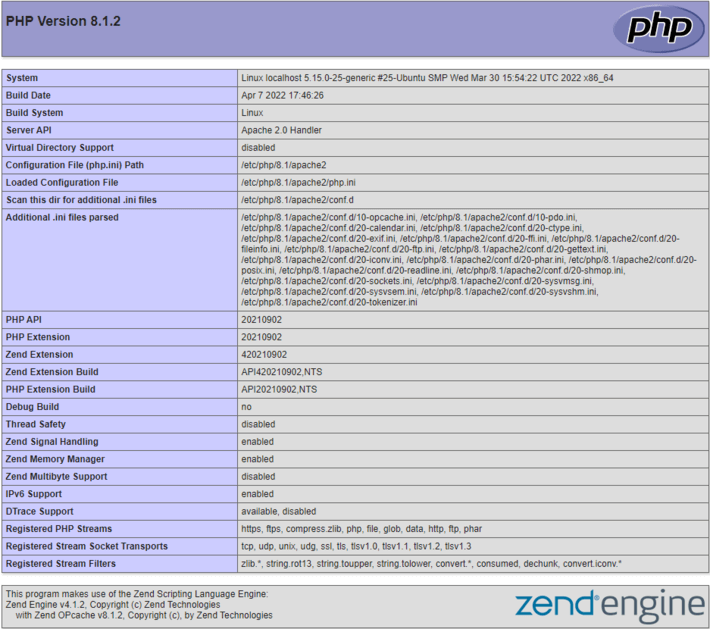
Both methods confirm that, indeed, PHP is installed.
Conclusion
In this guide, we learned various approaches to installing PHP and the required PHP modules on Ubuntu 22.04. PHP 8.1 is the default version that is provided by the official Ubuntu repositories. To install the latest versions of PHP, you need to enable the Ondrej PPA on your Linux system.


Comments