
Imagick, also referred to as the ImageMagick Extension, is a PHP extension used to create and modify images using the ImageMagick library. Basically, it's an extension of the main application ( ImageMagick ) that is used to create and edit images using API.
In this tutorial, you will learn how to install Imagick on Ubuntu 22.04. Imagick supports PHP 5.4, 5.5, 5.6, 7.0, 7.1, 7.2, 7.3, 7.4, 8.0, 8.1, and 8.2.
Prerequisites
To get started, ensure that you have the following requirements in place.
- An instance of Ubuntu 22.04 with an SSH connection and a sudo user in place.
- PHP is installed on your Ubuntu system.
Install Imagick on Ubuntu
The PHP Imagick extension is available from the apt repository on Ubuntu. The following steps have been tested for PHP 7.4. To check the php version, run the following command.
php -vNext, update the package lists as follows.
sudo apt update
With that out of the way, install the Imagick PHP extension as follows
sudo apt install php-imagick -yOnce the installation is complete, verify the presence of the ImageMagick package.
php -m | grep imagickYou should get an output that resembles what we have.

We will explore the directory where the PHP extensions are stored using the following command.
php-config --extension-dirThe output provides the full path to the directory. Be sure to note the last numerical value from the output.
Then, list all the PHP extensions as shown. You will notice that the Magick extension is among the extensions listed.
ll /usr/lib/php/20210902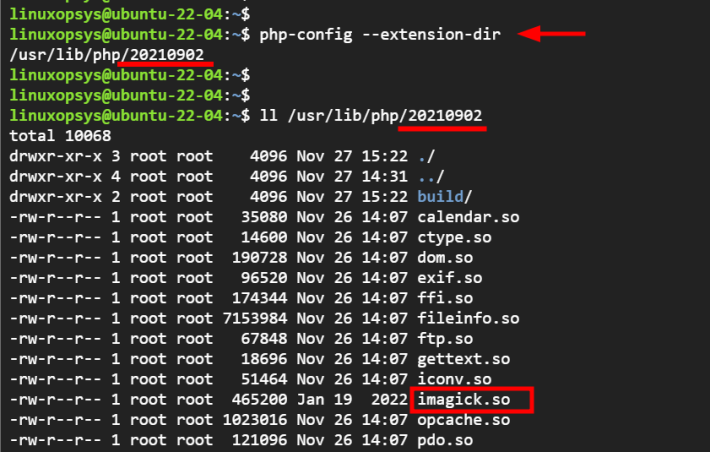
Ubuntu Install Imagick for PHP 8
If you are running PHP 8 on your system, you can install the latest version of PHP Imagick using PECL which is a repository of all known PHP extensions. PECL is based on PEAR (PHP Extension and Application Repository) and it provides groups of PHP functions that are no longer shipped with the default installation of PHP.
To start off, begin by installing the php-pear package on the command line as shown.
sudo apt install php-pearOnce the installation process is complete, install the following dependencies needed to install and build Imagick.
sudo apt install gcc make autoconf libc-dev pkg-config -y
sudo apt install libmagickwand-dev php-dev -y
Once installed, run the following command to ensure that PECL is up to date.
sudo pecl channel-update pecl.php.netThen install ImageMagick extension on the command line as shown.
sudo pecl install imagick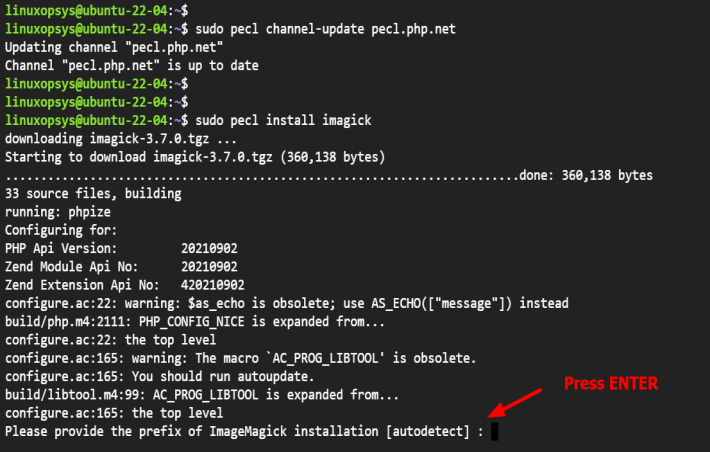
At the end of the installation process, you will get the following output indicating that Imagick has successfully been installed.
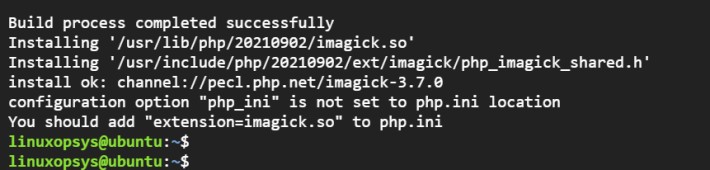
The output shows Imagick version 3.7.0 is installed.
Enable Imagick.so in php.ini file
Once the installation is complete, add the line extension=imagick.so to the php.ini file. If you are running Apache, the path to the php.ini file will be /etc/php/8.1/apache2/php.ini. For Nginx, this will be /etc/php/8.1/fpm/php.ini.
sudo vim /etc/php/8.1/apache2/php.iniAdd the following lines to the respective php.ini file
extension=imagick.soSave the changes and restart the Apache service.
sudo systemctl restart apache2If you are running Nginx with php-fpm, restart the php-fpm service for the changes to come into effect.
sudo systemctl restart php-fpmTo confirm that the Imagick PHP extension is now enabled to work with Apache, create a sample php info page in the document root.
sudo nano /var/www/html/index.phpPaste the following sample php code.
<?php

phpinfo();

?>
Save the changes and exit the configuration file.
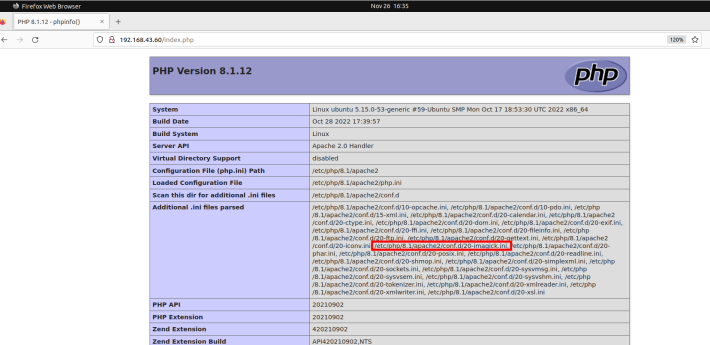
Finally, launch your web browser and head over to the server's URL pointing to the sample PHP page.
http://server-ip/index.phpThis displays the PHP info page as you can see below. Included in the list of ini files you will see the PHP file. /etc/php/8.1/apache2/conf.d/20-imagick.ini
Conclusion
In this tutorial, we learned how to install PHP ImageMagick Extension (Imagick) on Ubuntu 22.04. We started with installing from the apt repository and concluded with using PECL which installs the latest version.
Thanks for reading, please let us know your suggestions in the below comment section.


About The Author
Winnie Ondara

Winnie is a Linux technical writer with over 3 years of experience with various Linux distributions and writing technical guides in Linux. She is passionate about FOSS technologies and always endeavor to learn new technologies. During my free time, I watch movies, listen to music, and catch up with tech news.
Comments