
Xibo is open-source digital signage (public display signs) solution that is comprised of a web-based content management system (CMS). The best way to capture the attention of people for your very important announcements can be done with digital signs using Xibo. It lets us turn PCs and TVs into a distinctive way of getting the word out, transforming them into information desks that you can place in strategic locations to draw people's attention.
Using Xibo, you can set up your own digital signage server that can push out images, video, and even PowerPoint presentations to kiosks automatically, allowing you to keep your entire organization up to date on your latest news without resorting to mass e-mailings or having to hand-edit files or slideshows on multiple machines.
Xibo can be run through Docker or on a web server with MySQL/PHP installed. In this tutorial, we learn how to install Xibo CMS with Docker on Ubuntu 20.04.
Prerequisites
- A Ubuntu 20.04 instance
- A user with sudo priviledge
Step 1: Install Docker
First, we will install docker-engine and docker-compose.
Install pre-requisites packages:
sudo apt install apt-transport-https ca-certificates curl software-properties-commonNow we should add the GP key of the docker repository:
curl -fsSL https://download.docker.com/linux/ubuntu/gpg | sudo apt-key add -Let's now add Docker to the APT sources
sudo add-apt-repository "deb [arch=amd64] https://download.docker.com/linux/ubuntu focal stable"We can install docker-engine now:
sudo apt install docker-ceTo make sure we obtain the most updated stable version of Docker Compose, we’ll download this software from its official Github repository.
First, confirm the latest version available on their releases page. At the time of this writing, the most current stable version is 2.0.1.
The following command will download the 2.0.1 release and save the executable file at /usr/local/bin/docker-compose, which will make this software globally accessible as docker-compose:
sudo curl -L https://github.com/docker/compose/releases/download/v2.0.1/docker-compose-linux-x86_64 -o /usr/local/bin/docker-composeNext, set the correct permissions so that the docker-compose command is executable:
sudo chmod +x /usr/local/bin/docker-composeTo verify that the installation was successful, you can run:
docker-compose --versionDocker Compose version v2.0.1Now we need to add the non-root user to the docker group so the user can use the docker command without the sudo privileges:
sudo usermod -aG docker usernameStep 2: Download and Extract Xibo Docker File
Let first create the folder of our Xibo CMS
sudo mkdir /opt/xiboGive the permissions to the user
sudo chown -R username:username /opt/xibocd /opt/xiboYou can download the latest Download Xibo CMS:
wget -O xibo-docker.tar.gz https://xibo.org.uk/api/downloads/cmsAs of writing this article I am using Xibo 3.0.3 version.
tar --strip-components=1 -zxvf xibo-docker.tar.gzWe now have everything to install our Xibo
Step 3: Configure Xibo Docker-compose
Our Xibo container will run through docker-compose. So the files are extracted into /opt/xibo
ls -l /opt/xibototal 84
-rw-rw-r-- 1 franck franck 1491 Sep 8 08:01 cms_custom-ports.yml.template
-rw-rw-r-- 1 franck franck 1159 Sep 8 08:01 cms_remote-mysql.yml
-rw-rw-r-- 1 franck franck 4024 Sep 8 08:01 config.env.template
-rw-rw-r-- 1 franck franck 2231 Sep 8 08:01 config.env.template-remote-mysql
-rw-rw-r-- 1 franck franck 1511 Nov 2 23:18 docker-compose.yml
-rw-rw-r-- 1 franck franck 34520 Sep 8 08:01 LICENSE
-rw-rw-r-- 1 franck franck 2088 Sep 8 08:01 README.md
drwxr-xr-x 5 root root 4096 Nov 2 17:25 shared
-rw-r--r-- 1 franck franck 15570 Sep 8 08:54 xibo-docker.tar.gzXibo uses a configuration file to tell docker how the environment is configured such as the email config, mysql password, etc. A template file with the information needed is present and is called config.env.template; we will make a copy of this file, renaming it to config.env
cp config.env.template config.envNow we will edit some information as below
vim config.envMYSQL_PASSWORD=YOUR_DB_PASSWORD
CMS_SERVER_NAME=YOUR_DOMAIN_NAMENormally Xibo possesses a default web interface running on port 80 but we will only change this information to port 8080 as we will be using Nginx to proxy the communication on ports 80 and 443. To do so, we need to edit the docker-compose file to edit only the port of the cms-web service
vim docker-compose.yml
cms-web:
        image: xibosignage/xibo-cms:release-3.0.3
        volumes:
            - "./shared/cms/custom:/var/www/cms/custom:Z"
            - "./shared/backup:/var/www/backup:Z"
            - "./shared/cms/web/theme/custom:/var/www/cms/web/theme/custom:Z"
            - "./shared/cms/library:/var/www/cms/library:Z"
            - "./shared/cms/web/userscripts:/var/www/cms/web/userscripts:Z"
            - "./shared/cms/ca-certs:/var/www/cms/ca-certs:Z"
        restart: always
        links:
            - cms-db:mysql
            - cms-xmr:50001
        environment:
            - XMR_HOST=cms-xmr
            - CMS_USE_MEMCACHED=true
            - MEMCACHED_HOST=cms-memcached
        env_file: config.env
        ports:
            - "8080:80"
Step 4: Configure Xibo with SSL Behind Nginx
Now as we will use nginx to proxy the communication, we will first need to install it
sudo apt install nginxIn this article, we suppose that you already have your SSL certificate. In our case, we will copy the certificate and the key for the domain name
sudo cp xibo.domain.crt /etc/nginx/certs/xibo.domain.crtsudo cp xibo.domain.key /etc/nginx/certs/xibo.domain.keyNow create the configuration file of Xibo. Make sure to replace the value of the server IP, the Xibo domain name, the Xibo certificates, and keys with the good ones related to your configurations.
sudo vim /etc/nginx/sites-available/xibo_cms.confupstream xibo.domain.com {
server SERVER_IP:8080;
}
server {
server_name xibo.domain.com;
listen 80 ;
access_log /var/log/nginx/xibo.log;
return 301 https://$host$request_uri;
}
server {
server_name xibo.domain.com;
listen 443 ssl http2 ;
access_log /var/log/nginx/xibo.log;
ssl_protocols TLSv1 TLSv1.1 TLSv1.2;
ssl_ciphers 'ECDHE-ECDSA-CHACHA20-POLY1305:ECDHE-RSA-CHACHA20-POLY1305:ECDHE-ECDSA-AES128-GCM-SHA256:ECDHE-RSA-AES128-GCM-SHA256:ECDHE-ECDSA-AES256-GCM-SHA384:ECDHE-RSA-AES256-GCM-SHA384:DHE-RSA-AES128-GCM-SHA256:DHE-RSA-AES256-GCM-SHA384:ECDHE-ECDSA-AES128-SHA256:ECDHE-RSA-AES128-SHA256:ECDHE-ECDSA-AES128-SHA:ECDHE-RSA-AES256-SHA384:ECDHE-RSA-AES128-SHA:ECDHE-ECDSA-AES256-SHA384:ECDHE-ECDSA-AES256-SHA:ECDHE-RSA-AES256-SHA:DHE-RSA-AES128-SHA256:DHE-RSA-AES128-SHA:DHE-RSA-AES256-SHA256:DHE-RSA-AES256-SHA:ECDHE-ECDSA-DES-CBC3-SHA:ECDHE-RSA-DES-CBC3-SHA:EDH-RSA-DES-CBC3-SHA:AES128-GCM-SHA256:AES256-GCM-SHA384:AES128-SHA256:AES256-SHA256:AES128-SHA:AES256-SHA:DES-CBC3-SHA:!DSS';
ssl_prefer_server_ciphers on;
ssl_session_timeout 5m;
ssl_session_cache shared:SSL:50m;
ssl_session_tickets off;
ssl_certificate /etc/nginx/certs/xibo.domain.crt;
ssl_certificate_key /etc/nginx/certs/xibo.domain.key;
add_header Strict-Transport-Security "max-age=31536000";
location / {
proxy_pass http://xibo.domain.com;
}
}Now created a symbolic of the configuration file
sudo ln -s /etc/nginx/sites-available/xibo_cms.conf /etc/nginx/sites-enabled/xibo_cms.confAs it's our first configuration, remove the default configuration on the enabled sites not to have some conflicts
sudo rm /etc/nginx/sites-enabled/defaultNow start the nginx service
sudo systemctl start nginxNow enable on startup
sudo systemctl enable nginxCheck your configuration
sudo nginx -tnginx: the configuration file /etc/nginx/nginx.conf syntax is ok
nginx: configuration file /etc/nginx/nginx.conf test is successfulNow restart the service to take the configuration into consideration
sudo systemctl restart nginxNow open the ports 80 and 443 on the firewall:
sudo ufw allow 80,443/tcpAlso, make sure to open ssh before enabling UFW if not yet
sudo ufw allow 'OpenSSH'Now enable UFW if not yet
sudo ufw enableStep 5: Install Xibo container
Now that our Nginx is configured, we can run our docker-compose file
cd /opt/xiboWe will run the docker-compose file in the background. It can take some time the first time
docker-compose up -dNow can have a look at the containers running
docker container psCONTAINER ID IMAGE COMMAND CREATED STATUS PORTS NAMES
b5e8dda81529 xibosignage/xibo-cms:release-3.0.3 "/entrypoint.sh" About a minute ago Up About a minute 0.0.0.0:8080->80/tcp, :::8080->80/tcp xibo-cms-web-1
9f4591f0f91a mysql:5.7 "docker-entrypoint.s…" About a minute ago Up About a minute 3306/tcp, 33060/tcp xibo-cms-db-1
b706402036a0 xibosignage/xibo-xmr:release-0.8 "/entrypoint.sh" 2 minutes ago Up 2 minutes 0.0.0.0:9505->9505/tcp, :::9505->9505/tcp, 50001/tcp xibo-cms-xmr-1
75a971ab7435 memcached:alpine "docker-entrypoint.s…" 2 minutes ago Up 2 minutes 11211/tcp xibo-cms-memcached-1
3d2e30e8f9cb ianw/quickchart "node --max-http-hea…" 2 minutes ago Up 2 minutes 3400/tcp xibo-cms-quickchart-1Now you can try to access the Xibo page by your domain name http://xibo.domain.com
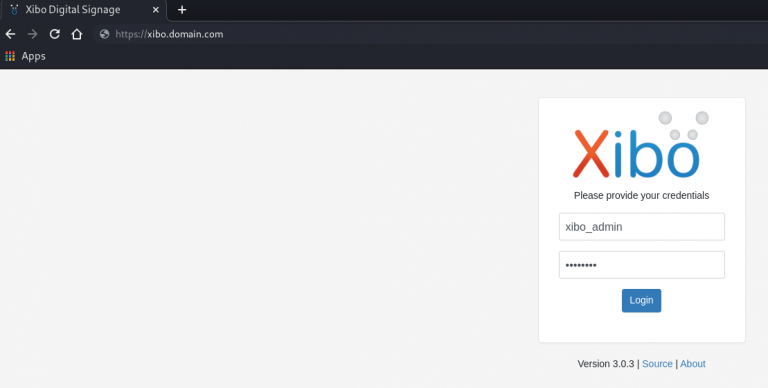
The default Xibo login credentials are:
username: xibo_admin
password: password
You can change the password by going to the profile settings.
If you want to stop Xibo, just move to the folder and run the command
docker-compose downConclusion
In this tutorial, we learned how to install Xibo CMS with Docker on Ubuntu 20.04. If you wish to upload large size of images, you can do so by the configuration of 'Php.ini' fil. For further settings and customization of Xibo CMS you can consider reading its official documentation for more details. Thank you for reading, and get back to us if you face any issues and leave your valuable comments.


Comments