Docker has been one of the best containerization tools and many industries are using docker in their application. The developers find it to be a very effective tool and they can deploy their application in production or any other environment without any dependencies on the target system.
It is always a best practice to not run any command as a sudo user since you have elevated permissions. Generally, when you install docker it needs root permission because the daemon runs as a root user. Due to this, you will have to run the docker command with sudo. While you run with sudo, you might see the below error -
docker: Got permission denied while trying to connect to the Docker daemon socket at unix:///var/run/docker.sock: Post http://%2Fvar%2Frun%2Fdocker.sock/v1.24/containers/create: dial unix /var/run/docker.sock: connect: permission denied.
See 'docker run --help'.
How can you fix the above error? In case you don't want to run the docker as the root user, you can read this page to solve this issue. In this guide, we learn how to run docker as a non-root user.
Steps to add a user to the docker group
There are various ways to add the user to a docker group. Below are the steps to follow to create a user, add the user to a group, and run docker commands as a non-root user.
Step 1. Create a docker group
You can skip this step if docker group already exists. You can check using grep docker /etc/group command.
To create a new group named docker, type:
sudo groupadd dockerIf the command execution is successful then it exists without output.

In my case docker group already exists.
Step 2. Add user to the docker group
sudo usermod -aG docker $USERThe usermod command with -a option means that you are adding or appending the user to a particular group. This should always be used with the -G option which specifies the group that the user is currently in. $USER indicates that we are going to add the currently logged-in non-root user. For a not-logged-in user, you have to explicitly mention the username.
Alternatively, you can also use the gpasswd command to add the user to the group
sudo gpasswd -a $USER dockerIt shall prompt for the password and upon passing the password, it adds the user to the docker group.
Step 3. Make the changes effective
As you created a new group the system needs to re-evaluate the group membership.
You may run any of the following methods.
Log out from the current terminal and log back in. You may also run exec su -l $USER or newgrp docker command.
If you are comfortable you can restart the docker service as well.
sudo systemctl restart dockerNote: In case you running a virtual machine it's necessary to restart it.
Step 4. Verify
Now let us run the docker command to verify that you can run as a non-root user. Let us run the hello-world docker.
docker run hello-world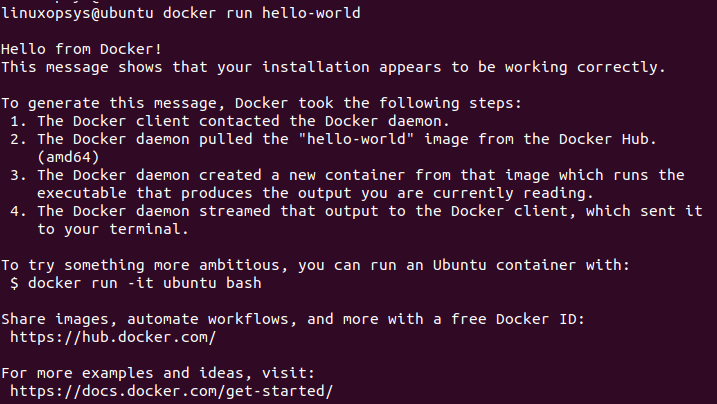
The command execution was successful and now we can run the hello-world docker successfully.
You may also verify using the groups command to check the group membership of the current user.
groupsThe output shows docker, which indicates the current user is a member of it.

NOTE:
In case you already ran the docker commands as a root user, you might get the below error:
WARNING: Error loading config file: /home/user/.docker/config.json -stat /home/user/.docker/config.json: permission deniedHere is how you can fix the issue. Let us take a look.
The error indicates that the docker directory has insufficient permissions and you can either remove the docker directory or change the ownership and permissions of the docker folder.
You have to change the ownership of the docker configuration folder using chmod command as shown below
sudo chown "$USER":"$USER" /home/"$USER"/.docker -Rsudo chmod g+rwx "$HOME/.docker" -R
Conclusion
We end up with this solution because of the fact that the root user owns the socket and non-users can only access using sudo.
This got solved by adding the user to the docker group, so when docker starts socket is accessible to its members. Moreover, remember docker group grants root privilege to the user.
Thanks for reading so far, please feel free to add your suggestions and feedback.


About The Author
Bobbin Zachariah

Bobbin Zachariah is an experienced Linux engineer who has been supporting infrastructure for many companies. He specializes in Shell scripting, AWS Cloud, JavaScript, and Nodejs. He has qualified Master’s degree in computer science. He holds Red Hat Certified Engineer (RHCE) certification and RedHat Enable Sysadmin.
Comments