
The ip command is the most recommended command for network interface configuration in Linux. This is because of its extended feature set and by default all modern Linux Distributions include and maintain it.
In this guide, we learn how to set IP address in Linux using ip command.
Identifying Your Network Interface
Before setting the ip address it's good to know an overview of your available network interfaces. You can use ip link show command to display all the network interfaces along with their state and details.
Example:
$ ip link show
The interfaces which I have are lo, enp0s3, enp0s8 and enp0s9. The first interface is lo stands for loopback - which used for local communication within the machine. The naming convention of the network interface depends on the system's distribution, version, and specific configurations.
From the output commonly we look for the number of interfaces, interface name, status, hardware address (MAC), and MTU size.
Remember ip link show command won't show ip address on the interfaces.
Set Temporary IP Address Using ip command
Before setting a temporary IP address you can verify the current network settings on all network interfaces. Use ip addr show command which includes all information network interface including its assigned IP addresses.
Example:
$ ip addr show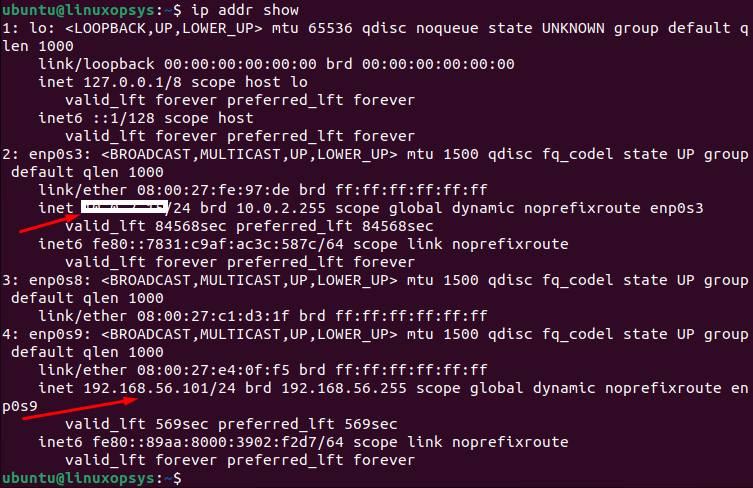
Except for enp0s8 interface, all other interfaces have IP addresses assigned.
You can use the following command to know the interface settings on a specific interface:
ip addr show enp0s9Let's add a new temporary IP address on the network interface, for this we use ip addr add command.
Syntax:
ip addr add [ip_address/subnet_mask] dev [interface_name]Here's an example of how you might add the IP address 192.168.56.102 with a subnet mask of 255.255.255.0 (or /24 in CIDR notation) to the interface enp0s8:
sudo ip addr add 192.168.56.102/24 dev enp0s8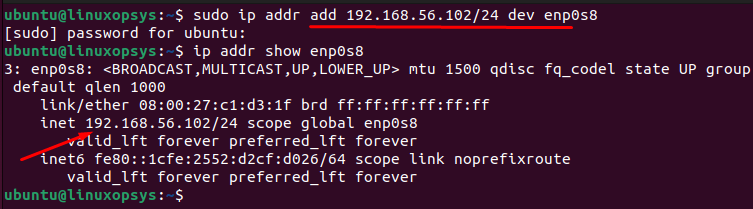
This command doesn't give any output. You can verify the IP address using ip addr show command.
This works on the fly and the network interface should be available to ping. That means no need to restart the network service. But this IP address is temporary means that it will be lost on reboot.
Note that this command requires root privileges, so you might need to use sudo.
Removing or Changing the Temporary IP Address
If you try to add another IP address to the same interface, it simply adds to the same interface.
For example, I am going to add 192.168.56.103/24 to the same interface enp0s8:
sudo ip addr add 192.168.56.103/24 dev enp0s8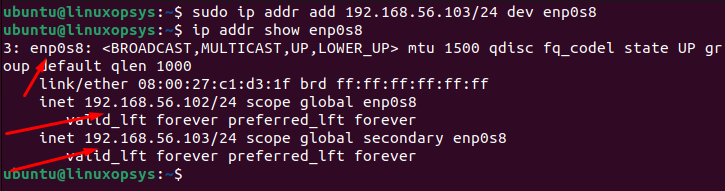
This command adds the new IP address 192.168.56.103/24 to enp0s8. Including the previous IP, you have a total of 2 IP addresses on the same interface.
To change the IP address using ip command, first you need to remove the current IP address and then add the new IP address. To remove the IP address use the ip addr del command and the syntax is similar to ip addr add command.
Example:
sudo ip addr del 192.168.56.102/24 dev enp0s8sudo ip addr del 192.168.56.103/24 dev enp0s8
Here I have removed both IP addresses which were added earlier to the enp0s8 network interface.
Now you can add the new IP address to enp0s8 using ip addr add command:
sudo ip addr add 192.168.56.104/24 dev enp0s8Making the IP Address Change Permanent
So far every change we performed using ip command won't persist after the reboot.
You need to make changes to the network configuration file in the appropriate file to make the IP address permanent. Depending on the Linux Distribution this config file, type, and location varies.
Debian-based distributions (like Ubuntu):
The latest version of Ubuntu uses Netplan as the default network management tool. The config files are located under /etc/netplan directory. The config files are written in YAML. Note: You need to be careful about the spaces and indentation.
For the configuration, you can use the default file in /etc/netplan (looks like 01-netcfg.yaml, 01-network-manager-all.yaml) or create a new file starting with 01 and ending with .yaml.
You can add the following lines and configure your appropriate network settings.
network:
 version: 2
 renderer: NetworkManager
 ethernets:
   enp0s8:
     dhcp4: no
     addresses: [192.168.56.104/24]
     gateway4: 192.168.56.1
     nameservers:
         addresses: [8.8.8.8,8.8.8.4]
Once the config file is updated, you can make the changes live using:
sudo netplan applyRed Hat-based distributions (like CentOS Stream, Fedora, RHEL):
In Red Hat-based distributions the network configuration files are stored in /etc/sysconfig/network-scripts/ directory. The files are generally named ifcfg-[INTERFACE_NAME] and contain key-value pairs that define the network configuration.
Once the config file is edited you would need to restart the network service to make the changes effective.
sudo systemctl restart network

About The Author
Bobbin Zachariah

Bobbin Zachariah is an experienced Linux engineer who has been supporting infrastructure for many companies. He specializes in Shell scripting, AWS Cloud, JavaScript, and Nodejs. He has qualified Master’s degree in computer science. He holds Red Hat Certified Engineer (RHCE) certification and RedHat Enable Sysadmin.
Hi, thanks a lot for this article.
I just saw a little mistake under 4:
It must be
sudo ip addr del 192.168.56.102/24 dev enp0s8
, so, not add but del.
Again, thanks a lot!
Thanks Sascha for pointing it out. I have fixed that typo.