
In your IT environment, sometimes you may be compelled to configure a static IP instead of relying on the DHCP protocol. A perfect example is when you are setting up a Ubuntu server to act as a file or a web server for your organization. A static IP, as the name suggests, ensures that the IP address of your system remains unchanged. With DHCP, the IP address changes once the lease time for the IP address expires and this is undesirable for servers.
In this guide, we will explore two ways of manually assigning a static IP on Ubuntu 20.04. We will demonstrate how you can configure a static IP on an instance of Ubuntu server and Ubuntu desktop.
Assign a static IP on Ubuntu server 20.04
From Ubuntu 17.10 and later versions, networking is controlled by the Netplan feature. The configuration files for Netplan are located in the /etc/netplan directory and are written in YAML. Inside this directory, you will find YAML configuration files labeled either 50-cloud-init.yaml, or 00-installer-config.yaml.
However, If you are running a cloud instance of Ubuntu, chances are that it is managed by cloud-init which auto-assigns it an IP address by leveraging the DHCP protocol. Before we proceed further, you need to disable cloud-init. To achieve this, open the subiquity-disable-cloudinit-networking.cfg cloud-init configuration file in the /etc/cloud/cloud.cfg.d/ directory
sudo vim /etc/cloud/cloud.cfg.d/subiquity-disable-cloudinit-networking.cfgSet the 'network' directive to 'disabled'.
network: {config: disabled}Save the changes and quit. Next, head over to the Netplan configuration file. In my case, I have the 00-installer-config.yaml file.

sudo vim /etc/netplan/00-installer-config.yamlFrom the configuration file, we can see the 'network' directive that has 2 elements. The first one is the 'ethernets' which specifies the network interface and the second one is the version of the renderer which is 'systemd-networkd' for non-GUI instances and NetworkManager for Ubuntu desktop ( With GUI )

We are going to set the 'dhcp4' value to 'no' to disable the DHCP protocol and specify the interface's Static IP as follows.
To assign a static IP address to ens3 interface, modify the file as follows:
- Specify the static IP address of the server. in the
addresses: section, specify an IPv4 address to be assigned to the network interface. - Next, Specify the gateway.
- Under
nameservers, specify the DNS or IP addresses of the nameservers. Here, we have specified Google's DNS which is 8.8.8.8 and the Router's IP.
network:
   ethernets:
        enp0s3:
            dhcp4: no
            addresses: [192.168.2.150/24]
            gateway4: 192.168.2.1
            nameservers:
                               addresses: [8.8.8.8, 192.168.2.1]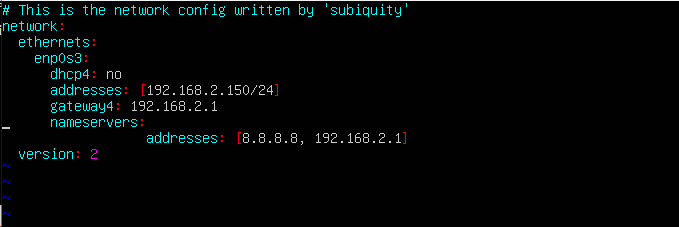
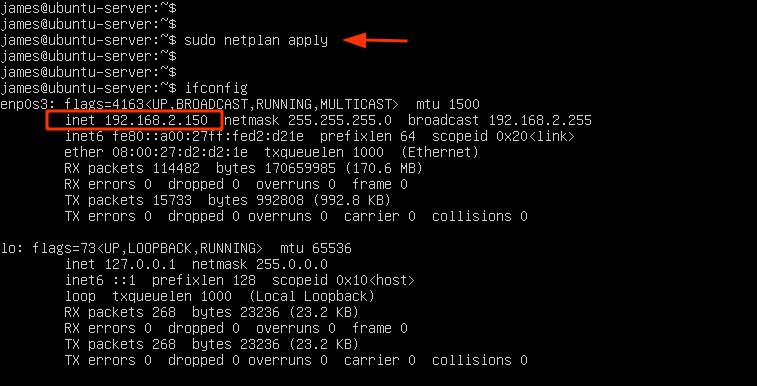
Save the YAML file and exit. To apply the changes made, run the command:
sudo netplan applyYou can use the ifconfig or ip command to verify that your network interface is set to use the static IP configured moments ago.
Additionally, you can use the IP route show command to display the new routes on your system.
ip route show
Perfect! We have successfully configured a static IP on the Ubuntu server. Let's now switch gears and see how you can replicate the same on Ubuntu Desktop 20.04
Configure Static IP on Ubuntu 20.04 Desktop
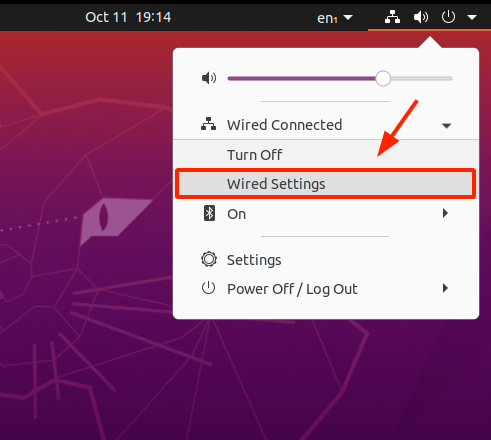
If you are running a Desktop GUI, then configuring a static IP should be quite easy. Click on the 'Network icon' at the top right corner of your screen and select the 'Wired Settings' option.
This opens the 'Network' configuration page. In the 'Wired' section, click on the gear wheel icon.
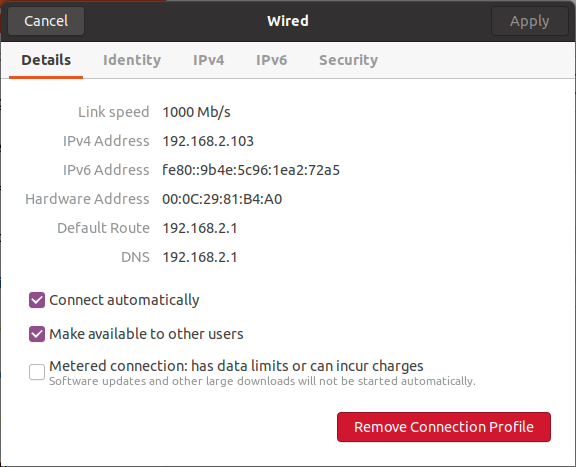
This displays a summary of your current IP configuration. By default, the system obtains its IP configuration via the DHCP protocol. We will change from using DHCP to Manual.
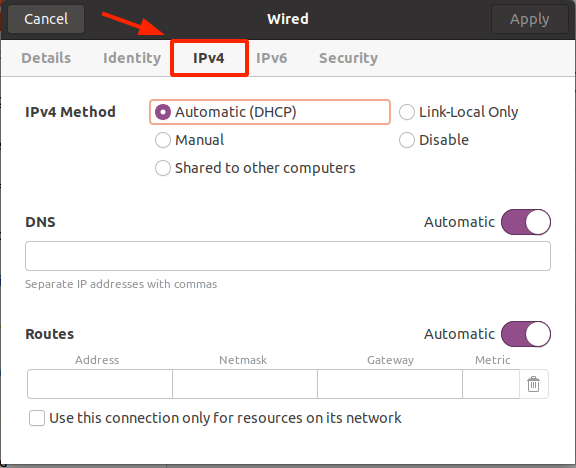
So, click on the 'IPv4' tab which directs you to this section. As anticipated, DHCP is turned on.
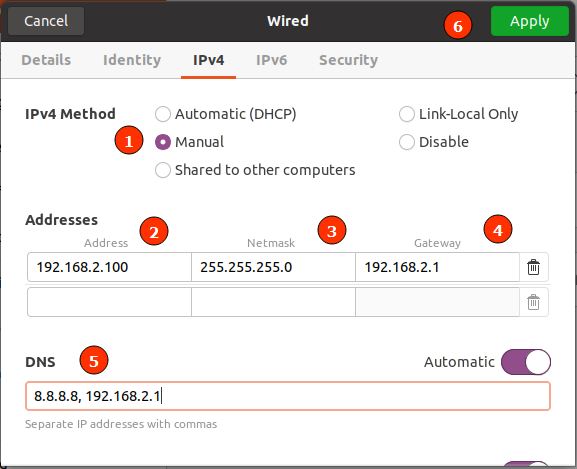
Switch from 'Automatic (DHCP)' to 'Manual'. Then specify the static IPv4 address including the netmask, gateway, and DNS servers. To save the changes, click on the 'Apply' button.
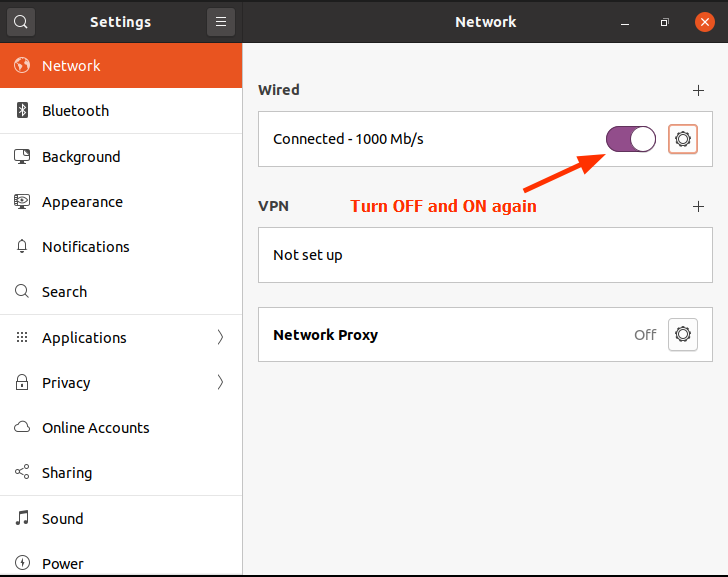
Head back to the 'Network' section and restart the networking service by toggling off and on.
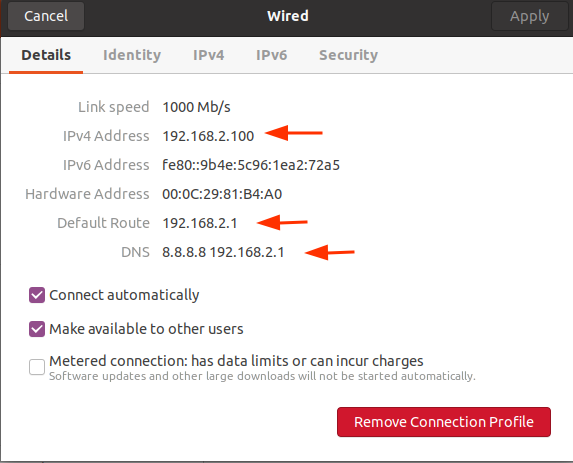
Once again, click on the gear wheel icon and confirm that the static IP settings have reflected.
And it's as simple as that. We have successfully configured a static IP on Ubuntu Desktop.
Conclusion
Ubuntu, like most other systems, comes configured with DHCP to obtain an IP from the DHCP server, or router. In this guide, we have covered how you can apply static IP settings on command-line and using the GUI. Before setting a static IP, it's always recommended to reserve the IP that you want to assign to your server on the router. Equally important is to ensure that no other client system is using that IP address to avoid an IP conflict.


About The Author
James Kiarie

James Kiarie is a skilled and certified LPIC Linux administrator with a strong passion for technical writing, specializing in the Linux domain. With over four years of experience, he has crafted numerous technical guides, helping a wide audience navigate through various Linux distributions.
Comments