
The Linux df command, also known as "disk free", is used to display the amount of free and used disk space on the Unix/Linux filesystem.
df command gives a quick overview of how much disk space is being used and how much remains on each mounted filesystem. It's especially useful to ensure that the system doesn't run into a situation where it's out of space.
Basic Syntax
The general syntax of the df command is:
df [OPTIONS]... [FILESYSTEM]...[OPTIONS]refers to the various options you can use with df to customize the output or specify how the disk space usage should be reported.[FILESYSTEM]allows you to specify which filesystem(s) you want information on. If you don't specify a filesystem, df will show information for all currently mounted filesystems.
Understanding df Output
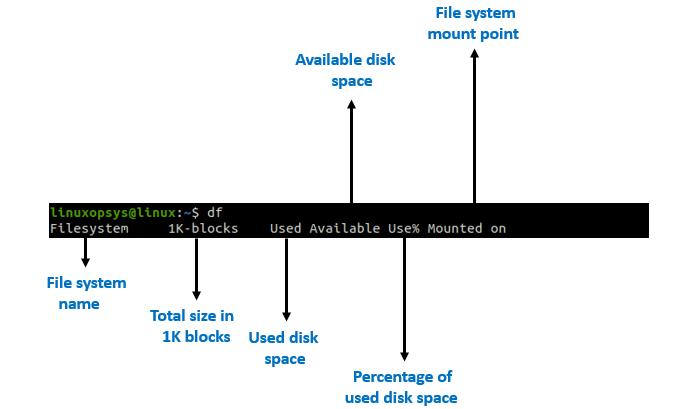
Here's a sample output from running df:
Filesystem     1K-blocks    Used Available Use% Mounted on
tmpfs              99272     980     98292   1% /run
/dev/sda1        25202692 5315988  18585844  23% /
tmpfs             496352       0    496352   0% /dev/shm
tmpfs               5120       0      5120   0% /run/lock
tmpfs              99268       4     99264   1% /run/user/0
/dev/sdb1       10238422   8256422   1471988  85% /mnt/data
Now, let's understand each column:
- Filesystem: This is the name of the storage device or filesystem. For instance, /dev/sda1 might represent the first partition (
1) on the first hard disk (sda). tmpfs represents a temporary filesystem that typically resides in memory or swap, and is used for things like /dev/shm which is shared memory. - 1K-blocks: This represents the total size of the filesystem in 1-kilobyte blocks. It's the sum of Used and Available.
- Used: This displays the amount of 1K-blocks used by the data on the filesystem.
- Available: Indicates the amount of 1K-blocks available for new data.
- Use%: This shows the percentage of the total size of the filesystem that's in use.
- Mounted on: Tells you where the filesystem is mounted in the directory tree.
Command Options
Here are some commonly used options with the df command:
-a, --all: Includes information about all filesystems, including the ones that have 0 blocks.-h, --human-readable: Print sizes in a human-readable format (e.g., 1K, 234M, 2G).-H: Similar to-h, but uses powers of 1000 instead of 1024.-T, --print-type: Display the filesystem type.-t: Specify a particular type of filesystem to be displayed.-x, --exclude-type=TYPE: Exclude filesystems of a specific type (TYPE).-i, --inodes: Display inode usage instead of block usage.--total: Display a grand total at the end.--output: Customize the display.
Examples of Common Scenarios
Checking usage in human-readable format
To check disk usage in a human-readable format using the df command, you can use the -h option. The -h stands for "human-readable," and it displays space usage statistics in a format that's more easily understood, using sizes in kilobytes (K), megabytes (M), gigabytes (G), and so forth.
Here's how to use it:
df -h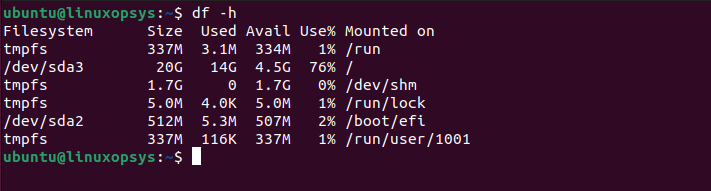
In this output:
- Sizes (Size, Used, and Avail columns) are shown in G (gigabytes) or M (megabytes), etc., depending on the size of the filesystem.
- The Use% column indicates the percentage of the total size of the filesystem that's in use.
- The Mounted on column shows where each filesystem is mounted in the directory tree.
Both -h and -H options in the df command are used to produce human-readable output, but they use different bases to compute the sizes:
- -h (Base 2)
- Sizes are represented using powers of 1024.
- Outputs sizes in K (kibibytes, 2^10 or 1,024 bytes), M (mebibytes, 2^20 or 1,048,576 bytes), G (gibibytes, 2^30 bytes), etc.
- -H (Base 10)
- Sizes are represented using powers of 1000.
- Outputs sizes in KB (kilobytes, 10^3 or 1,000 bytes), MB (megabytes, 10^6 bytes), GB (gigabytes, 10^9 bytes), etc.
- -k (default)
- Presented in terms of 1K blocks (where 1K = 1,024 bytes).
Example:
Suppose you have a filesystem that's 1,048,576 bytes in size (i.e., 1 mebibyte or MiB):
- Using -h: The df command would show this as 1.0M because it's considering the base as 1024.
- Using -H: The df command would show this as 1.05MB because it's considering the base as 1000.
If you want to check the disk space available on a specific mount point using the df command, you can simply provide the path of that mount point or the device name as an argument. Example:
df -h /dev/sda3
This checks the disk space on a device named /dev/sda3.
In general, df -h is favored when manually checking disk usage because it provides a more intuitive representation of sizes. In contrast, df -k or the default df might be preferred in scripting scenarios or when a consistent block size is desired for calculations or comparisons.
Remeber you can make use of grep or awk command to filter the output of df to get your desired lines.
Viewing the inode usage
Inodes are crucial data structures in many Unix-based file systems. Each inode represents metadata about a file or directory, such as its type, owner, access mode, and more. The number of inodes is often fixed when a filesystem is created, meaning there's a limit to the number of files and directories you can have, regardless of the actual space available on the disk.
To view inode usage with the df command, you use the -i option:
df -i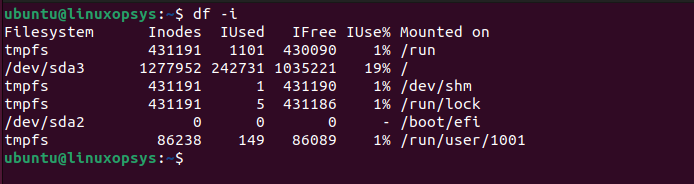
Let's break down the columns:
- Filesystem: The name of the storage device or filesystem.
- Inodes: Total number of inodes available in the filesystem.
- IUsed: Number of inodes that are currently in use (i.e., number of files and directories).
- IFree: Number of inodes that are still available.
- IUse%: Percentage of inodes that are in use.
- Mounted on: The location where the filesystem is mounted.
Excluding specific filesystem types
If you want to exclude certain filesystem types from the df output, you can use the -x option followed by the type of filesystem you want to exclude.
The syntax is as follows:
df -x [FILESYSTEM-TYPE]Example:
df -x tmpfs -x vfat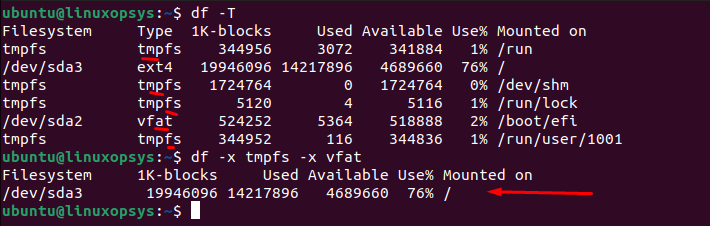
This command excludes multiple filesystem types, you can repeat the -x option.
This capability is particularly useful in systems where there might be numerous temporary or special-purpose filesystems (like tmpfs or vfat) that you might want to ignore when reviewing disk usage statistics.
Display file system type
In Linux, you can determine file system type in different ways. Using -T option df can display the type of filesystem with usual df output.
df -TThis will include an extra column labeled "Type" that shows the filesystem type for each device or mount point. Common filesystem types you might see include ext4, xfs, tmpfs, vfat, zfs, and others, depending on your system and configuration.
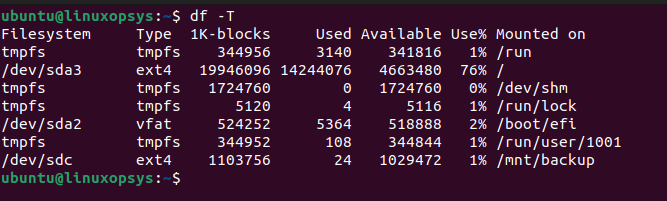
In the example above, /dev/sda3 is of type ext4 while the /dev/sda2 mount point uses a vfat filesystem.
You may also filter df -T output to show e specific filesystem type by excluding specific patterns
df -T | egrep -v 'vfat|tmpfs'Here egrep -v 'vfat|tmpfs' part that does the excluding of filesystems of type 'vfat' and 'tmpfs'
Limit output to specific file system
The -t option with the df command is used to filter the output based on the filesystem type. When used with the df command, -t allows you to display only those filesystems of a specified type.
Here's the syntax for its use:
df -t [FILESYSTEM_TYPE]Example:
df -t ext4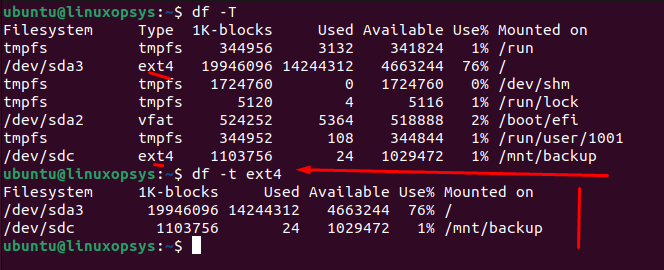
This command will limit the output to entries with the ext4 filesystem type.
Customize the display
With the df command in Linux, you can customize the display using the --output option, which allows you to specify the columns you want to see in the output.
Here's the syntax:
df --output=[FIELD,...]The available fields are:
source: The filesystem source.fstype: Filesystem type.itotal: Total inodes.iused: Used inodes.ifree: Free inodes.ipcent: Inode use percentage.size: Total size.used: Used space.avail: Available space.pcent: Use percentage.file: Filesystem name.target: Mounted on.
Examples:
Display only the filesystem source and its available space:
df --output=source,avail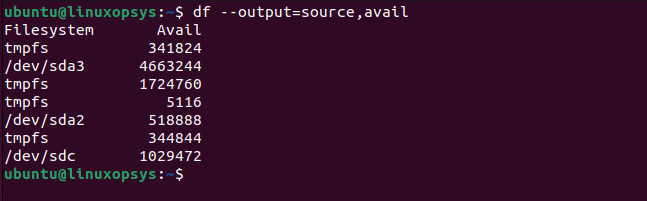
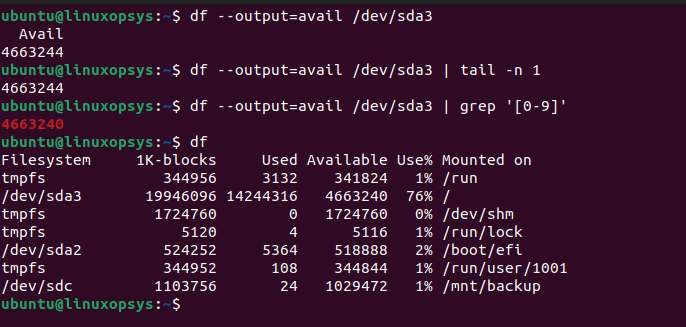
To display only the available disk space for the specified filesystem or mount point /dev/sda3:
df --output=avail /dev/sda3ordf --output=avail /dev/sda3 | tail -n 1//Removing the header ordf --output=avail /dev/sda3 | grep '[0-9]'//Using grep
Total available space
To get the total available space across all your filesystems, you can use the --total option with the df command. This option produces an additional line labeled "total" at the end of the output, which sums up the values in each column.
df --total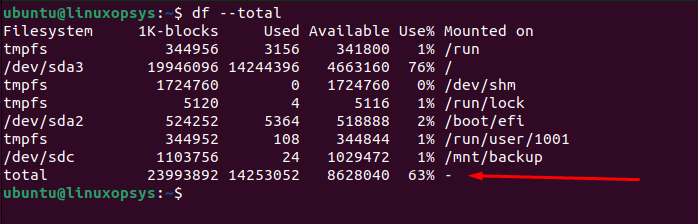
The output will show an additional "total" row at the bottom, and you can refer to the "Available" column to see the total available space.
If you want to see this in a human-readable format, combine it with the -h option:
df -h --totalTo isolate just the total value, you can use tools like grep and awk. For example:
df -h --total | grep total | awk '{print $4}'This command sequence will output the total available disk space across all filesystems in a human-readable format.


Comments