
The useradd command is used in Linux to create a new user account. It is a lower-level utlity for adding users which gives more control via many command line options. If you prefer a more interactive and guided process you can use adduser command instead.
In this tutorial, we learn about useradd command with examples.
Syntax
The basic syntax of the useradd command:
useradd [OPTIONS] USERNAMEWhere USERNAME is the name of the user you want to create and [OPTIONS] are the flags to customize the new user account.
Create a new user using useradd
To run useradd command either switch to superuser (root) or use with sudo command.
To create a new user run the following command from the terminal:
useradd tom
This creates a new user named tom. You can verify by checking the /etc/passwd file. You may notice it's set a User ID, home directory location, and default login shell.
Note: If you get an error saying the user already exists, that means you cant create another user with the same name. You can either modify the existing user using usermod or delete/re-add the user.
By default, useradd won't create the home directory in many Linux Distributions. Later section we see how to create the home directory if it doesn't exist.
What about setting the password for the user? The useradd command doesn't have an interactive way of setting passwords in one go unless you choose -p option to pass an encrypted password (has security risk as it stores in history). The recommended way to set a password is by using the passwd command.
Example:
passwd tomThis set a password for the user tom.
Options of useradd
Let's look into some of the useful options of useradd command with examples.
-m or --create-home
This option tells useradd to create a user's home directory in the default location (usually under /home) if it doesn't exist. Also, copy files from skeleton directory into the new home directory.
useradd -m john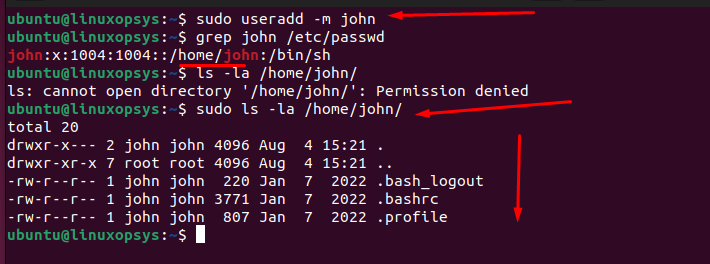
This command creates a new user john along with home directory named john under /home.
-d, --home HOME_DIR
This tells useradd to specify the user's home directory. You should provide a path followed by this option that will be recorded in the system (under /etc/passwd) but it won't create a home directory unless -m option is passed.
useradd -d /data/home/bravo bravo
This command creates a new user bravo and record its home directory as /data/home/bravo.
You can combine both -m and -d option to create custom home directory and ensure it is created if it doesn't exist.
useradd -m -d /data/home/toms toms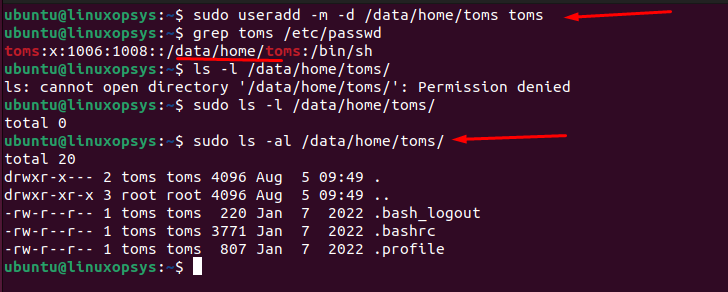
This command creates a new user toms with custom home directory named toms under /data/home directory.
-g and -G
The -g and -G options allow useradd to set the initial login primary or secondary group for the new user.
Example of -g option:
useradd -g pgroup user1This command adds the new user user1 to the specified group pgroup and files created by user will generally be owned by this group. If this option not specified useradd by default creates a primary group with same name as the username and makes that the initial login group.
Example of -G option:
useradd -G pgroup user2The new user named user2 will be added to the specified supplementary group named pgroup, in addition to the initial login group. You can provide multiple groups with commas separated.
Note: Make sure the group must exist in the system before running the command.
-c or --comment
The -c option with useradd allows to add comment about the user such full name of the user or any other description.
Example:
useradd -c "Test User" user3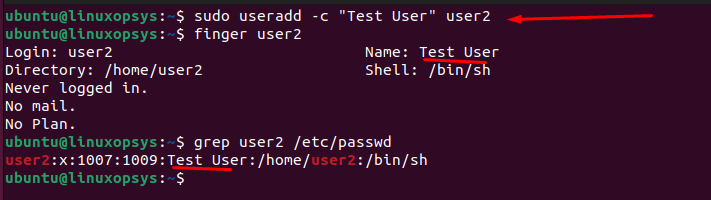
This command adds the specified comment "Test User" with the new user user2. You can confirm by checking the /etc/passwd file or by using the finger command.
-s or --shell
The -s option with useradd allows to specify the shell for a new user. This would be the command line interpreter the user uses when logging into the system.
Example:
useradd -s /bin/dash userdash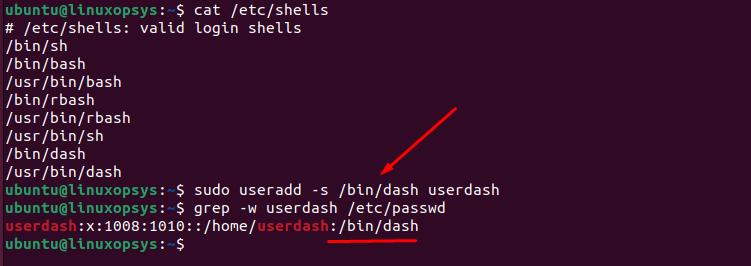
This command set the new user with /bin/dash shell as their login shell. If -s option is not specified, then the default shell defined in /etc/default/useradd or /etc/login.defs file will be used.
You can list the available shell in your system in /etc/shells file and once log in you check your current shell by using echo $SHELL.
-e or --expiredate
Using -e option useradd allows to set an expiration date for the new user. The account will be disabled after the specified date.
Examples
useradd -e 2023-08-30 user4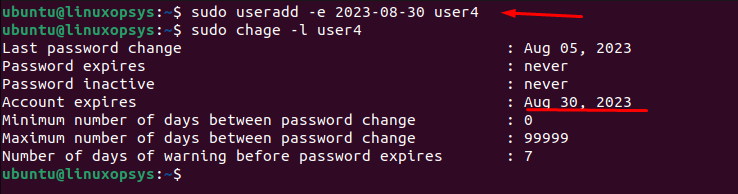
This command set the new user user4 to expire the account on 30-Aug-2023. You can verify the users expiration date using chage -l user4 command.
Note: The expiration date must be provided in the format YYYY-MM-DD.
-p or --password
The useradd doesn't set password for new user directly, instead you can set encrypted password using -p option.
Syntax:
useradd -p ENCRYPTED_PASSWORD usernameFor example, we can use openssl command to encrypt the password and pass it into the useradd command in one command.
useradd -p "$(openssl passwd -1 "TestPassword")" user6This command set an encrypted password for the new user named user6.
Remember: providing a password on the command line or via a script, this way have security issue as whoever has access to the system can easily retrieve it from history.
-D or --defaults
To display and change the default useradd value, use -D option when creating a new user account. You may also manually change the default value in /etc/default/useradd file.
To display the current default values for various parameters, type:
useradd -DLet's now try to change one default value for example inactivity period. We can combine -f and -D option together for this.
Example:
useradd -D -f 5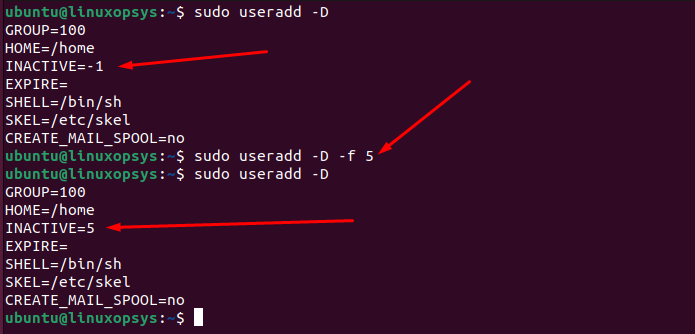
In this example, we have changed the default inactivity period value of -1 to 5. This means for every new users account expires and the user doesn't change it within 5 days, the account will be disabled.


Comments