
Sometimes, you might want to isolate running applications on your Linux system. It could be you want to perform a test run or something else. There are a couple of ways of doing this including running them as containers. The other way is by using a chroot jail.
A chroot is simply a way of running applications in isolation from the rest of the Linux directory tree structure. Short for change root, chroot is an operation in Linux/UNX that changes the apparent root directory to the one specified by the user.
Any process executed in this sandbox environment only has access to the newly defined root directory and its subdirectories. This directory is commonly referred to as the chroot jail since the processes that run here cannot read and write outside the newly specified root directory.
Let's take a look at the chroot directory with examples in Linux.
What is chroot directory
As earlier mentioned, chroot is an apparent root directory for the currently running processes and their corresponding children. Programs and applications that run in this environment do not have access to other files and programs in the conventional Linux directory tree, hence the name "chroot jail".
When creating the chroot directory, you copy and link all the system files and libraries required for commands or processes to run. Next, you invoke the chroot command to change the root directory to the base of this newly created directory tree. From here, you can execute your tasks in the chrooted directory.
Why is chroot directory important?
The chroot directory is mostly used as a test environment for testing software or scripts that are deemed risky to be executed normally on the system or in a production environment
Such a modified environment also comes in handy when recovering a Linux system from boot failure. It can be used to bootstrap the system from an alternate root file system such as a live CD or installation media.
Drawbacks of a chroot directory
Although chroot allows you to switch to the root directory of a specific process, it comes with some limitations. For example, it restricts the process from the Linux directory structure. This is because, as we mentioned earlier, the chrooted directory is isolated from the rest of the system.
Some command-line tools and services won't even work unless additional configuration steps are taken. For example, a process within a chroot environment will be unable to send out syslog messages, unless the syslog daemon is configured to create an additional /dev/log within the chroot environment. Moreover, you may be limited from accessing other devices unless the chroot environment includes its own copy of the necessary device nodes. If the /proc and /sys filesystems have not been bind-mounted or otherwise provided within the chroot environment, any system status query tools that use them will not work.
In most cases, the SFTP and home directory are the most chrooted directories. This is done in order to prevent users from accessing other user and system directories in the Linux tree structure.
Example: Restrict SFTP Users to Home Directories Using chroot Jail
In this section, we are going to create and limit an SFTP user to its user home directory using the chroot jail. In this demonstration, we are using Debian 10 as our test environment.
Step 1: Create the SFTP user
To start off, create an SFTP user as shown
# adduser sftp_userFor Red Hat distributions such as RHEL, CentOS Stream, Rocky, and AlmaLinux, run the following commands to create and assign a password to the user.
adduser sftp_user
passwd sftp_user
Next, alter the SFTP user so that they do not have the ability to log in via SSH protocol. We will set the /bin/bash attribute to /bin/false to deny access to the user's shell as shown.
usermod --shell /bin/false test_userYou can confirm this by viewing the /etc/passwd file as shown
cat /etc/passwd | grep -i test_user
Step 2: Create the SFTP group and add SFTP user
Next, create an SFTP group in which you will add the SFTP user.
groupadd sftp_groupThereafter, add the user to the SFTP group as shown.
usermod -G sftp_group test_userStep 3: Configure SFTP Chroot Jail
In this step, we will configure the user's home folder as the chroot jail. This will act as the new root directory and the user will be able to access and write delete files in this jailed directory. However, they will not be able to create or delete files in other users' directories.
To create the chroot jail, we need to configure the sshd_config file which is the main configuration file for SSH. Therefore, access the file using your favorite text editor ( here we are using nano ).
nano /etc/ssh/sshd_configLocate this line
Subsystem sftp /usr/libexec/openssh/sftp-serverModify it to appear as follows.
Subsystem sftp internal-sftpNext, add the following block of code
Match Group sftp_group
        ChrootDirectory /home  # sftp chroot jail directory
        X11Forwarding no
        ForceCommand internal-sftp
        AllowTcpForwarding no
        PermitTunnel no
        AllowAgentForwarding no
Let's briefly go over the main parameters that will configure the chroot jail
internal-sftp: This is a configuration keyword that instructs ssh to use SFTP server code built into sshd. It replaces the sftp-server keyword which is now redundant and now reserved for backward compatibility.
Match Group sftp_group: This is a conditional block that stipulates the users or group that the block of code will apply. In this case, it applies to users in the user group called sftp_group. If you wish, you can configure it for a specific user as follows Match user test_user
ChrootDirectory: This specifies the chroot folder. In our case, this is the home folder denoted by /home , is the chroot directory.
To activate the SFTP chroot jail configuration, restart the SSH service as follows
sudo systemctl restart sshdStep 4: Assign ownership and permissions on chroot jail folder
The permissions assigned to the SFTP folder vary on your requirement. For this guide, we will limit the user to creating and deleting files in their home directory only. This will be some sort of a mini jail.
So, assign the directory ownership to the user and the group to the root user.
chown test_user:root /home/test_userNext, assign the following permissions to give the SFTP user permission to read and write on their directory. This also restricts others from reading and writing in this folder.
chmod 700 /home/test_userYou can confirm the ownership and permissions
ls -ld /home/test_userStep 5: Verify
Now, let's try logging into the SFTP server.
When using the SSH protocol, you get a notification that the server only allows sftp connections only. This is because we disabled the user's login shell in step 1 and explicitly defined the chroot directory in step 3.
ssh test_user@hostname-or-ipaddress
Now, let's try accessing the server via the sftp protocol.
sftp test_user@hostname-or-ipaddressThis time around we are able to successfully log in to the root directory. This is the current working directory denoted by the forward-slash ( / ) symbol. To confirm this, run the pwd command.
pwd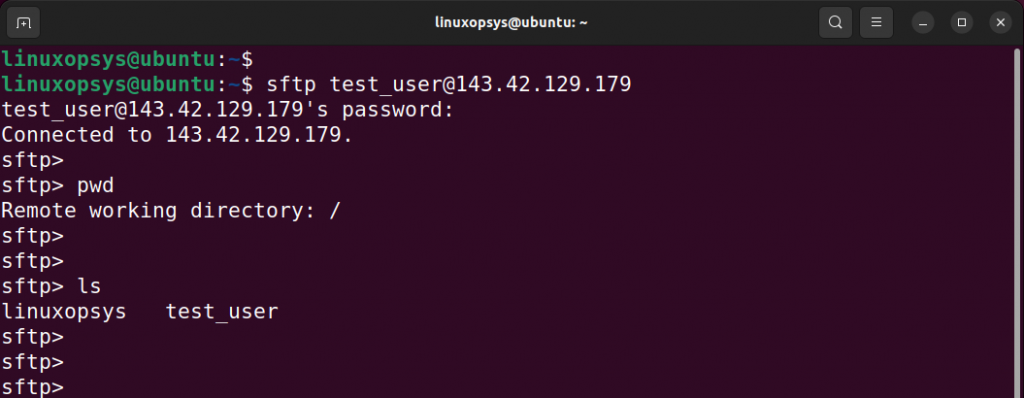
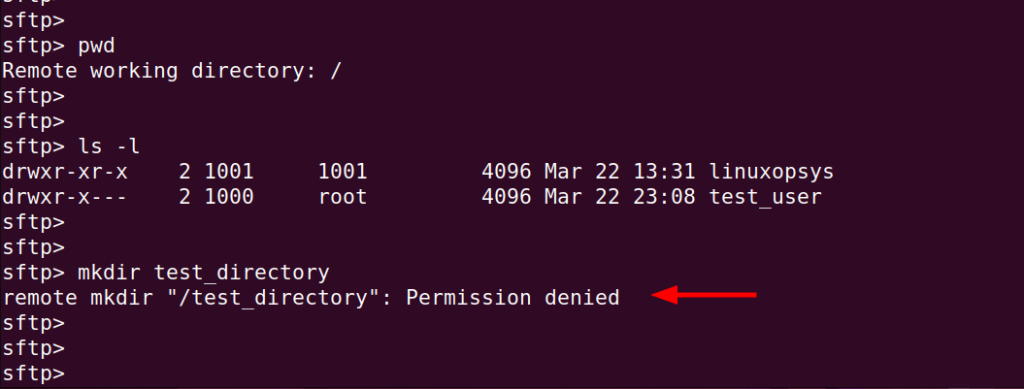
Let's try and see if we can create a sub-directory in the root directory.
mkdir test_directoryWe get a 'Permission denied' error. This is because we are trying to create a directory outside the chrooted jail which is the SFTP user's home directory.
When we navigate into the SFTP user home directory, this time around, we are able to create and remove the directory.
mkdir test_directoryTo confirm the existence of the directory, use the ls command as shown.
ls -l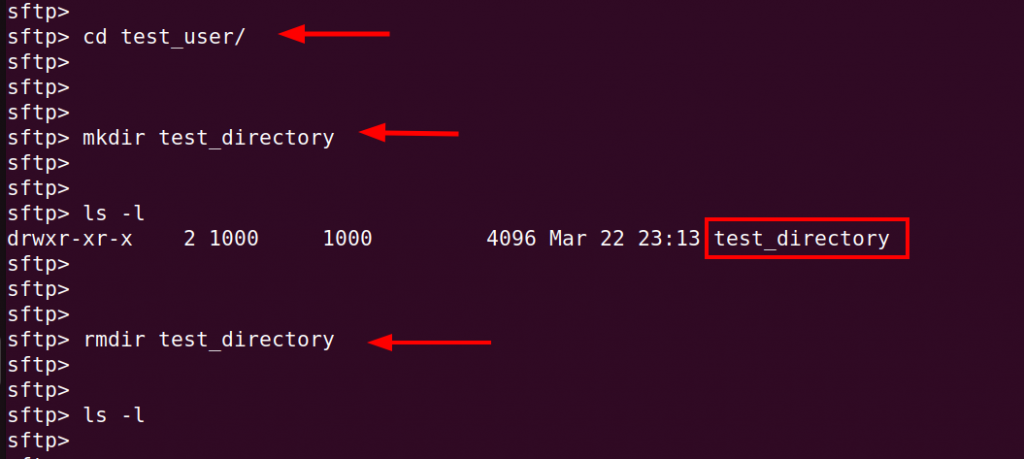
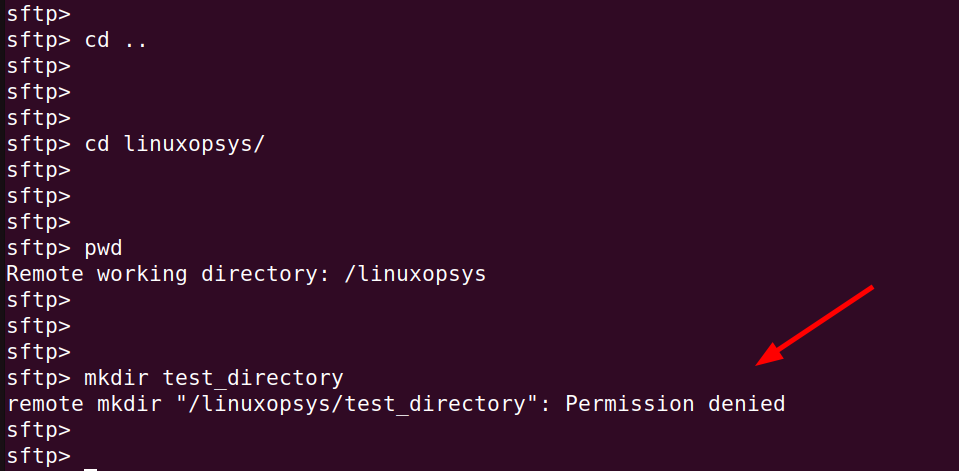
You can see that from the SFTP user's own home directory, you can do pretty much anything. However, when you are outside the chrooted user directory, you are restricted from creating any directory.
Conclusion
In this guide, we have looked at what is a chroot jail directory is and have gone further to configure a chroot jail directory to configure an SFTP user to their home directory.


About The Author
James Kiarie

James Kiarie is a skilled and certified LPIC Linux administrator with a strong passion for technical writing, specializing in the Linux domain. With over four years of experience, he has crafted numerous technical guides, helping a wide audience navigate through various Linux distributions.
Comments