Using chroot you can restrict SSH access to a user's home directory. This means when the user logs in via SSH, the user can access only the files and directories within their home directory.
In this tutorial, we learn how to restrict SSH access to a user's home directory.
Step 1: Create SSH root Jail
To start off, we will create an ssh root jail .
mkdir -p /home/test_dirThereafter, you need to identify the necessary files needed for the chroot directory to support a logged-in user's session.
An interactive session requires at the very least a shell, and basic /dev nodes such as zero, null, stdout, stdin, stderr, and tty devices. To list the requisite files, run the command.
ls -l /dev/{null,zero,stdin,stdout,stderr,random,tty}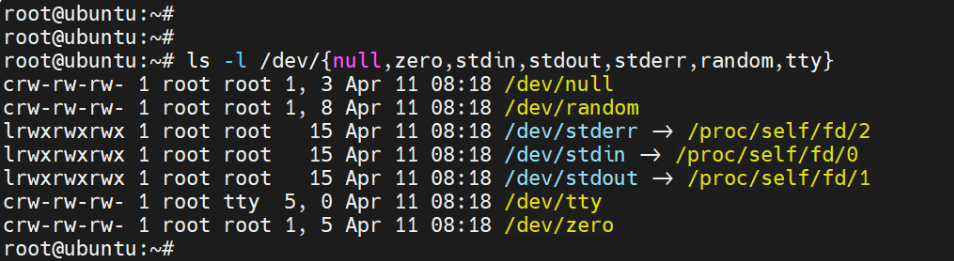
Next up, create the /dev directory inside the chroot jail and navigate into it.
mkdir -p /home/test_dir/dev/
cd /home/test_dir/dev/
Next, create the /dev files using the mknod command:
mknod -m 666 null c 1 3
mknod -m 666 tty c 5 0
mknod -m 666 zero c 1 5
mknod -m 666 random c 1 8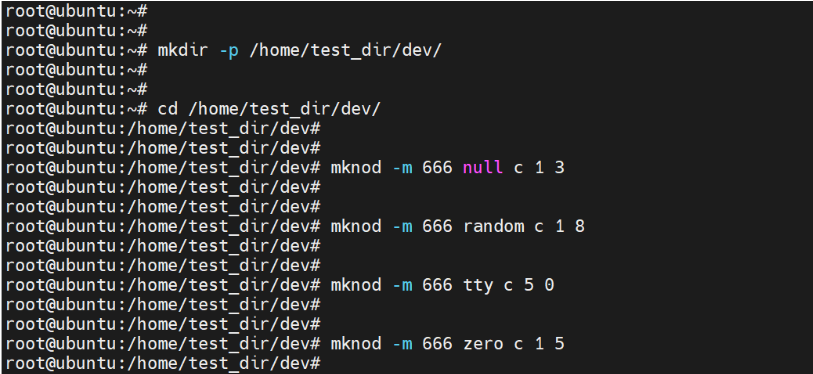
Thereafter assign the necessary permissions on the chroot jail. Note that the directory & subdirectories must be owned by the root user and not be writable by any user or group.
chown root:root /home/test_dir
chmod 0755 /home/test_dir
ls -ld /home/test
Step 2: Setup Interactive Shell for SSH Chroot Jail
You will then need to set up an interactive shell for the SSH Chroot Jail. First, create the bin directory and then copy the /bin/bash files into it.
mkdir -p /home/test_dir/bin
cp -v /bin/bash /home/test_dir/bin/
Next, identify the shared libraries needed in the /bin/bash directory

Create the /lib64 and /lib/x86_64 directories in the chroot jail
mkdir -p /home/test_dir/lib64
mkdir -p /home/test_dir/lib/x86_64-gnu
Then copy the libraries as shown.
cp /lib/x86_64-gnu/{libc.so.6,libtinfo.so.6} /home/test_dir/lib/x86_64-gnu
cp /lib64/ld-linux-x86-64.so.2 /home/test_dir/lib64
Step 3: Create SSH User
The next step is to add an SSH user that you will use to log in to the chroot jail. To create the user, run the following command:
adduser linuxopsysThen create a password for the user
passwd linuxopsysNext, create the /etc directory inside the chroot jail and copy the account files (/etc/passwd and /etc/group) into it.
mkdir /home/test_dir/etc
cp -vf /etc/{passwd,group} /home/test_dir/etc/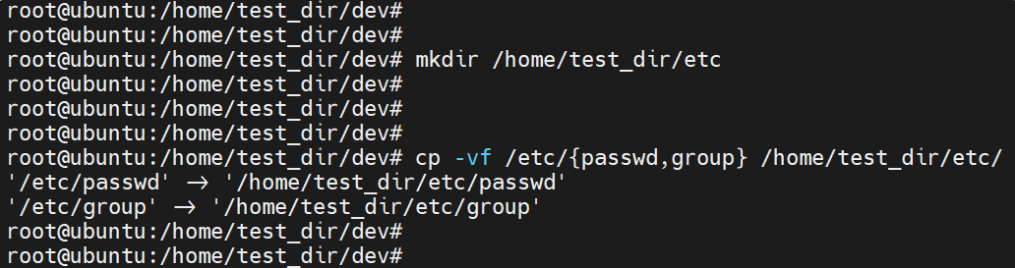
NOTE: Every time you add new SSH users, you need to copy the account files into the /home/test_dir/etc directory.
Step 4: Configure SSH to Use Chroot Jail
We need to configure the SSH user to log in to the chroot jail that we just created. In order to do that, modify the main SSH configuration file.
vim /etc/ssh/sshd_configAdd the following lines.
#define username to apply chroot jail to

Match User linuxopsys

#specify chroot jail

ChrootDirectory /home/test_dir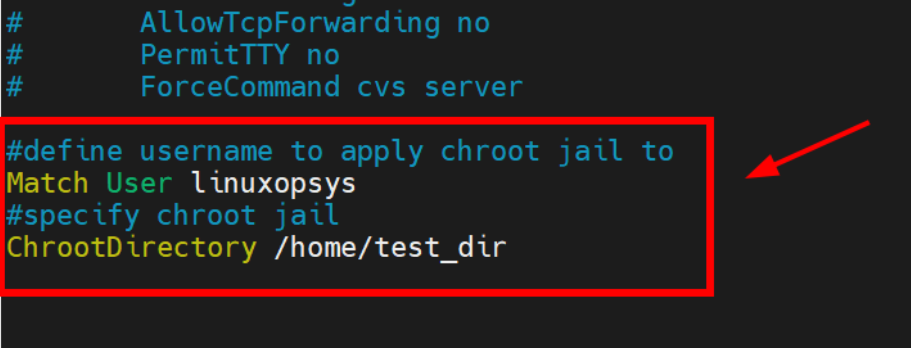
Save the changes and exit the configuration file.
Then restart the SSH service for the changes to come into effect.
systemctl restart sshdStep 5: Testing SSH with Chroot Jail
Let us now see if the chroot is working as expected.
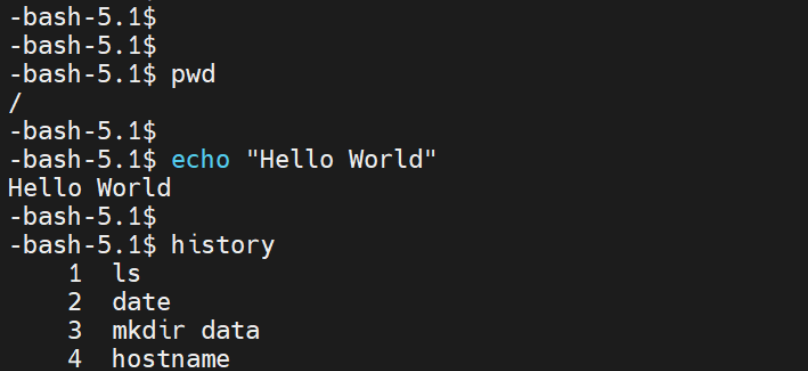
ssh jumpcloud@ipaddress-or-hostnameUpon logging in, you will realize that the user is restricted to the chroot jail and cannot run any external commands such as ls, date, mkdir, hostname.
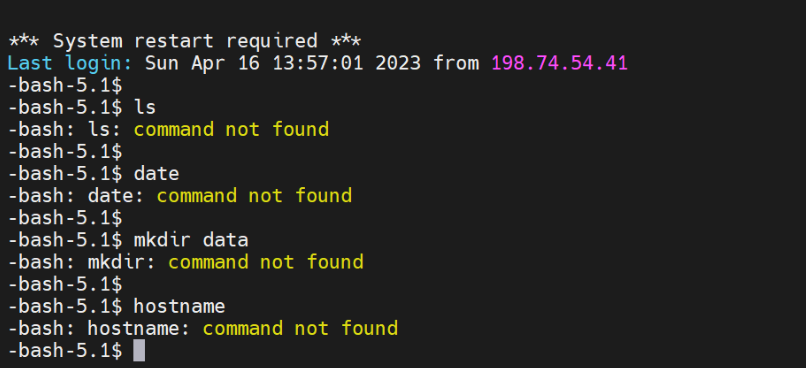
The user can only execute built-in bash commands such as pwd , echo and history as shown in the screenshot below.
Step 6: Create SSH User’s Home Directory
As we have previously seen, the user is locked in the chroot directory and cannot run any external commands. Now we need to create a home directory for the SSH user.
Therefore, create the home directory to the SSH user and assign permissions and ownerships as shown.
mkdir -p /home/test_dir/home/linuxopsys
chown -R linuxopsys:linuxopsys /home/test_dir/home/linuxopsys
chmod -R 0700 /home/test_dir/home/linuxopsys
Next, install a few commands as follows.
cp -v /bin/ls /home/test_dir/bin/
cp -v /bin/date /home/test_dirbin/
cp -v /bin/mkdir /home/test_dir/bin/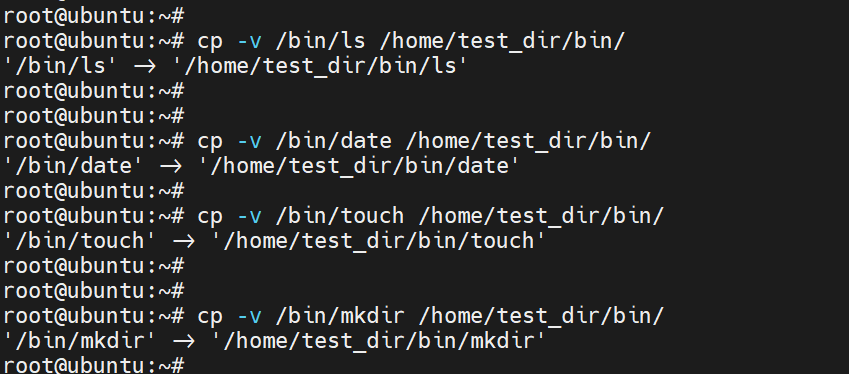
Step 7: Testing SFTP with Chroot Jail
In this section, we will disable SSH login and enable sftp access only. To do so, add the following lines to the SSH configuration file.
#Enable sftp to chrooted jail

ForceCommand internal-sftp
Where the ForceCommand option specifies that the user can only use the sftp command. You may also add AllowTcpForwarding option and set to no to prevent the user from forwarding traffic to other hosts.
Save the changes and exit. Then restart SSH service.
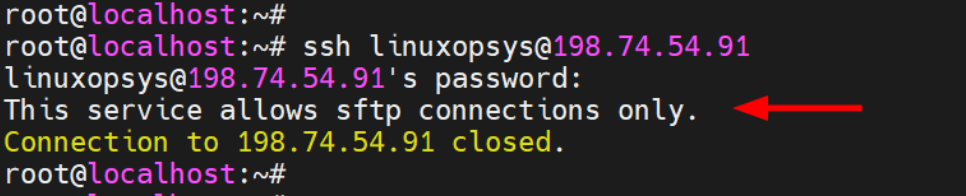
systemctl restart sshdNow if you try logging in via SSH, you will encounter the following error.
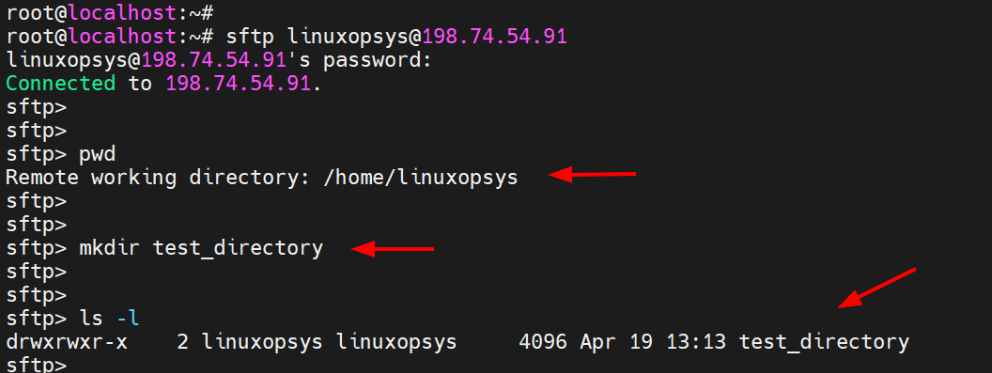
Now log in using SFTP
sftp linuxopsys@ipaddress-or-hostnameThis takes you straight to the home directory of the remote user.
Conclusion
Overall, limiting SSH access to a user's home directory is a wise security move since it keeps the user's access to the files and directories they need to work with to a minimum while preventing unintentional or deliberate access to or modification of other system components.


About The Author
James Kiarie

James Kiarie is a skilled and certified LPIC Linux administrator with a strong passion for technical writing, specializing in the Linux domain. With over four years of experience, he has crafted numerous technical guides, helping a wide audience navigate through various Linux distributions.
Comments