
The mount command in Linux allows users to attach file systems or devices to a specified directory in the file system hierarchy, making them accessible for reading and writing. It allows users to access and interact with files stored on various devices, such as SD cards, USB storage, and DVDs. By mounting a filesystem, it becomes associated with a specific point in the file system hierarchy, known as the mount point.
Syntax
The basic syntax of mount command:
mount [-t fstype] [-o options] device mountpointCommon flags:
-t: Specifies the type of the file system. Common types include ext4, ntfs, vfat, and iso9660. Generally not required as the mount command detects the filesystem automatically.-o: Specifies options for mounting the file system.device: This is the file or device that you want to mount.mountpoint: This is the directory where you want the device or filesystem to be mounted.-l: Lists all mounted filesystems, potentially with labels.-a: Mount all filesystems listed in /etc/fstab.-f: Fake the mounting process, meaning it doesn't perform the actual mounting but simulates the operation (useful for testing /etc/fstab entries).
Mounting File systems
In Linux, before you can access the data on any storage device (be it a USB drive, hard drive, CD/DVD, or even a network share), you need to mount it.
Manual mounting: This is done explicitly by the user using the mount command. The device remains mounted until it is unmounted using the umount command or the system is rebooted.
Automatic Mounting: Many modern Linux distributions will automatically mount removable media when it's plugged in. Additionally, file systems can be set to mount at boot time by adding their details to the /etc/fstab file.
Mounting a storage volume or a disk
Before mounting, you need to know the device identifier. You can list available disk devices and partitions with fdisk -l. Create a mount point - simply a directory to access the content - say /mnt/datadir1. Now to mount a disk partition:
sudo mount /dev/sdc1 /mnt/datadir1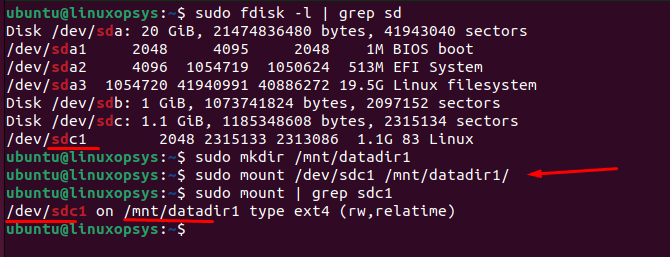
Replace /dev/sdc1 with the device identifier from the first step and /mnt/datadir1 with your chosen mount point. If the operation is successful, the command typically does not produce any output and returns to the shell prompt.
Remember If you want the device to be mounted automatically each time the system boots, you'll need to add an entry to the /etc/fstab file.
Mount a USB drive
Before mounting identify the USB drive - the device name (like /dev/sdb1 or /dev/sdc1) using lsblk or fdisk -l command. Rest the format is the same.
Example:
sudo mount /dev/sdb1 /mnt/usbdir1Mount an ISO file
The -o loop option is used when mounting an image file instead of a device.
Example:
sudo mount -o loop /path/to/iso/file.iso /mnt/isodir1Mounting network Drives
NFS
Ensure you have the necessary NFS client packages installed - nfs-common (for Debian/Ubuntu) and nfs-utils (Redhat/Fedora).
sudo mount server_ip:/path/on/server /local/mount/pointNFS supports various mount options tailored for network mounts. Examples include rsize, wsize, soft, hard, timeo, and others.
CIFS (Windows Share)
Ensure you have the necessary utilities (cifs-utils) installed.
Example:
sudo mount -t cifs //server-ip/sharename /local/mount/point -o user=username,password=passwordorsudo mount -t cifs //server_ip/share_name /mnt/cifs_share -o credentials=/path/to/.smbcredentials
Persistent mounting
If you want file systems to be mounted automatically every time your system starts up, you'll need to add entries for them in the /etc/fstab file.
The /etc/fstab entries have the format:
<device> <mount_point> <filesystem_type> <options> <dump> <pass><device>: This is the device you're trying to mount, e.g., /dev/sdb1.<mount_point>: The directory where the device will be mounted.<filesystem_type>: The type of the file system, e.g., ext4, vfat, etc.<options>: Mount options, e.g., defaults, noatime, etc.<dump>: A flag that determines if the file system needs to be dumped (usually set to 0).<pass>: Specifies the order in which filesystem checks are done at boot time (e.g., 1 for the root file system, 2 for others).
For example, if you want to mount /dev/sdb1 (an ext4 file system) to /mnt/myusbdrive:
/dev/sdb1 /mnt/myusbdrive ext4 defaults 0 2Instead of using device names, you may also use UUID (Universally Unique Identifier), id, or path. Using UUID is the most common approach since it remains consistent even if you move the physical drive to another machine or port.
Before rebooting, you can test the new fstab entry by using:
sudo mount -aThis will attempt to mount all entries in fstab. If there are no errors, your entries are likely correct.
Mount -o options
Here are some commonly used options with the -o flag:
defaults: Uses the default options, which are rw, suid, dev, exec, auto, nouser, and async.ro: Mounts the filesystem in read-only mode.rw: Mounts the filesystem in read-write mode.user: Allows any user to mount the filesystem.nouser: Only allows the root user to mount the filesystem. This is the default.users: Allows any user to mount and unmount the filesystem.noexec: Prevents execution of binaries on the mounted filesystem.exec: Allows execution of binaries. This is the default.sync: Performs all I/O to the filesystem synchronously.async: Performs all I/O to the filesystem asynchronously.nofail: This option ensures that the boot process continues even if this filesystem fails to mount.loop: Used to mount file images as block devices.suid: Permits the operation of suid, and sgid bits.nosuid: Blocks the operation of suid and sgid bits.noatime: Do not update inode access times on the filesystem.nodiratime: Do not update directory inode access times.relatime: Update inode access times relative to modify or change time.remount: Remounts an already mounted filesystem with new options.errors: Dictates the behavior of the system when an error is encountered.auto: Filesystem is mounted automatically at boot.noauto: Prevents the filesystem from being automatically mounted at boot.nodev: Do not interpret character or block special devices.dev: Allows interpretation of block special devices.
When mounting storage volumes in Linux, several options can enhance performance and reliability. Depending on the use case and the nature of the underlying storage, some of these options might be more beneficial than others.
Checking Mounted File Systems
Here's how you can verify mounted filesystems using different methods:
Using mount Without Arguments:
Running the mount command with no arguments will display a list of all currently mounted filesystems.
mountThe output provides details about the device, the mount point, the filesystem type, and the mount options.
If you use mount -l, and if the filesystems have labels assigned to them, those labels will also be shown in the output next to the device names.
Use may also use -t option to check specific mounted filesystem type. Example:
mount -t ext4ormount -t ext4,ext3
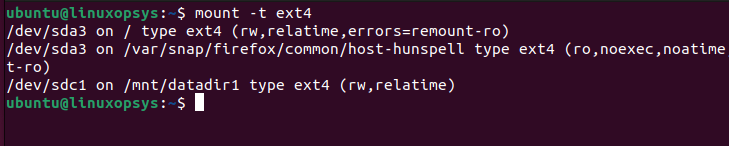
This will display only those filesystems that are of type ext4. Alternatively, you can combine mount with grep command eg mount | grep -Ew 'ext4|ext3'.
Reviewing /proc/mounts
It's a more raw and direct way to inspect the mounts.
cat /proc/mountsThe output structure is similar to the mount command but might contain more entries, especially for system and virtual filesystems
Using findmnt
The findmnt utility provides an easy way to list all mounted filesystems or search for a specific mount. Just typing findmnt will list all the mounted filesystems in a tree format:
findmntUsing df and lsblk commands
The df command stands for "disk free" and shows the available and used disk space on all currently mounted filesystems.
df -hThe -h option displays sizes in a human-readable format (e.g., 1K, 234M, 2G). The output will include columns for the filesystem, size, used space, available space, percentage used, and the mount point.
The lsblk command lists information about all available or specified block devices.
lsblkThe output will typically show the name of the block device, its size, and its mount point, among other details
For a quick overview, df or lsblk might be preferred. For a detailed view of mount options, the mount command or /proc/mounts can be more informative.
Unmouting File Systems
The primary tool for this is the umount command.
The basic usage of the umount command involves specifying the mount point or the device:
sudo umount /mount/point
or
sudo umount /dev/device_name
This command attempts to safely unmount the file system
Sometimes, unmounting can fail because the device is declared as "busy". This can happen for a variety of reasons: open files, active processes, etc. In those cases you can -f (Force unmounting ) or -l (lazy" unmount) option with caution.


Comments