
The fuser command in Linux is used to identify processes that are using specific files, sockets, or file systems. It is commonly employed to identify processes that are accessing or locking a specific file, especially when there's a need to edit, save, or delete that file without interference.
While fuser is more narrowly focused on identifying resource usage, lsof offers broader insights into open files, making them complementary tools for system administration and troubleshooting.
Syntax
fuser [OPTIONS] NAME…Where “NAME…” means that one or more files, directories, sockets or filesystems names can be inserted.
Command Options
Useful options for fuser command:
-a: Display information about the specified files whether or not they are being accessed.-c: Treats the argument files as mount points or block devices.-k: Kill the processes accessing the file.-i: Ask for confirmation before killing a process.-I, --inode: Display processes accessing specific inodes.-l: List available signal names.-m: Displays the PIDs of processes accessing the specified mount point or block device.-M, --ismountpoint: Treat the files strictly as mount points.-n SPACE: Display the names of the named files that are network files (either tcp, udp, or unix).-s: Silent operation; no error messages will be displayed.-u: Display the user IDs associated with the processes.-v: Verbose mode for more detailed information.-w: Access for writing; show only processes that would be prevented from writing to the specified files or filesystems.-SIGNAL: Directly send a specified signal (like TERM, KILL, etc.) to the processes.-4: Force IPv4 for -n.-6: Force IPv6 for -n.
Output format
The standard output of fuser is a list of process IDs (PIDs) that are accessing the specified resource (like a file, directory, socket, or mount point). But when combined with the -v (verbose) option, fuser reveals more detailed insights.
Using the -v option will produce a more detailed output.

Let's break down the columns:
- USER: The name of the user who owns the process.
- PID: The Process ID.
- ACCESS: A set of characters representing the type of access:
c: Current directory.e: Executable being run.f: Regular file access.F: Opened file for writing (might not have written yet).r: Root directory.m: Using a mounted filesystem (used with the-moption).- There are other flags; you can see them in the man page (man fuser).
- COMMAND: The name of the command or application associated with the PID.
Identifying Processes
Using fuser on files
Fuser, when used on files, helps to identify which processes are currently accessing those files. This can be incredibly handy in various situations, such as when you're trying to determine why a file is locked, or when troubleshooting system or application behaviors related to specific files.
Example:
fuser /usr/bin/python3
Output:
/usr/bin/python3.10: 1457e 3778eThis will show the Process IDs (PIDs) of all processes accessing the file /usr/bin/python3.
Let's break down the output:
- /usr/bin/python3.10: This is the path to the Python 3.10 binary or symbolic link.
- 1457e: This indicates that the process with the PID (Process ID) 684 is accessing the python3.10 executable (e).
- 3778e: Similarly, the process with PID 782 is also accessing the python3.10 executable (e).
For a more detailed output that displays user names, PID, ACCESS and the command being executed by the process, you can use the -v (verbose) option.
fuser -v /usr/bin/python3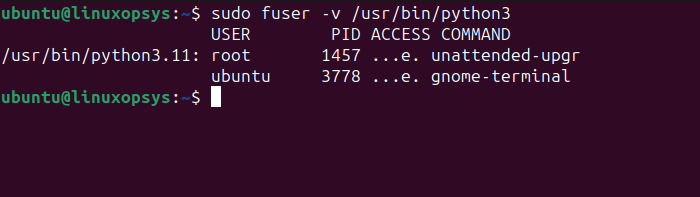
This shows a verbose output, which includes detailed information about processes accessing /usr/bin/python3.
Using fuser on directories
The fuser command is not limited to just files; it can also be applied to directories. This is particularly useful in scenarios where you want to check which processes are accessing a particular directory (or its contents) or if you're troubleshooting issues like being unable to unmount a filesystem due to active processes.
Example:
fuser /home/ubuntu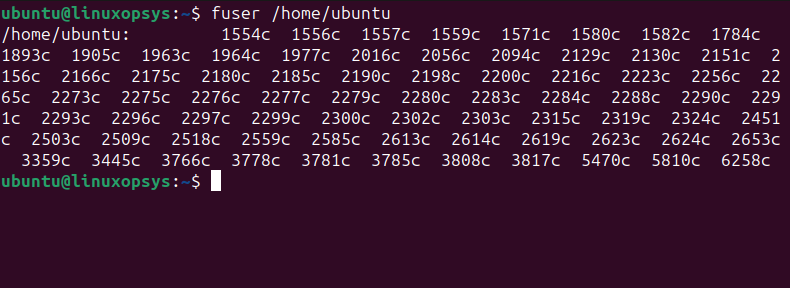
This will provide you with a list of process IDs that are accessing /home/ubuntu directory or any of its contents.
Using fuser on sockets
When you suspect that a particular network port or Unix socket is being used by a process, fuser can help you pinpoint the exact process(es).
Example:
fuser 22/tcp
This command reveals the processes currently utilizing TCP port 22. For UDP, replace tcp with udp.
Note: It's possible for multiple processes to be using the same socket, especially with certain server configurations. Ensure you review all processes before taking action.
Use-cases
Within the context of the Linux system, fuser has a lot of practical use cases, making it an invaluable utility for SysAdmin’s or users in general. This section will include some of the most common and valuable applications with fuser.
Process Using a Specific Port
Running fuser specifying the port and network protocol makes it possible to check which processes are using a specific socket.
Example:
fuser 80/tcp
This shows which processes are using the port 80 over TCP.
Accessing a Mounted Filesystem
Executing fuser with the -m option allows you to focus on processes accessing a specific mount point within the Linux file system. This reveals which processes are causing the hold-up, giving you the chance to terminate them or close files as needed.
Let's say you have a mounted filesystem at /var/www/html, and you want to determine which processes are accessing it (or any of its subdirectories and files):
fuser -m /var/www/html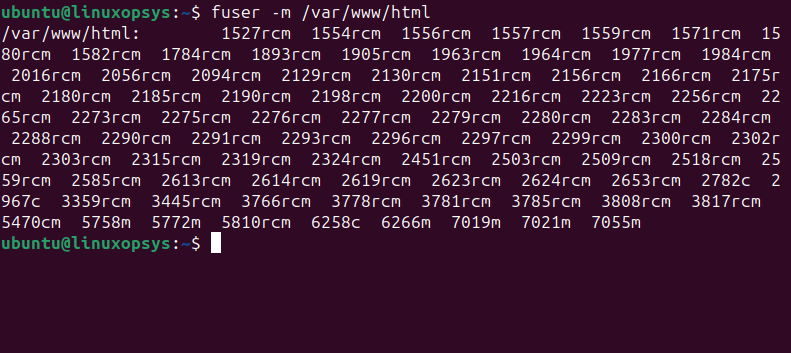
This lists the processes that are actively accessing the mount point at /var/www/html.
Killing Processes Using a Specific File
Besides just listing PIDs related to files, directories, sockets and filesystems usages, fuser also has the functionality to kill processes. Executing fuser with the option -k or –kill, makes the command end the execution of the processes that were presented in the list. In other words, in addition to listing the PIDs, the command operation will also terminate each of those processes.
Example:
fuser -k /usr/sbin/nginx
This lists all the processes IDs currently using ngnix, at the same time that it also terminates each process in the result.
By default, fuser sends the SIGKILL (KILL) signal to the processes.
Note: Use -i when you're uncertain about the processes you're about to terminate and want to proceed with caution. This prompts you for confirmation before terminating each process that's accessing a specified file or resource.
To see more details about the processes you're about to kill, use the -v (verbose) option:
fuser -k -v /usr/sbin/nginx
This will display detailed information about each process accessing the file before terminating them.
If you'd like to send a different signal to the processes, for example, SIGTERM (which is a gentler way to ask processes to terminate, giving them a chance to clean up), you can use:
fuser -k -TERM /usr/sbin/ngnix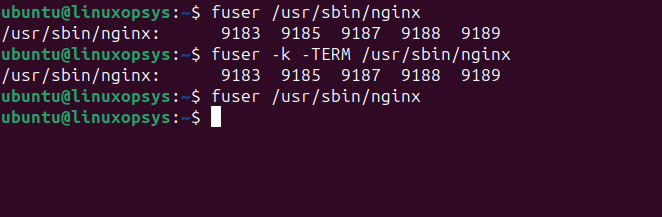
The command will send a TERM signal (known as SIGTERM) to each process presented in the result list. By using fuser -l, you can view the full list of signals available to send, enabling you to choose the most appropriate one based on your specific needs.


Comments