
Ping, also known as Packet Internet Groper, a command-line utility that uses Internet Control Message Protocol (ICMP) packets to collect local network statistics. This command is part of the iputils-ping (iputils) package, which is pre-installed on all Linux distributions, and other operating systems.
Using the Linux ping command, administrators can determine whether the remote host is active or not. This can also help you troubleshoot and fix delays in communication and identify packet loss. The ping command performs the following major tasks:
- Check server status.
- Identify DNS issues.
- Check network connectivity, including Internet and LAN connections.
This is one of the most used tools to test, diagnose, and troubleshoot network connectivity issues. Ping provides various options and variations to perform complex network troubleshooting.
The default interval between two packets in ping is one second.
Syntax
The basic syntax of the Linux ping command is as follows:
ping [options] hostname/IP addressHow Does the ping Command Work in Linux?
The ping command in Linux works by sending ICMP packets to the specified hostname or IP address on the network and waits for a connection establishment and a response from the server. When the destination IP address receives the packet, it responds with an ICMP reply.
Ping continues to send ICMP packets to the target server until an interrupt is received by the host. To stop the command, use the Ctrl+C key combination.
To understand the command function better, let’s try this example:
ping example.comThe ping command output looks like this:
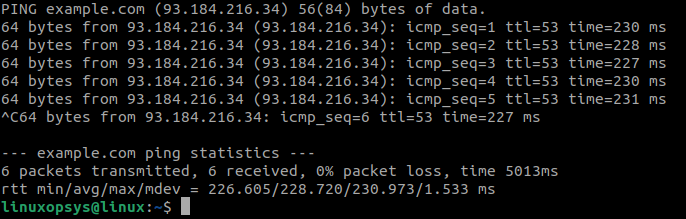
If ping gets a response from the destination server, then the ping command prints one line for each response. The following fields are displayed in the output:
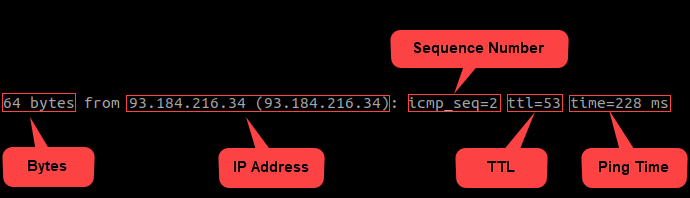
- Bytes: The total number of data bytes. The default value for this is 56 bytes, which then translates into 64 data bytes. The output in this case is 64 bytes.
- IP Address: Destination server IP addresses, which is 93.184.216.34 here.
- Sequence Number: Sequence number for each ICMP package, which is icmp_seq=2 in this case.
- TTL: Time to live for the request, which is 53 here.
- Ping Time: The round-trip time, measured in milliseconds for the ping. This time is calculated from the moment packet reaches to the destination and a response is returned on the source. Ping time is 228 ms in this example.
When you stop ping, it shows the ping statistics, including the total number of packets sent, total packets received, percentage of the packet loss, and total time.
If a packet was dropped in the network, then there is a network issue. Use the traceroute command to identify the source of the packet loss, which will help the administrators to fix the issue.
Ping does not return any output if it can not establish a connection. This could happen if the destination IP address is not active. The ICMP traffic may also be blocked by a firewall, or the server might be configured to not respond to the ping requests.
Can You Ping HTTPS?
Yes, you can get a reply from an HTTPS server if the ICMP replies are enabled on the server. The Linux ping command uses ICMP protocol, which belongs to the TCP/IP layer and is lower than both HTTPS and HTTP. It does not matter which protocol is used on the server, ping can get response from the HTTPS server.
How to Ping from the Terminal?
The ping command is very easy to use. Follow these steps to ping a server:
1. Open a terminal window.
2. Enter ping followed by the hostname or the server IP address:
ping <hostname as test.com>/<IP address as 192.168.2.1>3. Press the Enter key on your keyboard.
Ping Command in Linux Examples
If you are unable to reach a remote server, website, or a machine, then use the ping commands to check the connection. The following examples show you how to use the Linux ping command with different options:
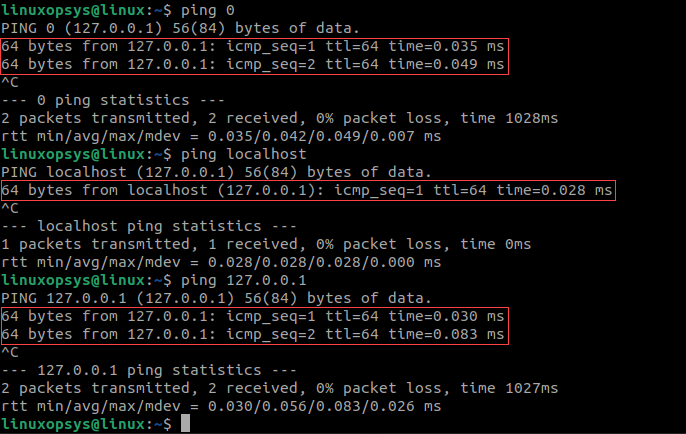
1. Using localhost
To check your connection if you are unable to connect to host, then you can ping localhost using any of the following options:
- ping localhost – Use the localhost name, which is usually localhost. When you use this command, you instruct the command to ping to your own computer.
- ping 0 – This is the fastest way to ping localhost. This command resolves your computer’s IP address and shows the output.
- ping 127.0.0.1 – This is the direct way to ping your localhost by providing the IP address of your computer.
The output of these commands will be almost the same:
2. Send N Number of Packets
By default, the ping command keeps sending packets until you use ctrl + C to interrupt it. Use the -c option to limit the number of packets sent by the ping command:
ping -c 1 yahoo.com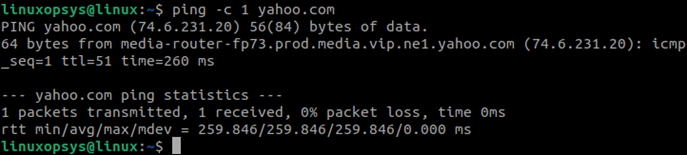
3. From An Interface
By default, the ping command sends ICMP packets using the default route. However, if multiple interfaces are available on your Linux computer, then you can use the -I option to specify the interface that you want to use with the ping command:
ping -I em2 yahoo.com4. Using IPv6
The ping command uses either IPv4 or IPv6 protocol, based on the default DNS settings of your Linux computer. To use the IPv6 internet protocol with the ping command, use the -6 option:
ping -6 yahoo.comOr
ping6 yahoo.comThis command works only if the IPv6 is configured on your computer.
5. Using IPv4
Similar to IPv6, you can also instruct the ping command to use the IPv4 internet protocol forcefully, using the -4 option:
ping -4 yahoo.comOr
ping4 yahoo.com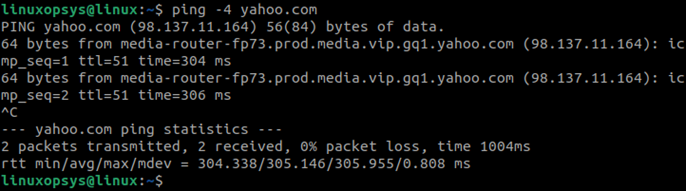
6. Specify the Size of a Data Packet
The default packet size for ping is 56 (86) bytes. You can use the -s option of the ping command to specify size of the packet, either larger or smaller than the default value. For example, to send a packet of 500 bytes, use the following command:
ping -s 500 yahoo.com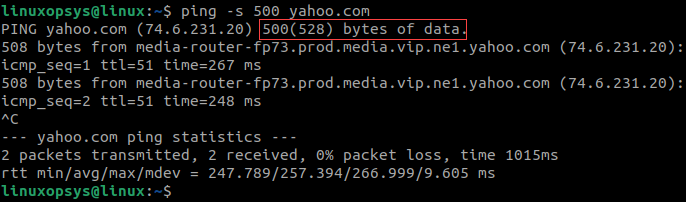
7. Set the Time Interval
By default, the interval between every request is one second. You can use the -i option to increase or decrease the time interval between ping requests. For example:
ping -i 2 yahoo.com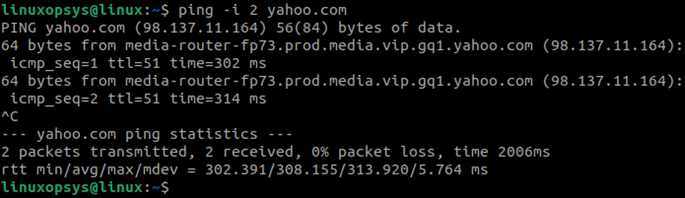
8. Set the Timeout
You can specify the time amount after which the Linux ping command stops sending packets using the -w command. To stop displaying the ping command after 4 seconds, use the following command:
ping -w 4 yahoo.com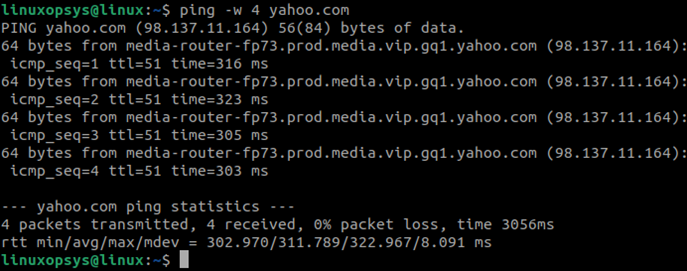
9. Ping Flood
To flood with the ping command to check your network performance, use the -f option:
sudo ping -f yahoo.com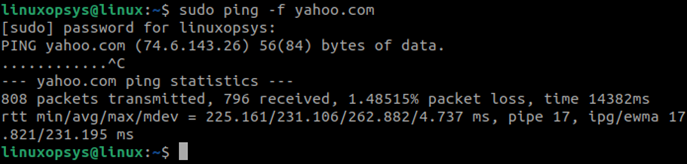
In this output, the command prints a dot for every packet that is sent, and a backspace for every packet that is received. After you interrupt the command, you get a summary of all the statistics.
10. Set TTL
The default Time to Live (TTL) for a request is 256 hops (an occurrence of sending a message). You can set TTL per your specific network requirements:
ping -t 64 yahoo.com
11. Determine mtu
Maximum Transmission Unit or MTU is the sum of the packet size and the overhead. The ICMP headers have an overhead of 8 bytes. For example, to specify a packet size of 9000 bytes, you need to provide the packet size as 9000-8=8992.
If the network MTU is set to a lower value and you specify a higher value, then you get an error:
ping -M do -s 8992 yahoo.com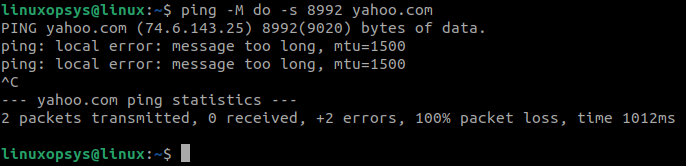
As shown in this output, the MTU on this system is 1500.
12. Do Not Fragment Ping
By default, Ubuntu and several other Linux distributions are set to “do not fragment” bit set. If it is not set in your distributions, then use the -D option.
ping -D -s 256 yahoo.com13. Set Time to Wait for Response
To set a timeout for the ping command results, use the -w option:
ping -w 30 test.com
The ping command waited for 30 seconds for a response and then exited.
14. Make Audible Ping
To instruct your system to make a sound when the ping command receives a response from the target server, use the -a option:
ping -a yahoo.com15. Add Timestamp
Use the -D option to add a timestamp to the ping responses:
ping -D yahoo.com
16. Get Only Summary
To display only the summary of the ping results, instead of showing a line item for each response, use the -q option:
ping -q yahoo.com
Ping Options
Here are some of the most frequently used ping options in Linux:
-c: Specifies the number of packets to send before stopping the command.-i: Sets the interval between sending each packet.-s: Specifies the size of the ICMP packets in bytes.-t: Sets the Time-to-Live (TTL) value for the packets.-q: Suppresses most of the output and only displays a summary.-W: Sets the timeout for waiting for a reply in seconds.-v: Increases the verbosity of the output.-A: Audible ping. This option makes a sound for each successful response, providing an audible notification of successful pings.-I: Specifies the source IP address to use when sending the ping packets.


About The Author
Subhash Chandra

Subhash Chandra, an Oracle Certified Database Administrator and professional writer, works as a Consulting User Assistance Developer at Oracle, bringing over 15 years of experience to the role. He enjoys sharing his technological passion through how-to articles, simplifying complex concepts in Linux, Windows, Mac OS, and various other platforms and technologies for a wide audience.
Comments