
When working large filesystem we need quick and efficient tools to search files.
The find is a powerful tool used in Linux to search files and directories. It can search directory tree ie directories and subdirectories based on expression or condition.
In this guide, we learn about the find command in Linux with examples.
Syntax
The basic syntax of the find command is:
find [options] [search-start-point] [expression]Where,
- [Options] : Alter the behavior of find. Examples -L (follow all symlinks), -depth , -maxdepth levels, etc.
- [search-start-point] : This is where find look to start searching.
- [expression] : It specifies the criteria for the file and directory to get matched. Examples: -name pattern, -type type, -mtime n, -perms mode, etc. The expressions can be combined with operators (such as -and, -or, -not). Find applies test conditions for the expressions, when true is returned it is considered matched.
The default output (-print) of find command is to print pathnames of the matched file to the standard output followed by a newline. Instead of separating the filenames with newline characters, can use print0 to separate them with a null character.
Search Start Point
The search point tells the find command where to start the recursive search.
Start point as Current Directory: By default find command uses the current directory as the start point of the search. Or you can explicitly mention using a dot ('.').
Example:
find -name myfile.txt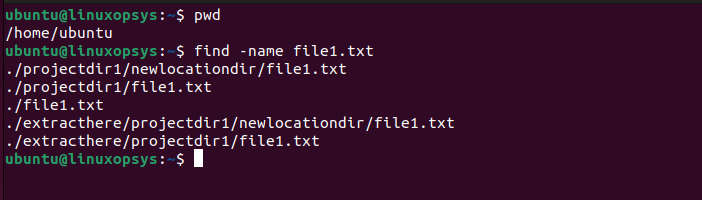
This command by default search file1.txt in the current directory and its subdirectories.
Start point as Specific Directory: You can specify the absolute or relative path as the location of the search start search. Example of the absolute path "/home/ubuntu". Example of the relative path - relative to the current directory "./subdir1".
Example:
find /home/ubuntu -name file1.txt
This command search file1.txt in the /home/ubuntu directory and its subdirectories.
cd /home/ubuntu
find ./myprojects -name myfile.txt
This command search myfile.txt in the myprojects directory located in the current directory as well its subdirectories.
Start point as Root Directory: Use / to tell find to search from root directory.
Example:
find / -name myfile.txtThis command search myfile.txt from / and all its subdirectories. That means it searches the entire filesystem.
You may see in the output permission denied messages, this mostly happens due to the permission issue. You can hide those messages by suppressing them by adding 2>/dev/null to the end of the command.
Search multiple directories: Provide each directory path separated by space.
Example:
find . dir1 /path/to/dir2/ /path/to/dir3 -name file1.txt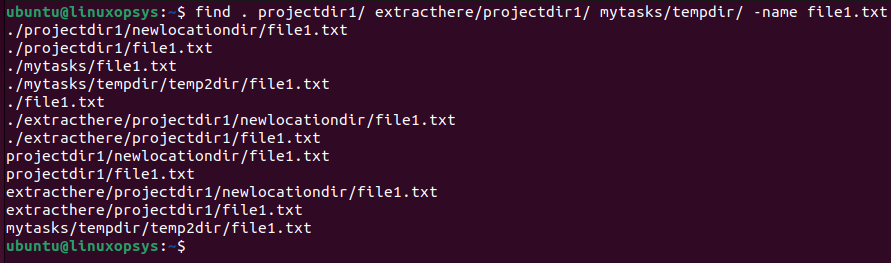
This searches the file named file1.txt in multiple directories and its subdirectories named projectdir1, extracthere/projectdir1, and mytask/tempdir.
Controlling the Depth of Search
By default find command search current directory and all its subdirectories. You can use -maxdepth and -mindepth options to control the depth of the search.
- -maxdepth levels: Controls level deep the find command can explore. Default find starts from level 0 and its subdirectories are level 1 and so on. Since
.(the current directory) is level 0, -maxdepth 1 means going one level deep from there - which is the immediate subdirectories. But because -maxdepth 1 also includes level 0, the files in the current directory will be included in the search. - -mindepth levels: Not apply any tests or actions at levels less than levels.
Examples:

To search the current directory and its immediate subdirectories for files that are owned by the user ubuntu.
find . -maxdepth 1 -user ubuntu
To search for files owned by the user ubuntu by start applying its tests and actions from the second level of directories below the starting point.
find . -mindepth 2 -user ubuntu
Search Criteria
Using the find the command you can use different search criteria to fine-tune search results. Let's look into some of the common use cases with examples.
Searching by File Name
One of the most common uses of find is to search for files by its name. It's done using the -name test.
Examples:
To find a file named myproject.txt in /home/ubuntu and its subdirectories:
find /home/ubuntu -name projectdata.txt
To find all files with extension .txt in the current directory and its subdirectories:
find . -name "*.txt"
To find all files that start with the name "project" in the entire filesystem, use:
find / -name "project*"
Note: The -name test is case-sensitive. To ignore the case replace -name with -iname. So in the above example, it can search "PROJECT", Project, PRoject, etc.
Searching by File Type
The find command can search files based on their type using -type test. Some of the file types are follows:
ffor regular filesdfor directorieslfor symbolic linkscfor character devicesbfor block devicessfor local socketspfor named pipes (FIFOs)
Let's look into some examples on using -type in find.
Examples:
To find all directories in the current directory and its subdirectories, use:
find . -type d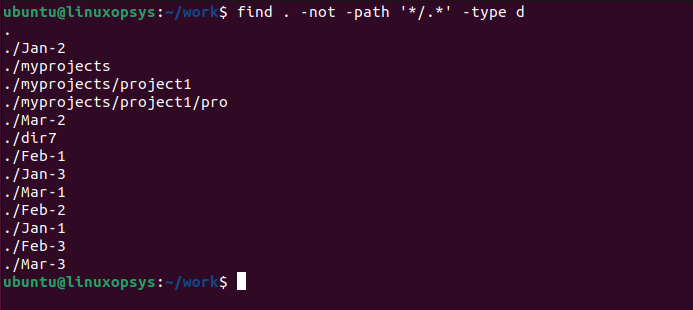
You can also use -d option of ls command for the same purpose but only in the current directory. If you see lots of hidden files or directories and want to exclude them from the search add -not -path '*/.*' to the command.
Let's look into another example to find all regular files under /home/ubuntu/work and its subdirectories:
find /home/ubuntu/work -type f
Searching by File Size
The find command, use -size test to search files by size to match.
You can precede the size by + or - to find files greater than or less than the specified size. Without it, you can search for specific sizes.
Size units:
cfor byteskfor KilobytesMfor MegabytesGfor Gigabytesbfor 512-byte blocks (this is the default if no suffix is used)
Examples:
To find all files in /home/ubuntu with an exact size of 50 Kilobytes in size, type
find /home/ubuntu -size 50kTo find all files in the entire filesystem greater than 1 Megabyte in size, use:
find / -size +1MSearching by Modification Time
The find uses a few tests to search files by modification time such as -mtime and -mmin.
- -mtime n : Used to search for files that were modified n x 24 hours ago. Where n for the exactly n, +n more than n and -n less than n.
- -mmin n : For more precision, you can use this, which specifies time in minutes instead of days.
Examples:
To find files modified greater than 24 hours ago:
find . -mtime +0This command will print a list of files in your current directory and its subdirectories that were modified more than 24 hours ago. It's important to note that, because of rounding, find -mtime +0 will not find files modified within the same day.
To find files modified between now and 1 day ago
find . -mtime 0This searches for files in the current directory (and its subdirectories) that have been modified from 0 to 24 hours ago (ie within the past day).
To find files modified less than 1 day ago
find . -mtime -1This is the same as -mtime 0.
To find files modified between exactly 1 day ago, but less than 2 days ago:
find . -mtime 1searches for files in the current directory (and its subdirectories) that have been modified between 24 and 48 hours ago.
To find files modified more than 1 day ago:
find . -mtime +1This command searches for files in the current directory (and its subdirectories) that have been modified more than 48 hours ago. Note: The find command treats time in a way that rounds down to the nearest day. Therefore, when using -mtime +1, it includes files modified more than 2*24 hours ago.
The same way you can use -mmin, the only difference is in the units of time. It allows you to specify time in minutes rather than days.
Similarly, you can use other timestamps such as -atime (last access time) and ctime (file's metadata is changed) to search files.
Searching by User Ownership
Use -user option to find files based on their ownership. This helps if you are an administrator and need to find files owned by a specific user or files owned by you.
Examples:
Find all files owned by the user "ubuntu" in the current directory:
find . -user ubuntu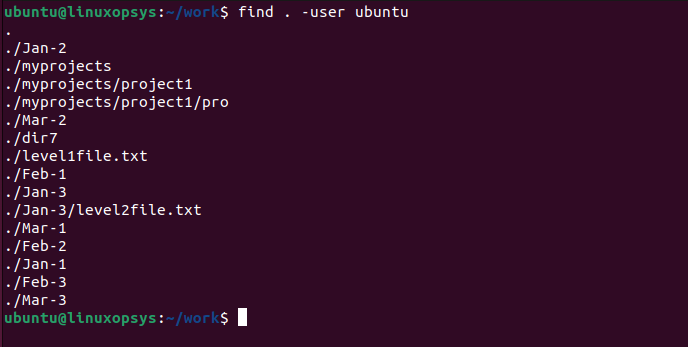
This command find all files owned by the user "ubuntu" in the current directory and its subdirectories. Remember the find command treats directories as files by default. Therefore, when you run find . -user ubuntu, it will include both regular files and directories that are owned by "ubuntu" in its output.
You can restrict to search only regular files owned by user "ubuntu":
find . -type f -user ubuntuSearching by Group Ownership
Similarly, you can search files based on group ownership using -group option. This helps to search files or directories belonging to a specific group.
Examples:
To find all files belonging to the group developers in the current directory and its sub-directories:
find . -group developersTo search for only directories that belong to the group developers, use:
find . -type d -group developersCase Insensitive Search
By default, find is case sensitive when searching using -name option. If you want to search case-insensitively use the -iname option.
Example:
find . -iname "file1.txt"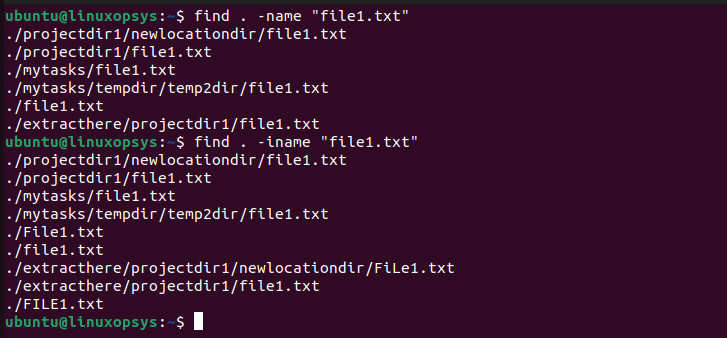
This command prints paths of all files in the current directory (and its subdirectories) that are named "samplefile.txt", regardless of case.
Using Wildcards in the find Command
The find command support using wildcards which enables you select filenames based on patterns of characters. The * and ? are the commonly used wildcards. Let's look at some examples to understand it.
To find all files ending with .txt in the current and subdirectories:
find . -name "*.txt"To find all files start with the name "sample" in the current and subdirectories:
find . -name "sample?.txt"To find all files that start with "sample", followed by any single character and ending with .txt extension:
find . -name "sample?.txt"Options in the find Command
Some of the commonly used options of find are shown in the following table:
| Options | Description |
|---|---|
-name | Search by file name. |
-iname | Search by filename but ignore case. |
-type | Search by file type. |
-size | Search by file size. |
-mtime | Search by file modification time. |
-exec | Execute specific command for file match. |
-user | Search file by specific user. |
-group | Search file that belong to group. |
-perm | Search file by permission. |
-maxdepth | Limit the depth of find explores. |
Actions with find Command
The find command can take action when the file matches the search criteria. Some of the commonly used actions are -delete, exec, and print0. Let us show some examples to understand actions by find.
Example:
To delete all files with .bak extension that are older than 7 days:
find . -name "*.bak" -mtime +7 -delete
Find .png files and move them to /tmp directory:
find . -name "*.png" -exec mv {} /tmp/ \;Note: Be careful when using -exec, especially when using the delete action, you may replace -exec with -ok which will give a prompt before the action.
You can perform very complex operations by combining find with other Linux commands. For example to find to all .log files and create a gzipped tar archive logarchive.tar.gz, use:
find . -name "*.log" -print0 | xargs -0 tar -cvzf logarchive.tar.gz

Comments