
The dig command in Linux is a DNS (Domain Name System) tool used for querying DNS servers to retrieve information about domain names. Its primary usage is to resolve domain names to IP addresses or retrieve various DNS records like A (IPv4 address), MX (Mail exchange), CNAME (Canonical name), and more. dig utilizes the operating system's resolver libraries, making it more reliable and consistent across different systems.
Let's look further into dig command in Linux.
Syntax
The basic syntax of the dig command:
dig [OPTIONS] [NAME] [TYPE]Where,
NAME: The domain name or IP address you want to query.TYPE: The type of DNS record you want to query.
OPTIONS are optional, specifying at least the NAME and TYPE is necessary for most dig queries:
+short: Provides concise output.+trace: Traces the DNS query process from root servers to authoritative servers for detailed resolution path information.+stats: Displays query statistics, including query time and response size.@server: Specify a specific DNS server to query.-x: Performs a reverse DNS lookup based on an IP address.+tcp: Forces the use of TCP for the DNS query, suitable for large responses or when UDP is blocked.+class: Specify the DNS class for the query (default is "IN").+comments: Displays comments in DNS responses for additional information.+question: Shows the question section of the DNS response.+answer: Displays the answer section of the DNS response.+authority: Shows the authority section of the DNS response.+additional: Displays additional information in the DNS response.+noquestion,+noanswer,+noauthority,+noadditional: Hide specific sections in the DNS response.+nocl: Hides the class in DNS records.+nocmd: Hides command information in the output.+nocomments: Hides comments in DNS responses.+nostats: Hides query statistics.+noall: Hides all sections except for the answer section.ANY: Request all available DNS record types.
Installation
dig utility comes preinstalled in all modern Linux distributions. In case not found, you can easily install using the package manager of the Distro.
sudo apt install dnsutils    ###Debian and Ubuntu
sudo dnf install bind-utils  ###Fedora
sudo yum install bind-utils  ###Red Hat Enterprise Linux (RHEL)
Basic Usage
The dig command, when used with just the domain name, performs a basic DNS query to retrieve information about the domain "yahoo.com."
The default behavior is to query for the A (IPv4 address) record of the domain.
dig yahoo.com
Output:
; <<>> DiG 9.18.12-0ubuntu0.22.04.3-Ubuntu <<>> yahoo.com
;; global options: +cmd
;; Got answer:
;; ->>HEADER<<- opcode: QUERY, status: NOERROR, id: 40184
;; flags: qr rd ra; QUERY: 1, ANSWER: 6, AUTHORITY: 0, ADDITIONAL: 1

;; OPT PSEUDOSECTION:
; EDNS: version: 0, flags:; udp: 65494
;; QUESTION SECTION:
;yahoo.com.                     IN      A

;; ANSWER SECTION:
yahoo.com.              1650    IN      A       74.6.231.21
yahoo.com.              1650    IN      A       98.137.11.164
yahoo.com.              1650    IN      A       98.137.11.163
yahoo.com.              1650    IN      A       74.6.143.25
yahoo.com.              1650    IN      A       74.6.143.26
yahoo.com.              1650    IN      A       74.6.231.20

;; Query time: 0 msec
;; SERVER: 127.0.0.53#53(127.0.0.53) (UDP)
;; WHEN: Tue Dec 05 01:51:35 UTC 2023
;; MSG SIZE  rcvd: 134
In the output:
- The very first line represents the installed version of dig.
- The second line represents global options.
- The next three lines represent technical details of the response received from the server, including opcode and status.
- The new versions also display OPT PSEUDOSECTION information.
- The QUESTION section in the dig command output shows the DNS query.
- The ANSWER section shows the answer to the DNS query.
- The last dig output section shows query statistics.
Example 1: Querying an A Record
dig google.com AExample 2: Querying an MX Record
dig example.com MXQuery Types
Here are some common query types:
A: IPv4 address record.AAAA: IPv6 address record.MX: Mail exchange record.CNAME: Canonical name record.CAA: Certificate Authority Authorization record.TXT: Text record.NS: Name server record.SOA: Start of authority record.PTR: Pointer record (reverse DNS lookup).
Examples 1:
dig yahoo.com NS
In this example, you can see the NS records for "yahoo.com," which specify the authoritative name servers responsible for the domain. The NS records indicate that "ns1.yahoo.com" and "ns2.yahoo.com" are the authoritative name servers for "yahoo.com."
Example 2:
dig txt _dmrc.yahoo.comThe above command queries TXT records associated with "_dmrc.yahoo.com" and checks if there is a DKIM (DomainKeys Identified Mail) record.

List All DNS Records
dig yahoo.com ANYTo list all DNS records for the domain "yahoo.com" with the ANY query type.

Some DNS servers may limit the response or omit certain record types for security or performance reasons. so cannot expect all records always.
Query Specific DNS Servers
You can specify a DNS server to query using the @ symbol. This way you can override the system's default DNS server settings (/etc/resolv.conf file) and query the specific DNS server.
Example:
dig @ns1.yahoo.com yahoo.com AThis command sends a query to the "ns1.yahoo.com" DNS server specifically for the A record of "yahoo.com."
Reverse DNS Lookup
You can perform a reverse DNS lookup using the -x option followed by the IP address.
Example:
dig -x 209.132.183.81
Here dig command performs a reverse DNS lookup for the IP address "209.132.183.81"
Query Multiple Domain
To query multiple domains at once by providing a list of domain names in a text file, and then using the -f option to specify the file containing the list.
Example:
dig -f domains.txt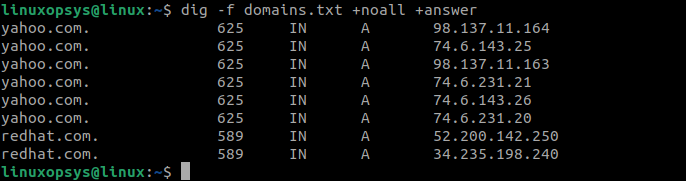
Here the command reads the list of domain names from the domains.txt file and performs DNS queries for each domain listed.
Tracing
You can use +trace option to trace the entire DNS server path from the root servers down to the authoritative name servers for the queried domain. This can help diagnose DNS resolution issues and understand the DNS hierarchy.
Example:
dig yahoo.com +traceUsing ~/.digrc file
The ~/.digrc configuration file is generally used to place certain options to get output more readable and tailored to your preferences.
Example .digrc file:
cat ~/.digrc
+noall +answer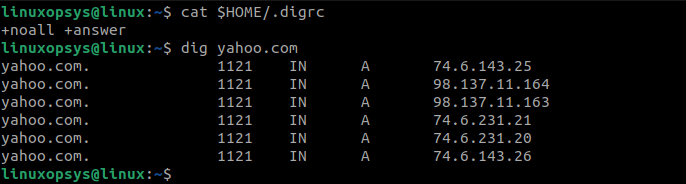
This configuration is useful for obtaining a simplified and focused output when using the dig command.


About The Author
Subhash Chandra

Subhash Chandra, an Oracle Certified Database Administrator and professional writer, works as a Consulting User Assistance Developer at Oracle, bringing over 15 years of experience to the role. He enjoys sharing his technological passion through how-to articles, simplifying complex concepts in Linux, Windows, Mac OS, and various other platforms and technologies for a wide audience.
Comments