
The shred command in Linux is used to securely delete files making data recovery extremely difficult.
How does the shred command work? Shred overwrites a file's data randomly and repeatedly. Additionally, it allows overwriting with zeros if required. The effectiveness of the shred command in securely deleting data relies on the underlying filesystem's behavior.
Syntax
The basic syntax of the shred command
shred [options] [filename]Some of the useful options are:
-f, --force: Change permissions to allow writing if necessary-n, --iterations=N: Specifies the number of iterations to overwrite the file's content (default is 3).-s, --size=N: Shred only N bytes of the file.-u, --remove: After shredding, remove the file.-v, --verbose: Display progress information while shredding.--random-source=FILE: Use FILE as a source of random data (default is /dev/urandom).zor--zero: Add a final overwrite with zeroes to hide the shredding process.
Examples of Using shred
1. Securely delete file by overwriting content
$ shred file.txtThis securely deletes the file by overwriting its contents with random data. By default, it will perform three iterations (passes) of overwriting. After shred is completed, the file will be marked for deletion. You can use rm to delete the file.
For verbosity you can add -v option:
$ shred -v file.txt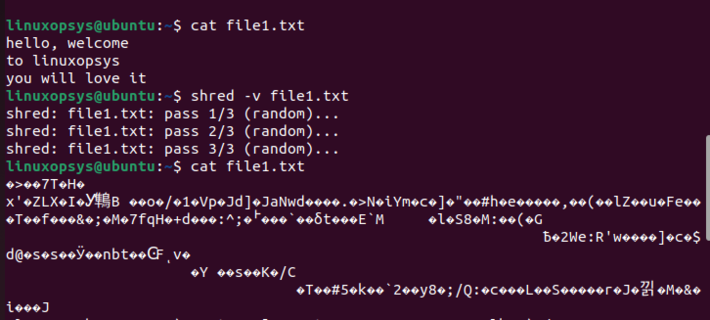
To shred and delete the file use -u option:
$ shred -uv file.txt
shred: file.txt: pass 1/3 (random)...
shred: file.txt: pass 2/3 (random)...
shred: file.txt: pass 3/3 (random)...
shred: file.txt: removing
shred: file.txt: renamed to 00000000
shred: 00000000: renamed to 0000000
shred: 0000000: renamed to 000000
shred: 000000: renamed to 00000
shred: 00000: renamed to 0000
shred: 0000: renamed to 000
shred: 000: renamed to 00
shred: 00: renamed to 0
shred: file.txt: removed
$ ls file.txt
ls: cannot access 'file.txt': No such file or directory
$
2. Shred with Specific Number of Iterations
You can use the -n option to specify the number of iterations (passes) for overwriting the file's contents. The default is 3 iterations, but you can increase this number for added security. Generally, the default 3 pass is good enough.
$ shred -n 4 -u -v file1.txtshred: file1.txt: pass 1/4 (random)... shred: file1.txt: pass 2/4 (ffffff)... shred: file1.txt: pass 3/4 (000000)... shred: file1.txt: pass 4/4 (random)... shred: file1.txt: removing shred: file1.txt: renamed to 000000000 shred: 000000000: renamed to 00000000 shred: 00000000: renamed to 0000000 shred: 0000000: renamed to 000000 shred: 000000: renamed to 00000 shred: 00000: renamed to 0000 shred: 0000: renamed to 000 shred: 000: renamed to 00 shred: 00: renamed to 0 shred: file1.txt: removed
Here,
-n 4: Specifies that shred should perform 4 iterations (passes) of overwriting the file's contents with random data. From the output, you can see it passes 4 times (4/4).-u: After shredding, mark the file for deletion (unlink).-v: Verbosely display the progress of the shredding process.
2. Final overwrite contents with zeroes
When you use -z option, it will securely overwrite the file's contents with random data and then it will perform a final overwrite of the file's contents with zeroes.
Example:
$ shred -v -n 4 -z -u file1.txt
shred: file1.txt: pass 1/5 (random)...
shred: file1.txt: pass 2/5 (ffffff)...
shred: file1.txt: pass 3/5 (000000)...
shred: file1.txt: pass 4/5 (random)...
shred: file1.txt: pass 5/5 (000000)...
shred: file1.txt: removing
shred: file1.txt: renamed to 000000000
shred: 000000000: renamed to 00000000
shred: 00000000: renamed to 0000000
shred: 0000000: renamed to 000000
shred: 000000: renamed to 00000
shred: 00000: renamed to 0000
shred: 0000: renamed to 000
shred: 000: renamed to 00
shred: 00: renamed to 0
shred: file1.txt: removed
In the fifth line (5/5) you can see file1.txt is zeroed.
3. Recursively shred an entire directory
To recursively shred an entire directory and its contents, you can make use of find command in combination with shred. There is no direct way of doing it.
Example:
$ find /mnt/data -type f -exec shred -v -n 4 -z -u {} \;The above command securely deletes all files (recursively) within the /mnt/data directory and its subdirectories by overwriting their contents with random data, renaming them with zeroes, and marking them for deletion, leaving only the directory structure intact.
Shred a Device or Partition
Please use this command with caution, as it will irreversibly erase all data on the specified device or partition. Double-check your device name to ensure you are targeting the correct one.
Example:
shred -v -n 1 -z /dev/sdXWhere,
/dev/sdX: Replace sdX with the actual device or partition you want to shred.
The effectiveness of the shred
The effectiveness of the shred command in securely deleting data relies on the underlying filesystem's behavior. The assumption is that the filesystem overwrites the data in place, making it difficult or impossible for data recovery. However, in certain filesystems and storage configurations, this assumption may not hold, and data recovery may still be possible.
- Log-Structured or Journaled Filesystems: Filesystems that use log-structured or journaled techniques may not overwrite data in place, potentially allowing for data remnants to exist even after using shred. In ext3 with the data=ordered and data=writeback modes, data is written to data blocks first, and then the metadata is updated. In these modes, shred is more effective because it overwrites the data blocks, and there's less chance of remnants being stored in the journal.
- Filesystems with Redundant Data Setups (RAID): In RAID configurations or other redundant setups, data may be stored redundantly across multiple drives. Shredding one copy of the data may not affect the other copies.
- Filesystems that Make Snapshots: Some filesystems support snapshots, which are point-in-time copies of the filesystem. Data may still exist in snapshots even after using shred on the active filesystem.
- Filesystems with Caching: Filesystems that use caching mechanisms may temporarily store data in cache, making it possible to recover data if it hasn't been flushed to disk.
- Compressed Filesystems: Compressed filesystems may store data in a compressed format, and even if you overwrite a file, remnants of the original data might exist in the compression history.
- Flash-Based Storage and SSDs: Flash-based storage devices, including solid-state drives (SSDs), have wear-leveling mechanisms that can move data around in the background. This can make it difficult to ensure that data is overwritten in place.
shred vs rm
Shred and rm are used to remove a file from file systems. However, they have two main differences.
The rm command only deletes the pointer to a given file system, but that doesn't wipe the data from the disk. However, a shredded file has its data overwritten several times, making it unrecoverable.
rm command is faster at deleting files, as only the pointer gets removed. However, shredding takes time as the data in the file has to be randomly overwritten before you optionally delete the file.


About The Author
Bobbin Zachariah

Bobbin Zachariah is an experienced Linux engineer who has been supporting infrastructure for many companies. He specializes in Shell scripting, AWS Cloud, JavaScript, and Nodejs. He has qualified Master’s degree in computer science. He holds Red Hat Certified Engineer (RHCE) certification and RedHat Enable Sysadmin.
I used the shred command to wipe my hard drive on my Linux mint system. The problem is, now I can’t reinstall a new version of Linux or use the hard drive at all.
All I get is a message saying “invalid partition table”. I can get to the bios setup, and try numerous methods and settings, but nothing works. It appears the hard drive is toast now.
Hi Norman,
If its already on UEFI still not working.
Use live USB and then run boot repair.
Verify UEFI partition already exists, if not need to create