
In this guide, we learn how to take a screenshot in Arch Linux. By default Arch installation (GUI) comes with a screenshot utility. But there are other efficient and simple third-party utilities to take a screenshot on Arch Linux and other Linux distributions.
Below listed are the default keyboard shortcuts which work on UI across all Linux Distros.
PrtScn - Take a screenshot of the entire screen and save it to the users home 'Pictures' directory.Shift + PrtScn - Take a screenshot of a section of the screen.Alt + PrtScn - Take a screenshot of the active window to users' home 'Pictures' directory.Ctrl + PrtScn - Take a screenshot of the whole screen to the clipboard.Shift + Ctrl + PrtScn - Select a specific area to the clipboard.Ctrl + Alt + PrtScn - Take a screenshot of the active window to the clipboard.
Prerequisites
1. Arch Linux installed with GUI
2. Internet connection to download the tools
1. The default way to take a screenshot in Arch Linux
The Arch Linux installation (Pantheon UI) comes with a simple screenshot utility. You can go to software and search for “screenshot” and launch it.
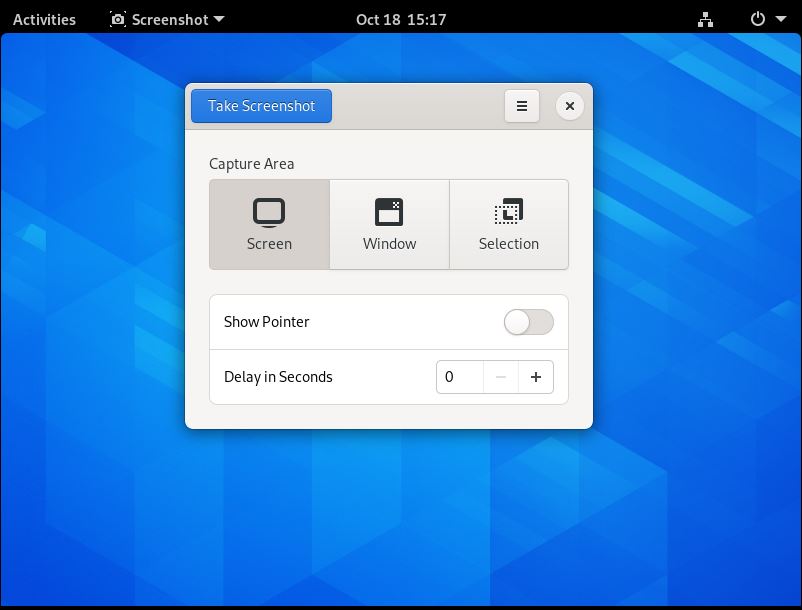
Features:
• Come up in GUI desktop installation, no need to separate install.
• Capture area: Screen, window and Selection.
• Delay your screen capture.
• Ability to show/hide mouse pointer in screenshot
2. Take Screenshot using Ksnip tool
Ksnip is a cross-platform, free screenshot tool that provides many annotation features for your screenshots.
Installation
1. Install snap with the following
git clone https://aur.archlinux.org/snapd.git
cd snapd
makepkg -si
2. Once installed, the systemd unit that manages the main snap communication socket needs to be enabled.
sudo systemctl enable --now snapd.socket3. Create symbolic link
sudo ln -s /var/lib/snapd/snap /snap4. Install ksnip
sudo snap install ksnipYou may need to restart the system to work correctly. Search ksnip and you can launch by clicking on it.
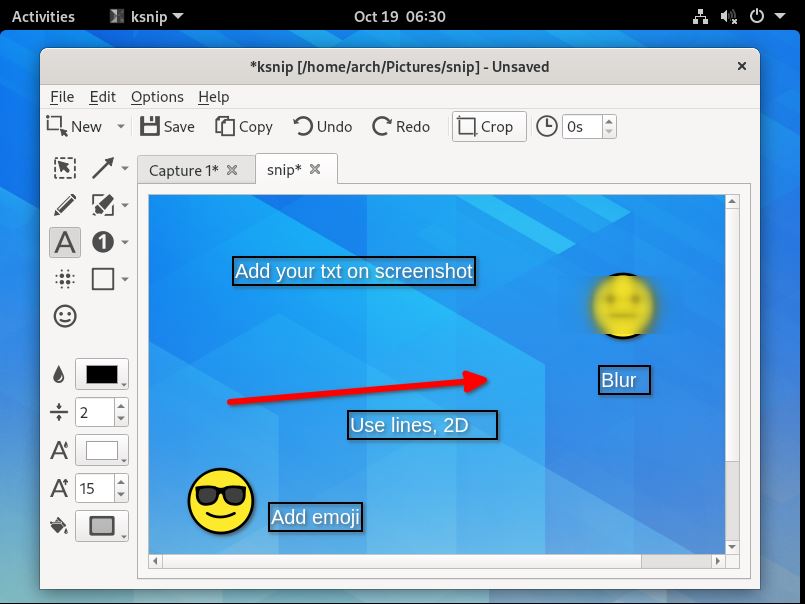
Features:
• Taking screenshot of a custom rectangular area, screen/monitor, under mouse cursor also.
• Customizable capture delay for all capture options.
• Upload screenshots directly to imgur.com in anonymous or user mode.
• Command line support, for taking screenshot and saving it to default location, filename and format.
• Annotate screenshots with pen, marker, rectangles, ellipses, texts and stickers.
• Add watermarks to captured images.
• Blur the selection.
3. Take screenshots using Spectacle
Spectacle is a simple KDE application for capturing desktop screenshots. It can capture the whole screen, a specified region, an individual window, or only part of a window.
Installation
1. Install snap with the following:
git clone https://aur.archlinux.org/snapd.git
cd snapd
makepkg -si
2. Once installed, the systemd unit that manages the main snap communication socket needs to be enabled.
sudo systemctl enable --now snapd.socket3. Enable the symbolic link.
sudo ln -s /var/lib/snapd/snap /snap4. Install Spectacle
sudo snap install spectacleYou may need to restart the system to work correctly. Search Spectacle and you can launch by clicking on it.
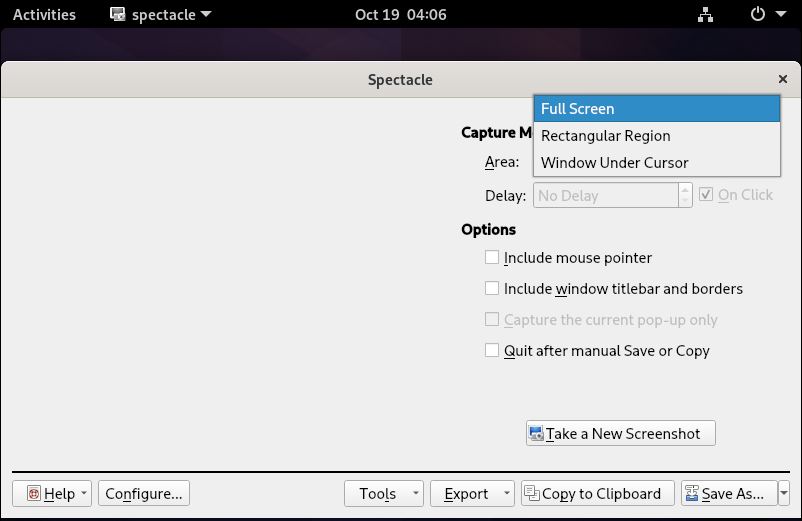
Features:
• Capture Entire Desktop, current monitor, rectangular or active window
• Keyboard shortcuts for taking screenshots
• Include or exclude mouse pointer
4. Take screenshots using Flameshot
Flameshot, a simple and powerful, feature-rich screenshot tool for Unix-like operating systems. It is a completely free and open-source tool and also has a CLI version, so you can take screenshots from command line as well.
Installation
1. Flameshot is available in the community repository of Arch Linux. Make sure you have enabled community repository and install Flameshot using pacman as shown below:
sudo pacman -S flameshotNow, you can launch by just searching flameshot.
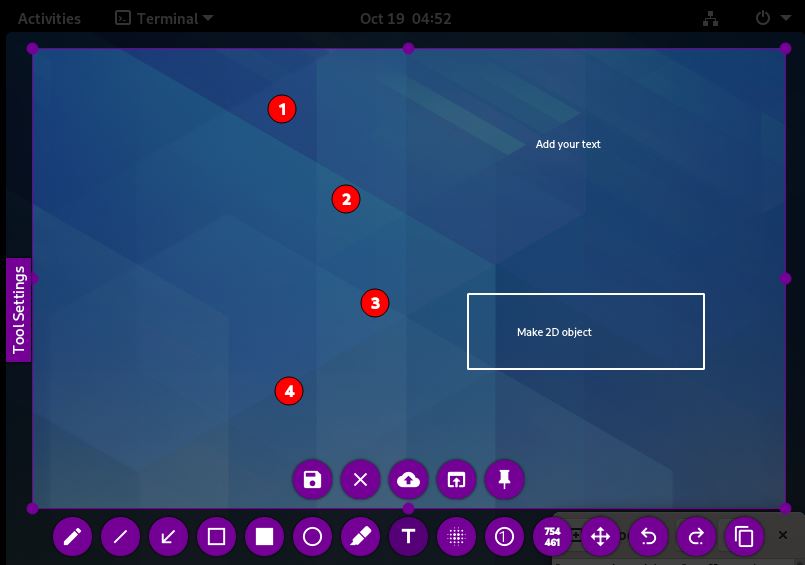
Features:
• Annotate (highlight, point, add text, box in)
• Blur part of an image
• Crop part of an image
• Direct upload to [imgur] https://imgur.com/
• Mark you step with number on just click
• Add 2D image to your screenshot.
5. Taking screenshot in Arch Linux using command-line tools
ImageMagick package comes with a screenshot utility that allows us to take a screenshot from the command line. To take a complete screenshot of your active window, use:
import -window root screenshot1.pngInstall GNOME screenshot allows GNOME users to print from GUI (Apps > Accessories > Take Screenshot) and command line.
For command line type gnome-screenshot, which will take a screenshot and dialog to save it.
gnome-screenshotTo delay 2 mins and take screenshot, run,
gnome-screenshot -w -d 2To select a specific area choose -a option, once run mouse pointer will allow to drag and select portion.
gnome-screenshot -aScrot is a tool that helps to take screenshots from CLI and set user-defined delay period.
To take a screenshot of the complete screen:
scrot picture.pngTo capture a selected portion, run:
scrot -s picture.pngTo set delay and give some more time to capture the image, type:
scrot -u -d 2 picture.pngWhere u option is for the currently active window and d option is for the delay in seconds.
Conclusion
In this guide, we learned how to make use of different tools to take screenshots in Arch Linux. Please let us know if you are using any other screenshot tools which make your life easier.


Comments