
The passwd command used in Linux to change the password of a user account. Using this command, the superuser can change the password of other users and general users can change their own password.
The command works by hashing the input password and comparing it with the stored hashed password to validate the correctness. You can find the default hashing algorithm in /etc/login.defs file and look for the ENCRYPT_METHOD directive.
The encrypted password is stored in /etc/shadow file and a record is stored in /etc/passwd file to indicate that (by 'x' symbol) it's encrypted.
The passwd command interacts with PAM system. Linux uses PAM to develop a modularized authentication mechanism. When you change the password it interacts with the PAM modules files in /etc/pam.d/ directory. You can enforce password complexity in the respective files in that folder (/etc/pam.d/common-password file for Debian system and /etc/pam.d/system-auth for Red Hat based).
Syntax
The basic syntax of passwd command:
passwd [options] [username]You can use various options to change the behavior of passwd command.
The username is the name user to whom you want to change the password. If a username is not provided it will change the password of the currently logged-in user.
Basic Usage
Simply typing passwd and pressing Enter key would change the logged-in user's password. You need to provide your current password to get authenticated for password change.
Example:
passwd
This command change the current password of logged-in user ubuntu (only if the hash value current password match with the stored hash value).
Common Usages
Let's look into the very common usages of passwd command with examples.
Change password of other users
The superuser or account with sufficient privilege ( such sudo user) can change the password for other users by specifying the username.
Note: Typically, on systems that use sudo, you can do this by prefixing the command with sudo. If prompted, enter your own password to authenticate with sudo at first.
Example:
sudo passwd bob
This command will prompt to enter a new password for the user bob. After confirmation, the new password is hashed and stored in /etc/shadow file and replaces the old hashed password.
Locking and Unlocking User Accounts
The password command can be used to both lock and unlock user accounts. Locking prevent the user from logging into the system and unlock restores it.
To lock use -l option with passwd command followed by username.
Example:
sudo passwd -l bob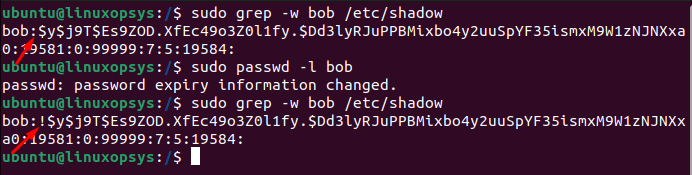
This command locks the user bob from login into the system.
Basically, this command adds an exclamation mark (!) to the password hash in the /etc/shadow file. That means the command actually doesn't change the password instead modifies the entry.
For unlocking a user account use -u or --unlock option. Example:
sudo passwd -u bob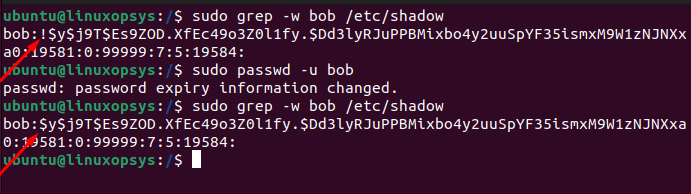
This will remove the exclamation mark from the beginning of the password hash in the /etc/shadow file for the user bob and restore the original hash.
Forcing Password Change on Next Login
To force a user to change the password on next time they log in, use -e or --expire option with passwd command. This would change password's last change date to a date in the distant past. So when the user login again the system recognizes that the password is outdated based on the aging configuration.
Example:
sudo passwd -e bob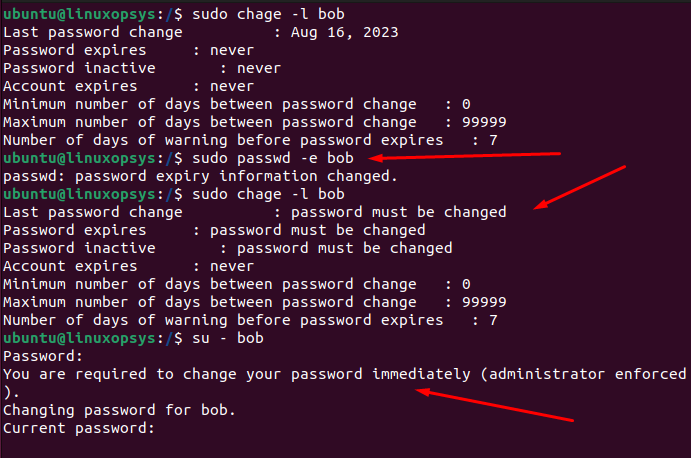
This command force the user bob to change the password on the next log-in to the system.
You can use chage -l username to display aging details for a user. The chage -d 0 [username] will have a similar effect of forcing the user to change their password at the next login.
Options
Here are some options for passwd command to manage user passwords.
-S or --status :
The -S or --status option with passwd command helps to display status information of user's password. This gives a quick view of password status and related information for user accounts from /etc/shadow file.
Example:
sudo passwd -S bob
The output format:
username status last_change_date min_age max_age warning_period inactive_periodWhere:
username: The name of the user.status: A single character that represents the status of the password. It can be:P: The password is present (i.e., the account has a password and is not locked).L: The account is locked (i.e., the password is prefixed with an exclamation mark!in the/etc/shadowfile, preventing login).NP: No password (i.e., the account has no password).
last_change_date: The date of the last password change.min_age: The minimum number of days required between password changes.max_age: The maximum number of days the password is valid (after which it will expire).warning_period: The number of days the user will be warned about an expiring password.inactive_period: The number of days after password expiration that the account will be disabled.account_expiration_date: The date on which the account will be disabled.
If you consider displaying the status report of all user accounts, should use the -a option in conjunction with -S. Example:
sudo passwd -S -a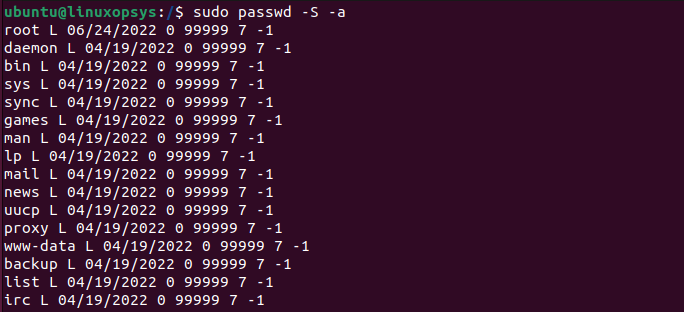
-i or --inactive DAYS :
Use -i option to set inactive period which means number of days after a password has expired during which the account will remain usable. After this period, the account will be disabled, preventing the user from logging in. Basically, this gives a grace period to keep the account active after the defined password expiry date.
Syntax:
sudo passwd -i [DAYS] [username]Example:
sudo passwd -i 10 bob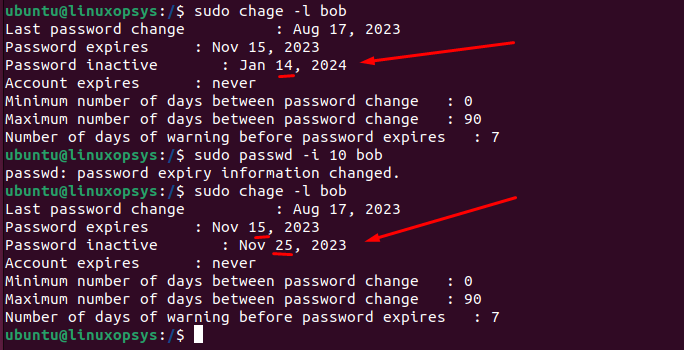
This command gives the user bob a grace period of 50 days after his password expires.
-w or --warndays DAYS :
The -w option with passwd command is used to display a warning message a number of days before the password expires. This gives users a heads-up that their password is expiring soon.
Syntax:
sudo passwd -w [DAYS] [username]
Example:
sudo passwd -w 5 bob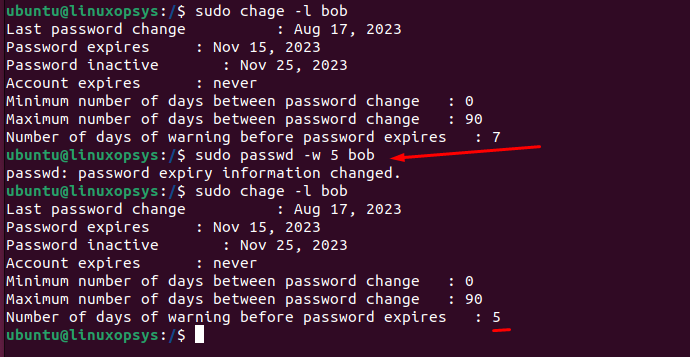
This command set the user bob to receive a warning message 5 days before his password expires.
-x or --maxdays DAYS :
The -x option with passwd command is used to set the maximum number of days the password remains valid. After this period the user would be forced to change the password. By default (as defined in /etc/login.defs file) when a user account is created this maxdays is set to a big number like 99999 ie 273 years. We can change this value.
Example:
sudo passwd -x 90 bob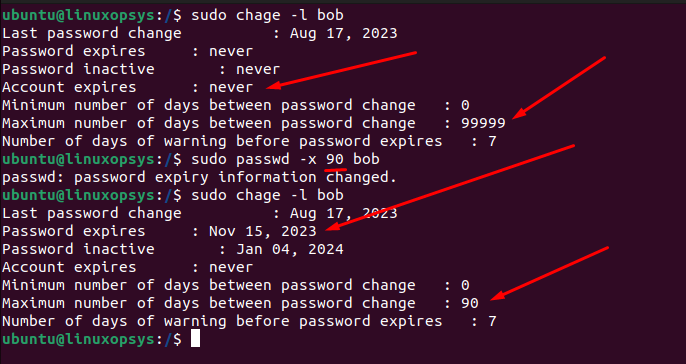
This command means after 90 days when user bob tries to login he would be prompted to change the password.
If you wish to turn off the password expiration you can use -x with -1. And for changing the password for the next login use 0.
Note: The -x option is often combined with -w, -n and -i option to give a comprehensive password aging policy.
-n or --mindays DAYS :
The -n option with passwd command set a minimum number of days between password changes. This means once users change the password they cannot change it again until the specified days passed.
Example:
sudo passwd -n 5 bob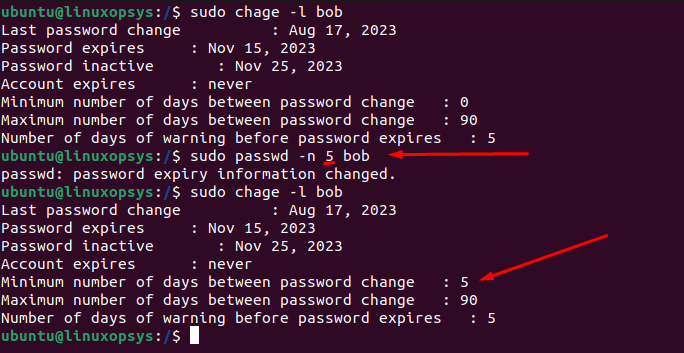
After this command is applied the user bob cannot change the password for next 5 days.
-d or --delete :
The -d option with passwd command is used to delete the password associated with the user account. This makes the user to login to the system without a password.
Example:
sudo passwd -d bob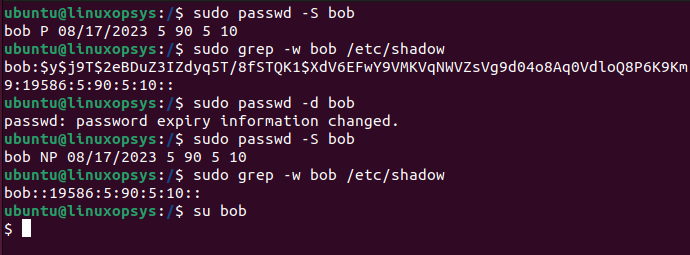
This command delete the password for the user bob. You can verify the record in /etc/shadow file or using -S option of the passwd command.


Comments