
Ulimit (user limit) is a powerful command which helps to limit resources on your system.
Sometimes, but not very often a single user may start too many processes to make the system unstable. To mitigate this we can use ulimit command to limit the number of process each user or group can run.
In this tutorial, we learn how to limit the process at user level on Linux.
Check all current limits
You can check all the limits for the currently logined user.
Run the following ulimit command with -a option:
ulimit -a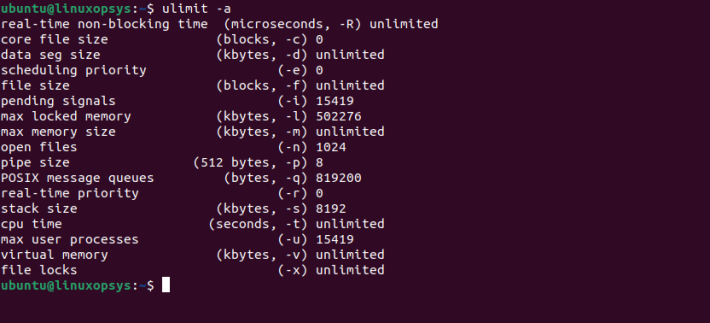
The output from the command will show the current limits for core file size, data seg size, file size, open files, pipe size, stack size, CPU time, max user processes, virtual memory, and more.
Here are some of the more commonly used limits:
- Core file size: This is the size of the core file that will be created when a program crashes. The core file contains information that can be used to debug the program.
- Data seg size: This is the size of the data segment for a program. The data segment is the area of memory that contains the program's initialized data.
- File size: This is the maximum file size that can be created by a program.
- Open files: This is the maximum number of files that can be opened by a program.
- Stack size: This is the size of the stack for a program. The stack stores the program's local variables and function call information.
Note: The /proc file-system stores the per-process limits in the file system object located at /proc/4548/limits, where '4548' is the process’s PID or process identifier.
Find max user processes
In a Linux system, we can use the ulimit command to check the maximum number of processes a user can create.
We can check the current limit by using the -u option:
ulimit -u
We got the image above. This user can create 15419 processes.
Set ulimit for user
First, we have to log in as the target user. Next, run “ulimit -u” to find max user processes. The current process limit is 15419.
To temporarily set this value, we will run:
ulimit -u 15400
The image above shows that our new limit is 15400. The change was verified with ulimit -u.
Keep in mind that the limits set with ulimit are only effective for the current user, and they only apply to processes started by that user. Also, the limits set with ulimit are not persistent, so they will be reset when the user logs out or when the system is restarted.
Set to Permanent
It is possible to set the maximum number of processes a user can initiate permanently in most versions of Linux. This is often the case in a real-life scenario.
When a user logs in, the system reads /etc/security/limits.conf to set that user limits. Without any settings, most users can initiate an unlimited number of processes.
Note: if you are using systemd, limits of services defined in /etc/security/limits.conf or /etc/security/limits.d/*.conf are ignored.
However, limiting the number of processes a user can initiate is often desirable. For example, you should prevent a user from starting too many processes and thus using too much of the system's resources.
Process limits are set for each user, so if you want to set limits for multiple users, you will need to edit /etc/security/limits.conf multiple times.
Run the following to check out the limits.conf file:
cat /etc/security/limits.conf
We will take our time to explain the image above.
The /etc/security/limits.conf file has the following format:
<domain> <type> <item> <value>The <domain> field specifies the user or group to which the rule applies. You can use the user's username or UID to specify a user. You can use the group's name or GID to specify a group. You can also use the wildcard character * to specify all users or all groups.
The <type> field specifies what kind of limit is being set. There are two possible values:
- "soft limit": This type of limit can be exceeded by a process with the appropriate privileges.
- "hard limit": This type of limit cannot be exceeded by any process, even with the appropriate privileges.
The <item> field specifies the resource that will be limited. There are many different types of items, as listed above.
The <value> field specifies the value of the limit.
Now we'll tweak limits.conf. We're going to use the nano text editor. A root privilege is needed to edit the file; without it, the changes won't save. Run:
sudo nano /etc/security/limits.conf
This command already gives us the output we discussed earlier. Let's take it a step further. Now we'll add this line of code:
ubuntu hard nproc 12444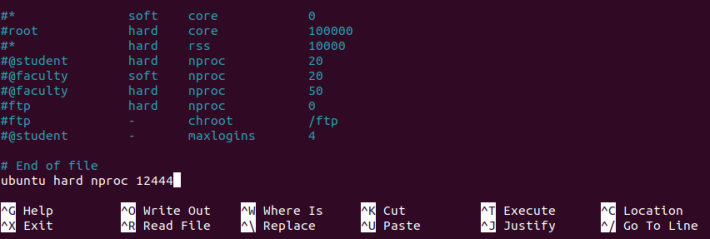
Then save the file and close the editor. You'll need to reboot your system for the changes to take effect.
Let's verify the result. Run the following:
ulimit -a ubuntu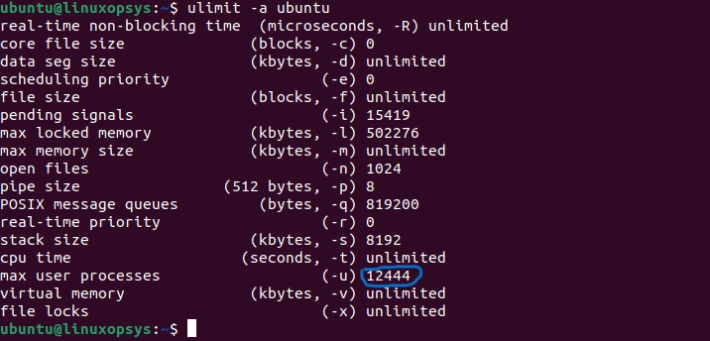
Our changes can be seen in the image above.
Set user limit via systemd
Systemd by default reads from '/etc/systemd/system.conf' file. Below are systemd limits equivalent to ulimits.
Directive        ulimit equivalent     Unit
LimitCPU=        ulimit -t             Seconds
LimitFSIZE=      ulimit -f             Bytes
LimitDATA=       ulimit -d             Bytes
LimitSTACK=      ulimit -s             Bytes
LimitCORE=       ulimit -c             Bytes
LimitRSS=        ulimit -m             Bytes
LimitNOFILE=     ulimit -n             Number of File Descriptors
LimitAS=         ulimit -v             Bytes
LimitNPROC=      ulimit -u             Number of Processes
LimitMEMLOCK=    ulimit -l             Bytes
LimitLOCKS=      ulimit -x             Number of Locks
LimitSIGPENDING= ulimit -i             Number of Queued Signals
LimitMSGQUEUE=   ulimit -q             Bytes
LimitNICE=       ulimit -e             Nice Level
LimitRTPRIO=     ulimit -r             Realtime Priority
LimitRTTIME=     No equivalent
Example:
We can set a limit on the maximum number of processes that a service can create for a particular user or group using systemd. We will use the LimitNPROC option in the [Service] section of the service unit file, along with the User or Group option.
The User or Group option specifies the user or group that the service should run as, and the LimitNPROC option specifies the maximum number of processes that the service is allowed to create.
To create a service unit file, we will first need to create a file with the “.service” extension in the /etc/systemd/system directory.

In the image above, we used the “cd” command to navigate to /etc/systemd/system directory, and created a service unit file named myservice01 with “.service” extension. Using nano text editor, we will open the unit file.
sudo nano /etc/system/system/myservice01.serviceNow, we will add the following to the unit file to limit the maximum number of processes that the service can create to 10, and run the service as the “ubuntu” user.
[Unit]
Description=My Service

[Service]
ExecStart=/etc/systemd/system/myservice01.service
LimitNPROC=10
User=ubuntu

[Install]
WantedBy=multi-user.target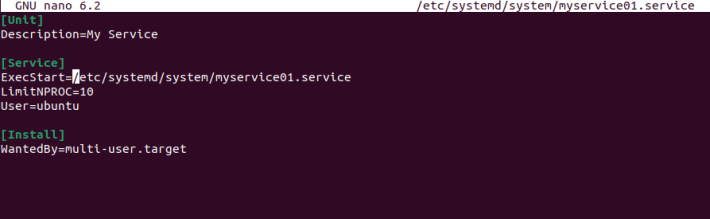
Alternatively, if we want to run the service as a particular group, we can use the Group option instead of the User option.
[Unit]
Description=My Service

[Service]
ExecStart=/etc/systemd/system/myservice01.service
LimitNPROC=10
Group=`sudo ubuntu`

[Install]
WantedBy=multi-user.target
We can now use the systemctl command to start, stop, and manage the service, as well as to enable or disable it to start automatically at boot time.
To start the service, use the following command:
sudo systemctl start myservice01.serviceTo enable the service to start automatically at boot time, use the following command:
sudo systemctl enable myservice01.serviceConclusion
In Linux, ulimit is a command that allows you to set limits on the resources that a user can use, such as the maximum number of open file descriptors or the maximum processes for a user.
systemd allows you to set resource limits on services by using the Limit* options in the service's unit file.
I hope you enjoyed reading and please leave your suggestions or feedback in the comment section.


Comments