Laravel is an open-source PHP web framework. It is mainly used for building PHP-based web applications.
Laravel is suitable for both small-scale and enterprise-level application development. Its elegant syntax, advanced features, robust tools help simplify web application development. Laravel is highly scalable and has built-in support for distributed cache systems.
In this tutorial, we learn how to install Laravel 8 on Ubuntu 20.04.
Step 1: Install Apache web server
Let's first install a webserver to host the Laravel application. You can either use Apache or Nginx web server. Here I am using an Apache web server.
To install apache2, type:
$ sudo apt install apache2Once installed, Apache should be running. If it's not, for whatever reason, start it:
$ sudo systemctl start apache2Then enable it to start on boot time.
$ sudo systemctl enable apache2To verify the status of Apache, execute:
$ sudo systemctl status apache2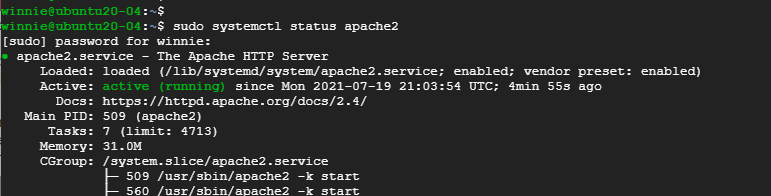
Step 2: Install PHP and additional PHP extensions
Laravel 8 requires PHP 7.3 or above. Thankfully, PHP 7.4 is available in Ubuntu repositories. So, install PHP and the following PHP extensions.
$ sudo apt install php libapache2-mod-php php-mbstring php-cli php-bcmath php-json php-xml php-zip php-pdo php-common php-tokenizer php-mysqlWhen the installation is complete, verify the PHP version.
$ php -v
Step 3: Create Database for Laravel Application
Next up, we will create a database for the Laravel application.
But first, we need to install a database server. Laravel supported database systems are MariaDB, MySQL, SQLite, Postgres, or SQL Server.
We will go with the MariaDB database engine.
$ sudo apt install mariadb-serverOnce the database server is installed, log into the MariaDB prompt:
$ sudo mysql -u root -pOnce logged in create the database, database user, and grant all privileges to the database user.
CREATE DATABASE laravel_db;CREATE USER 'laravel_user'@'localhost' IDENTIFIED BY 'secretpassword';GRANT ALL ON laravel_db.* TO 'laravel_user'@'localhost';FLUSH PRIVILEGES;QUIT;Step 4: Install Composer
Composer is a dependency package manager for PHP. It provides a framework for managing libraries and dependencies and required dependencies. To use Laravel, first install composer.
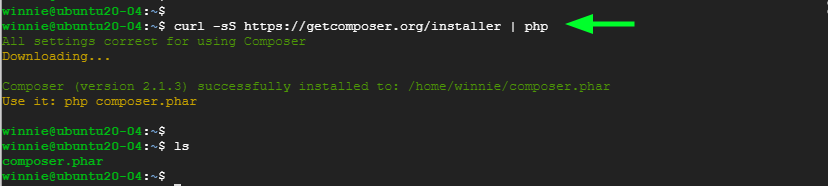
To download Composer, invoke the command shown.
$ curl -sS https://getcomposer.org/installer | phpThis downloads the composer.phar file.
Next, move the composer file to the /usr/local/bin path.
$ sudo mv composer.phar /usr/local/bin/composerAssign execute permission:
$ sudo chmod +x /usr/local/bin/composerVerify the Composer version installed:
$ composer --version
Composer version 2.1.3 is installed.
Step 5: Install Laravel 8 on Ubuntu
With Composer installed, the next course of action is to install Laravel.
Navigate to the webroot directory, type:
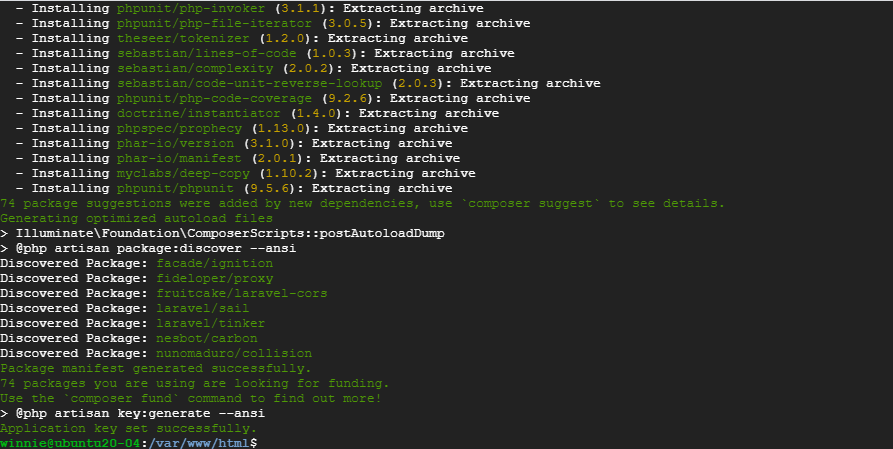
$ cd /var/www/htmlNow, install Laravel using the composer command, type:
$ sudo composer create-project laravel/laravel laravelappThe command creates a new directory called laravelapp and installs all the files and directories for Laravel.
Change the ownership of the Laravel directory to the webserver user and also the permissions:
sudo chown -R www-data:www-data /var/www/html/laravelapp
sudo chmod -R 775 /var/www/html/laravelapp/storage
Feel free to replace laravelapp with a preferred directory name.
Once the installation is done navigate to the installation directory and check the Laravel version.
$ cd laravelapp$ php artisan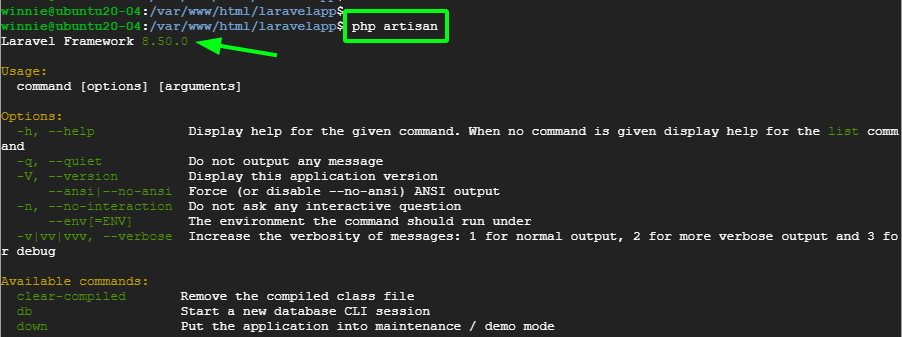
Laravel Framework version 8.50.0 is installed.
Step 6: Configure Apache to serve Laravel site
Lastly, we need to set up the Apache webserver to host the Laravel site. For that to happen, we need to create a virtual host file.
$ sudo vim /etc/apache2/sites-available/laravel.confNext, past the content shown and replace the example.com ServerName directive with the FQDN or public IP of the server ( Or private IP in case the server is on a LAN network ).
<VirtualHost *:80>
ServerName example.com
ServerAdmin [email protected]
DocumentRoot /var/www/html/laravelapp/public
<Directory /var/www/html/laravelapp>
AllowOverride All
</Directory>
ErrorLog ${APACHE_LOG_DIR}/error.log
CustomLog ${APACHE_LOG_DIR}/access.log combined
</VirtualHost>
Save the changes and exit the file. Next, enable the Laravel site and Apache rewrite module using these two commands.
$ sudo a2ensite laravel.conf$ sudo a2enmod rewriteTo apply the changes, restart Apache.
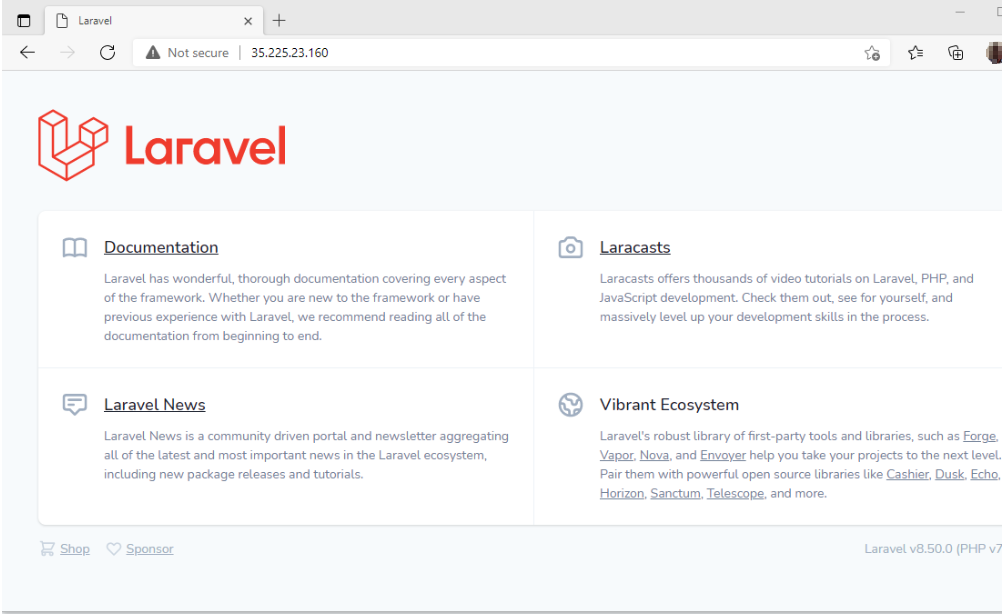
$ sudo systemctl restart apache2Step 7: Access Laravel from a browser
Finally, to access Laravel visit your server's FQDN or IP address. The default Laravel webpage will be displayed.
Conclusion
In this tutorial, we learned how to install Laravel 8 on Ubuntu 20.04. You can proceed to develop a modern full stack PHP web application in cleaner and expressive syntax.


About The Author
Winnie Ondara

Winnie is a Linux technical writer with over 3 years of experience with various Linux distributions and writing technical guides in Linux. She is passionate about FOSS technologies and always endeavor to learn new technologies. During my free time, I watch movies, listen to music, and catch up with tech news.
Comments