
ClamAV is an open-source antivirus software toolkit used to scan files for viruses. It is commonly used to scan emails on mail gateways. ClamAV is completely free software.
ClamAV provides inbuilt tools - a command-line scanner, database updater, milter interface for Sendmail, built-in support for almost all mail file formats, archive formats, popular document format, and more.
In this tutorial, we learn how to install and use ClamAV on Ubuntu 20.04
ClamAV Components
ClamAV components consist of:
clamd (clamav-daemon) - This daemon is mainly responsible for loading the virus database to memory when scanning starts.
freshclam (clamav-freshclam) - This daemon is used to update, download and install the Virus signature database.
clamdscan - Tool to scan files and directories for viruses.
clamonacc - This daemon provides on-access scanner functionality for ClamAV
Install ClamAV on Ubuntu
ClamAV is available in the Ubuntu repository. You can simply install ClamAV using the apt command.
First, update the Ubuntu system.
sudo apt updateInstall ClamAV on Ubuntu:
sudo apt install clamav clamav-daemon -yVerify the installation by checking the ClamAV version, type:
clamscan -VOutput:
ClamAV 0.103.2/26233/Thu Jul 15 07:31:54 2021By default, clamav-freshclam service will be enabled and running.
sudo systemctl status clamav-freshclamOn clamav-freshclam startup its automatically update Virus database to /var/lib/clamav. If not started run the following command to start clamav-freshclam.
sudo systemctl start clamav-freshclamDownload and Update ClamAV Signature Database
After ClamAV installation and verification, you will need to update the ClamAV Signature Database for Virus. freshclam command is used to download and update ClamAV’s official virus signature databases.
1. First, we will need to stop the clamav-freshclam service with the following command, before updating the database.
sudo systemctl stop clamav-freshclam2. Next, download and update the database manually using the following command:
sudo freshclamIf you get the following output, then the database is updated:
Tue Jul 13 04:15:19 2021 -> ClamAV update process started at Tue Jul 13 04:15:19 2021Tue Jul 13 04:15:19 2021 -> daily.cvd database is up to date (version: 25930, sigs: 4317819, f-level: 63, builder: raynman)Tue Jul 13 04:15:19 2021 -> main.cvd database is up to date (version: 59, sigs: 4564902, f-level: 60, builder: sigmgr)Tue Jul 13 04:15:19 2021 -> bytecode.cvd database is up to date (version: 331, sigs: 94, f-level: 63, builder: anvilleg)
By default ClamAV signature database is updated automatically every hour, this behavior can be changed in freshclam configuration file /etc/clamav/freshclam.conf.
NOTE: It is also possible to manually download the signature database from the ClamAV virus database mirror.
ClamAV use three virus definitions files such as main.cvd, daily.cvd, and bytecode.cvd and kept in the directory /var/lib/clamav.
3. Finally, start the freshclam daemon service:
sudo systemctl start clamav-freshclamThe output of the above command will indicate whether the virus signatures are up-to-date.
Output:
● clamav-freshclam.service - ClamAV virus database updater
      Loaded: loaded (/lib/systemd/system/clamav-freshclam.service; enabled; vendor preset: enabled)
      Active: active (running) since Fri 2021-07-16 01:41:20 UTC; 41s ago
        Docs: man:freshclam(1)
              man:freshclam.conf(5)
              https://www.clamav.net/documents
    Main PID: 65112 (freshclam)
       Tasks: 1 (limit: 1073)
      Memory: 2.0M
      CGroup: /system.slice/clamav-freshclam.service
              └─65112 /usr/bin/freshclam -d --foreground=true
 Jul 16 01:41:20 li1129-224 systemd[1]: Started ClamAV virus database updater.
 Jul 16 01:41:20 li1129-224 freshclam[65112]: WARNING: Ignoring deprecated option SafeBrowsing at /etc/clamav/freshclam.conf:22
 Jul 16 01:41:20 li1129-224 freshclam[65112]: Fri Jul 16 01:41:20 2021 -> ClamAV update process started at Fri Jul 16 01:41:20 2021
 Jul 16 01:41:20 li1129-224 freshclam[65112]: Fri Jul 16 01:41:20 2021 -> ^Your ClamAV installation is OUTDATED!
 Jul 16 01:41:20 li1129-224 freshclam[65112]: Fri Jul 16 01:41:20 2021 -> ^Local version: 0.103.2 Recommended version: 0.103.3
 Jul 16 01:41:20 li1129-224 freshclam[65112]: Fri Jul 16 01:41:20 2021 -> DON'T PANIC! Read https://www.clamav.net/documents/upgrading-clamav
 Jul 16 01:41:20 li1129-224 freshclam[65112]: Fri Jul 16 01:41:20 2021 -> daily.cld database is up-to-date (version: 26233, sigs: 1961297, f-level: 90, builder: raynman)
 Jul 16 01:41:20 li1129-224 freshclam[65112]: Fri Jul 16 01:41:20 2021 -> main.cld database is up-to-date (version: 61, sigs: 6607162, f-level: 90, builder: sigmgr)
 Jul 16 01:41:20 li1129-224 freshclam[65112]: Fri Jul 16 01:41:20 2021 -> bytecode.cvd database is up-to-date (version: 333, sigs: 92, f-level: 63, builder: awillia2)
For fresh installation, its recommended to start clamav daemon after ClamAV Virus Database (.cvd) file(s) installed. Now start clamav-daemon service to load database definitions to memory.
sudo systemctl start clamav-daemonTo verify clamd, check the ClamAV logs in /var/log/clamav/clamav.log
tail /var/log/clamav/clamav.log
Output:
Thu Jul 15 04:23:41 2021 -> Portable Executable support enabled.
Thu Jul 15 04:23:41 2021 -> ELF support enabled.
Thu Jul 15 04:23:41 2021 -> Mail files support enabled.
Thu Jul 15 04:23:41 2021 -> OLE2 support enabled.
Thu Jul 15 04:23:41 2021 -> PDF support enabled.
Thu Jul 15 04:23:41 2021 -> SWF support enabled.
Thu Jul 15 04:23:41 2021 -> HTML support enabled.
Thu Jul 15 04:23:41 2021 -> XMLDOCS support enabled.
Thu Jul 15 04:23:41 2021 -> HWP3 support enabled.
Thu Jul 15 04:23:41 2021 -> Self checking every 3600 seconds.
Testing ClamAV
For testing ClamAV, we can download a test virus to /tmp and scan using clamscan tool.
$ cd /tmp
$ wget http://www.eicar.org/download/eicar.com
$ clamscan --infected --remove eicar.com
Output
/tmp/eicar.com: Eicar-Test-Signature FOUND
 /tmp/eicar.com: Removed.
 ----------- SCAN SUMMARY -----------
 Known viruses: 8553243
 Engine version: 0.103.2
 Scanned directories: 17
 Scanned files: 1
 Infected files: 1
 Data scanned: 0.00 MB
 Data read: 0.00 MB (ratio 0.00:1)
 Time: 62.005 sec (1 m 2 s)
 Start Date: 2021:07:16 02:08:29
 End Date:   2021:07:16 02:09:31
How to use ClamAV
ClamAV configuration file is located at /etc/clamav/clamd.conf. Configuration file allows to set scanning behavior, user name for clamd daemon (by default daemon is run by clamav), exclude directories from scanning, and much more.
ClamAV logs are stored in /var/log/clamav/, which contains information about each virus scan.
ClamAV comes with many inbuilt tools, among clamscan is the important tool. Clamscan is a clamd client used to scan files.
1. Scanning all files, from the current directory.
clamscan -r /2. Scan files but only show infected files.
clamscan -r -i /[path-to-folder]3. To scan infected files in a specific directory recursively and then remove them.
clamscan --infected --remove --recursive /home/ubuntu/Desktop/These options means:
- --infected: prints only infected files
- --remove: removes infected files
- --recursive: all directory and subdirectories in that path will be scanned
Output:
------------ SCAN SUMMARY ------------
Known viruses: 2226383
Engine version: 0.103.2
Scanned directories: 18
Scanned files: 75
Infected files: 0
Data scanned: 15.80 MB
Data read: 5.66MB (ratio 3.09:1)
Time: 15.842 sec (0 m 15 s)
The best practice is to set up cron jobs to run ClamAV scans in regular intervals.
4. To scan your web server and everything in the standard Apache document root, you scan any suspicious files and unwanted applications with the following command.
sudo clamscan --infected --detect-pua=yes --recursive /var/www/html/pua - Potential Unwanted Application
5. Scan files, but show only infected files without displaying OK files.
clamscan -r -o /[path-to-folder]6. Scan files, but only send results of infected files to a new results file.
clamscan -r /[path-to-folder] | grep FOUND >> /[path-folder]/[file].txt7. Scan and move infected files to a different directory path.
clamscan -r --move=/[path-to-folder] /[path-to-quarantine-folder]For more information check clamscan man page or clamscan -h.
Install ClamTK on Ubuntu
ClamTK on the other hand is a Graphical User Interface for a ClamAV software program. If you are more comfortable using GUI instead of the command line, you can install ClamTK with the following command:
apt install clamtkIf you already have ClamAV installed on your system and need to upgrade it, type:
apt --only-upgrade install clamav clamav-daemon
After installing clamTK, open it and you will get a nice GUI with all options including Configuration, History, Updates, Analysis.
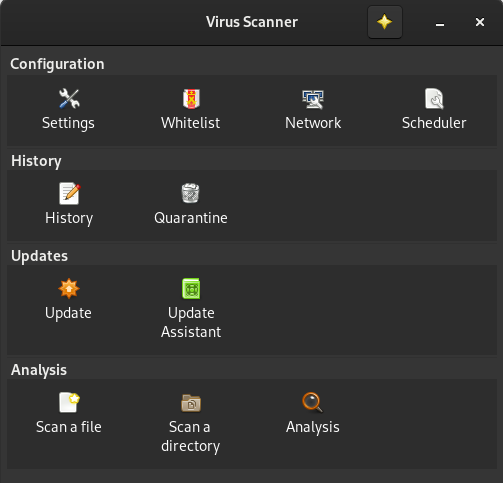
Now go to the Analysis group, and chose "Scan a directory" option. Then, will be asked to chose desired directory that want to scan.
After choosing the desired directory, ClamTK will scan that directory and will display the result of scanning.

In terms of performance between ClamAV and ClamTK, there is no difference between these two tools. You can choose the one that is more suited to use, and ClamTK is more user-friendly, especially for beginners.
Conclusion
It is most commonly known that viruses do not exist in Linux, and cannot be infected, but it is not true. Viruses, trojans, and malware exist in Linux but they are not quite common. If you want your Linux machine to be more secure, you can install and start using either ClamAV or ClamTK software tools to protect the system from suspicious things.


About The Author
Bobbin Zachariah

Bobbin Zachariah is an experienced Linux engineer who has been supporting infrastructure for many companies. He specializes in Shell scripting, AWS Cloud, JavaScript, and Nodejs. He has qualified Master’s degree in computer science. He holds Red Hat Certified Engineer (RHCE) certification and RedHat Enable Sysadmin.
Comments