For modern versions of Red Hat Enterprise Linux ( RHEL 8 and later ), DNF is the default package manager which replaces YUM. DNF creates a transaction history for every operation you undertake be it installing or upgrading a package. This transaction history enables you to keep track of all the operations and this comes in handy when pinpointing a problem that occurred during one of those operations.
The dnf history command provides a detailed history of all the commands carried out by the dnf command and actions according to that. In earlier versions of RHEL, yum history command would be used instead of dnf history.
In this tutorial, we learn about dnf history command and its actions.
DNF History Details
The dnf history by default list all the dnf transactions made on your system. Simply type the following command to display history:
dnf historyor
dnf history list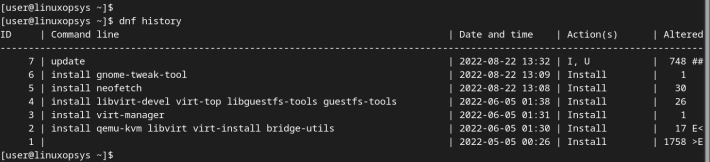
A table with four columns is displayed. From the far left, we have:
ID: This indicates the transaction ID that is unique for each transaction. The output lists the transactions from the most recent one which appears at the top. From the output, DNF command has been executed 7 times with the most recent transaction being dnf update.
Command line: The actual command used to carry out the transaction.
Date and time: This is the time the command was executed.
Actions: These are the tasks that dnf tool performed during a transaction.
Altered: This refers to the number of packages altered to complete the transaction.
The 'actions' column indicates the operations carried out during a particular transaction. Here is a list of possible values in the 'action' column and what they stand for.
Install (I): Indicates that at least one package has been installed
Update (U): Indicates that at least one package has been reinstalled.
Reinstall (R): Indicates that at least one package has been reinstalled.
Downgrade (D): Indicates that at least one package has been downgraded to an earlier version.
Erase (E): Indicates that at least one package was uninstalled or removed from the system.
Obsoleting (O): Shows that at least one package was marked as obsolete.
DNF History List
The dnf history command provides additional arguments to help you search for a specified transaction in the dnf history command. In this section, we are going to narrow down to listing specific dnf transactions.
List the last DNF transaction
To display the last transaction performed by DNF, run the command
dnf history list last
From the output, the last transaction performed was the system update.
List the last x-number of DNF transactions performed
In addition, you can further narrow down your search to the last x number of transaction that was carried out. For example, to list the last 5th DNF transaction, run the command:
dnf history list last-5
List DNF Transaction by ID
Furthermore, you can list the transactions by transaction id by providing the ID as follows. In this example, we are listing the transaction bearing the ID of 6.
dnf history list 6
List DNF Transaction by Range
Also, you can display a range of transactions performed using their IDs. For instance, to display the transactions between ID 2 and 6 run the command:
dnf history list 2..6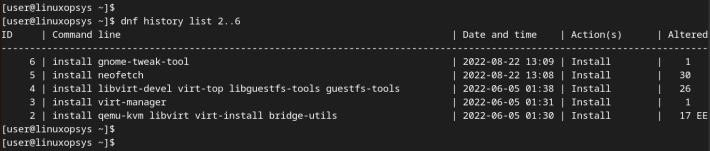
Filter the DNF history output
You can filter out the output to get the desired results using the grep command tool. For example, you can filter a specific package from a list of installed packages using the following syntax.
dnf history list | grep package-nameFor example, to search the history for the date and time that you installed the neofetch package, run the following command.
dnf history list | grep neofetchTo search for virt-manager, follow the same syntax.
dnf history list | grep virt-manager
DNF history show detailed information
At times, you might need to retrieve finer details about a particular DNF transaction. To do so. pass the "info" option. This provide more information about the particular transaction. The output includes:
- The duration it took to complete a certain transaction
- The user that executed the transaction
- The return code
- The version release
- The command that was executed on command line
- Packages that have been altered
For example to get detailed information about the installation of flameshot package whose transaction id is No. 8, we will run the command:
dnf history info 8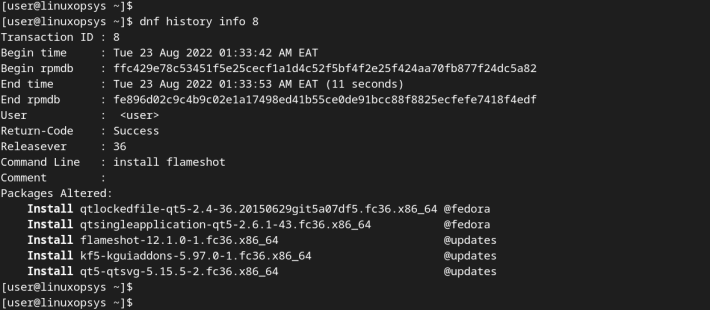
DNF history undo
The "undo" option is used to reverse a transaction. This implies that a particular dnf command will be reversed. To demonstrate this, we will undo transaction id 5 which is the installation of neofetch package.
sudo dnf history list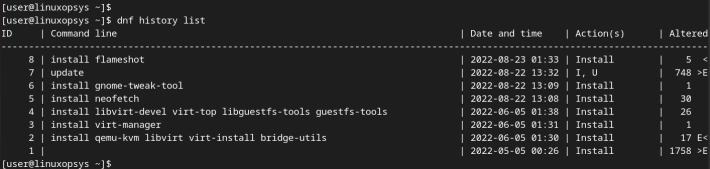
To undo the transaction, we will run the command:
sudo dnf history undo 5The command uninstalls the package alongside its dependencies.

When you list the history of all the transactions once more, you will realize that the transaction id associated with the removed package is not removed. Instead, DNF simply adds another ID showing the new undo transaction, in this case, ID No. 9.
sudo dnf history list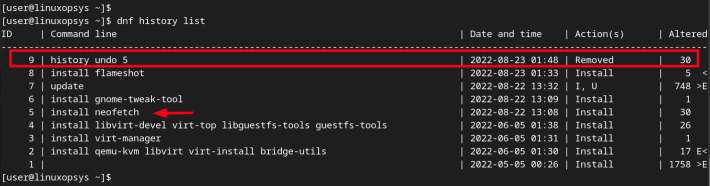
DNF history rollback
Sometimes, you might want to uninstall some packages installed earlier on. In this example, we want to roll back to the point where the Xscreensaver was installed. During a roll back, all transactions between the ID specified and the last transaction are reversed or undone.
dnf history list
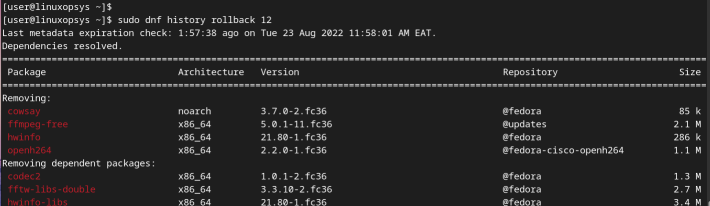
Therefore, to roll back the changes from the point where Xscreensaver was installed, we will run the following command.
sudo dnf history rollback 12In this case, the "ffmpeg-tree", "hwinfo" and "cowsay" packages are removed.
DNF history redo
You can undo a transaction that was rolled back. For example, to redo the removal of the "cowsay" package, run the command:
sudo dnf history redo 15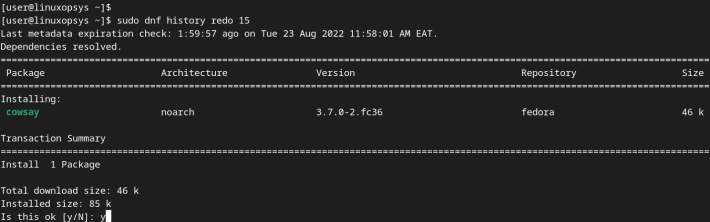
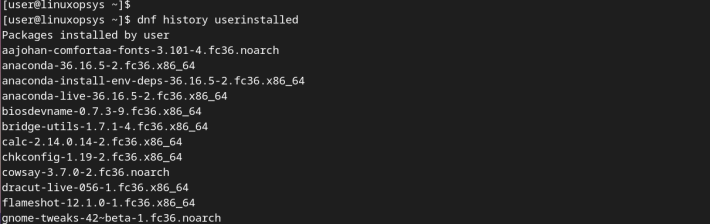
DNF history user installed
To retrieve a list of manually installed packages by the user, run the command:
sudo dnf userinstalledThe command populates a list of all the packages installed and their dependencies by the logged-in user.
Conclusion
In this tutorial, we learned about dnf history command and how you can use it to view the history of transactions performed by the DNF package manager.
Thanks for reading, please leave your feedback and suggestions on the below comment section.


About The Author
Winnie Ondara

Winnie is a Linux technical writer with over 3 years of experience with various Linux distributions and writing technical guides in Linux. She is passionate about FOSS technologies and always endeavor to learn new technologies. During my free time, I watch movies, listen to music, and catch up with tech news.
Comments