
dmidecode is a command-line tool in Linux to retrieve detailed information about your computer's hardware components (such as motherboard, CPU, memory, BIOS) and system firmware. It provides a structured and human-readable output, to understand hardware configuration.
The dmidecode tool reads information from the DMI (Desktop Management Interface) tables, which are often referred to as SMBIOS (System Management BIOS) tables. These tables are a standardized way for the system firmware (usually the BIOS or UEFI) to provide information to the operating system about the system's hardware.
Installing dmidecode
If dmidecode utility is not found installed, you can easily install using the package manager of the Distro.
Debian / Ubuntusudo apt install dmidecodeFedorasudo dnf install dmidecodeRedhatsudo yum install dmidecodeArch Linuxsudo pacman -S dmidecode
Basic Usage
When you run dmidecode without any options or arguments, it typically displays the full DMI data, which includes information about various hardware components and system settings.
sudo dmidecode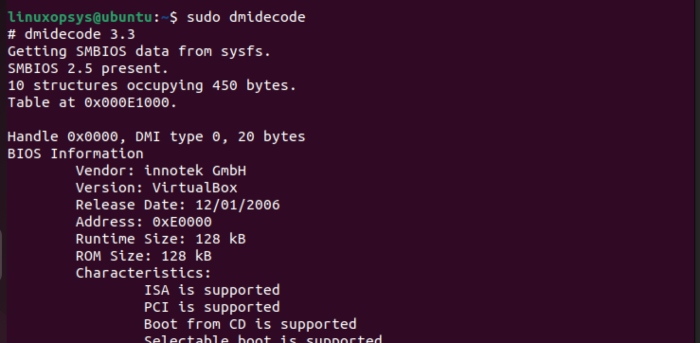
This can be quite extensive, so it's often best to narrow down the output by specifying a DMI type with the -t option.
sudo dmidecode --type biosorsudo dmidecode -t biosorsudo dmidecode -t 0### You can use the -t option followed by the DMI type code
Alternatively, you can use a specific string keyword from the DMI data to retrieve information, you can use the -s option followed by the keyword you're interested in.
sudo dmidecode -s system-manufacturer
Common dmidecode Options:
-tor--type: Specifies the type of information to retrieve.-sor--string: Retrieves a specific string field.-uor--dump: Dumps the full DMI data to a file for further analysis.-qor--quiet: Suppresses verbose output.
Examples of dmidecode Usage
1. Checking System Information
sudo dmidecode -t system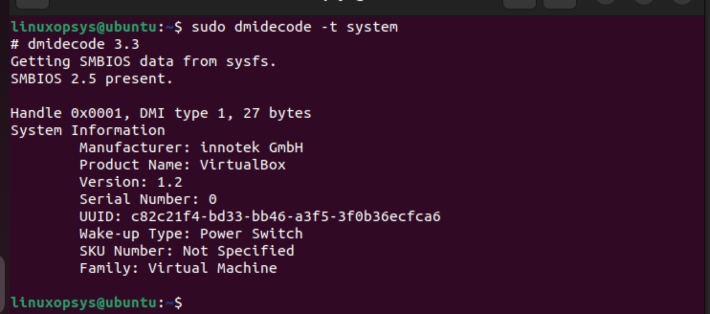
2 Examining Memory Information
sudo dmidecode -t memory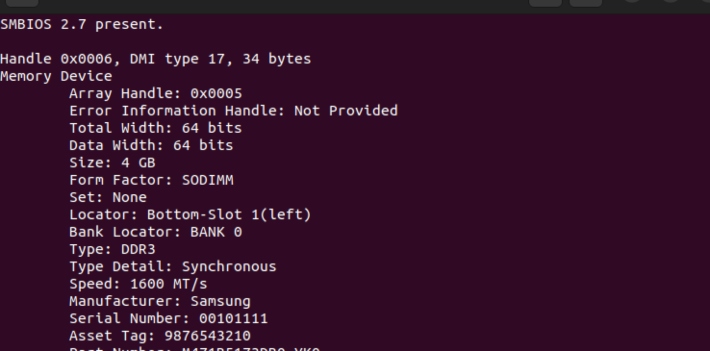
To filter the information you need you can pipe the output to other commands or use grep. Example:
sudo dmidecode -t memory | grep Size
        Size: 4 GB
Alternatively, you can use the following command to identify installed DIMMs:
sudo dmidecode -t 173. Retrieving CPU Details
sudo dmidecode -t processor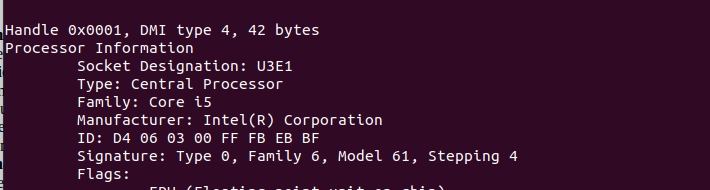
You can confirm so by noting the processor type. In this case, it’s highlighted as core i5.
4. Investigating BIOS/Firmware Details
sudo dmidecode -t bios
Alternatively, use -s option with strings keyword such as bios-version, bios-release-date, and bios-vendor.
Example:
sudo dmidecode -s bios-version5. Get system cache information
sudo dmidecode -t 7orsudo dmidecode -t cache
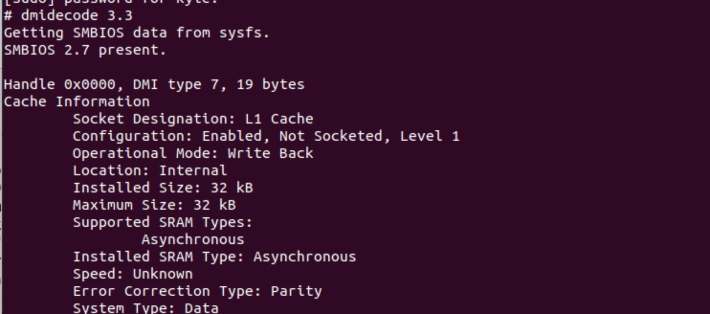
You can retrieve information about the L1 and L2 caches, including their sizes, configuration, operational mode, and more.
6. Retrieve system's serial number
sudo dmidecode -s system-serial-numberRunning this command will display the serial number of your system, if it's available in the DMI data.
You may also find from the system information by using sudo dmidecode -t 1.
7. Get motherboard information
sudo dmidecode -t 2orsudo dmidecode -s baseboard-product-name
8. Displaying UUID
dmidecode | grep UUID###on AWS this helps to determine system is EC2.sudo dmidecode --string system-uuid
Note: Depending on the SMBIOS version presented to it by the virtual machine's hardware version, dmidecode may display the UUID differently. Also, the format of the UUID in SMBIOS data may change between different SMBIOS versions or hardware versions.
dmidecode Type
Here list of DMI types for dmidecode:
| Type | Information |
|---|---|
| 0 | BIOS |
| 1 | System |
| 2 | Baseboard |
| 3 | Chassis |
| 4 | Processor |
| 5 | Memory Controller |
| 6 | Memory Module |
| 7 | Cache |
| 8 | Port Connector |
| 9 | System Slots |
| 10 | On Board Devices |
| 11 | OEM Strings |
| 12 | System Configuration Options |
| 13 | BIOS Language |
| 14 | Group Associations |
| 15 | System Event Log |
| 16 | Physical Memory Array |
| 17 | Memory Device |
| 18 | 32-bit Memory Error |
| 19 | Memory Array Mapped Address |
| 20 | Memory Device Mapped Address |
| 21 | Built-In Pointing Device |
| 22 | Portable Battery |
| 23 | System Reset |
| 24 | Hardware Security |
| 25 | System Power Controls |
| 26 | Voltage Probe |
| 27 | Cooling Device |
| 28 | Temperature Probe |
| 29 | Electrical Current Probe |
| 30 | Out-of-band Remote Access |
| 31 | Boot Integrity Services |
| 32 | System Boot |
| 33 | 64-bit Memory Error |
| 34 | Management Device |
| 35 | Management Device Component |
| 36 | Management Device Threshold Data |
| 37 | Memory Channel |
| 38 | IPMI Device |
| 39 | Power Supply |
| 40 | Additional Information |
| 41 | Onboard Devices Extended Information |
| 42 | Management Controller Host Interface |


About The Author
Bobbin Zachariah

Bobbin Zachariah is an experienced Linux engineer who has been supporting infrastructure for many companies. He specializes in Shell scripting, AWS Cloud, JavaScript, and Nodejs. He has qualified Master’s degree in computer science. He holds Red Hat Certified Engineer (RHCE) certification and RedHat Enable Sysadmin.
Comments