Every file and directory in Linux is associated with an owner and a group. The owner is the user who creates it and the group is a set of users who share the same permissions. File and directories get appropriate access permission-based permission set to the owner and the group.
chown command is used in Linux to set a new owner or group or both on files or directories. You need a user with sudo privilege or appropriate privilege to run the command.
Syntax
Following is the basic syntax for chown command:
chown OPTIONS OWNER{:GROUP} file/directory- OPTIONS: Optional flags to make additional changes
- OWNER: New user owner or userID of file or directory.
- GROUP: (Optional) The new group owner of file or directory.
- Files(s): The file(s) or directory(s) whose ownership is being modified.
OPTIONS:
- -R or --recursive: Recursively change ownership of files and directories.
- -f or --silent: suppress error messages. By default shows error messages when there is an issue to change ownership.
- -h or --no-dereference: Change ownership of the symbolic link itself rather than following the link and changing the target file. By default, follows the link and change the referenced file.
- --preserve-root: Prevent recursive ownership change for the root directory (/).
- -v - display a message when each file is processed.
- -c - Same like -v but only display message when change is made.
- --from=CURRENT_OWNER:CURRENT_GROUP - change only from specific owner and group to new ownership.
Modifying Ownership
Remember don't confuse with chmod and chown. Chmod is used to modify the permissions whereas chown is only used to modify ownership of files and directories to a new user category.
Based on the requirement you can use different syntax to modify ownership of a file or directory.
1. Change the owner of the file
chown owner filename2. Change only the group of the file
chown :group filename3. Change owner of the filename1 and directory1
chown owner filename1 directory1Here you can specify multiple files or directories separated by spaces to change their ownership simultaneously.
4. Using numeric User IDs (UIDs) change the owner of the file
chown UID filenameYou can also use numerical Group IDs (GIDs).
5. Change both owner and group of the file
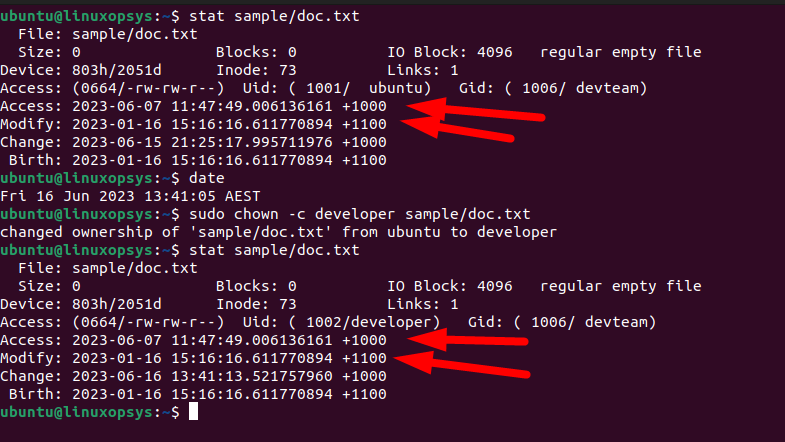
chown owner:group fileBy default chown preserves the timestamp - ie it won't change the access time and modification. The following output ran after the chown change, then used stat command to prove it.
Examples
Change owner to "ubuntu" for the file doc.txt
sudo chown ubuntu doc.txt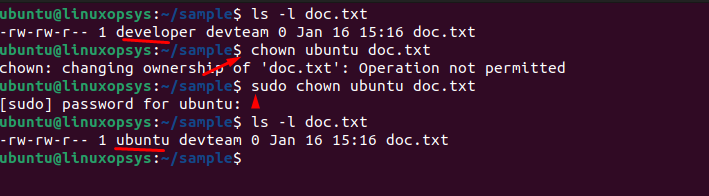
Change group to "ubuntu" for the file doc.txt
sudo chown :ubuntu doc.txt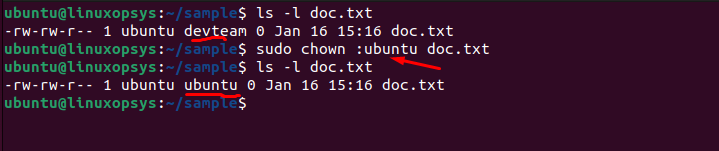
Change owner to developer and group to devteam for the doc.txt file
sudo chown developer:devteam doc.txt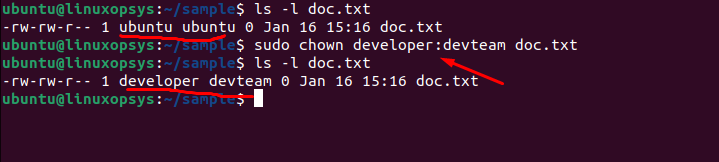
Recursive Ownership Change
Use -R (--recursive) option with the chown command to recursively change ownership of files and directories.
Syntax:
chown -R OWNER:GROUP /path/to/parent-directory-nameThis will set a new owner and group for all files, directories and subdirectories including the parent directory.
For example to recursively change owner to developer and group to devteam on directory /home/ubuntu/sample.
sudo chown -R developer:devteam /home/ubuntu/sample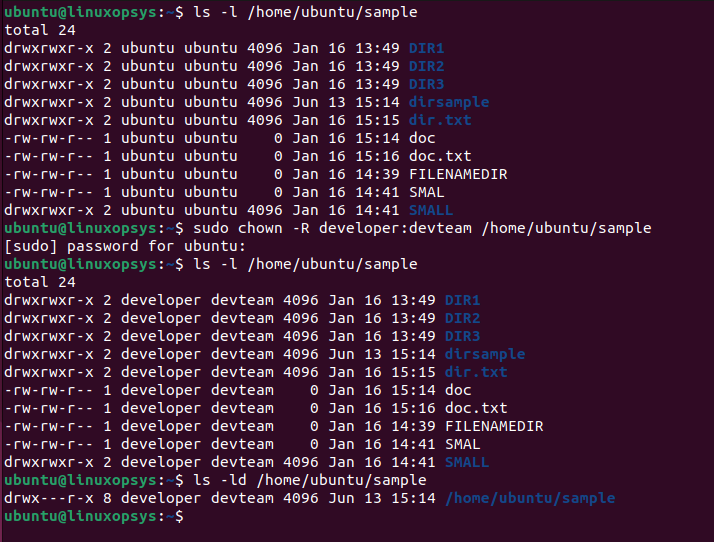
The new owner and group will be changed for all files, directories and subdirectories inside /home/ubuntu/sample. Remember the parent directory sample ownership will also be changed. To avoid owenrship change the parent directory you can navigate in the directory and use . (dot) instead of absolute path. You may also use wildcard (*) at the end of absolute path to avoid action on parent folder.
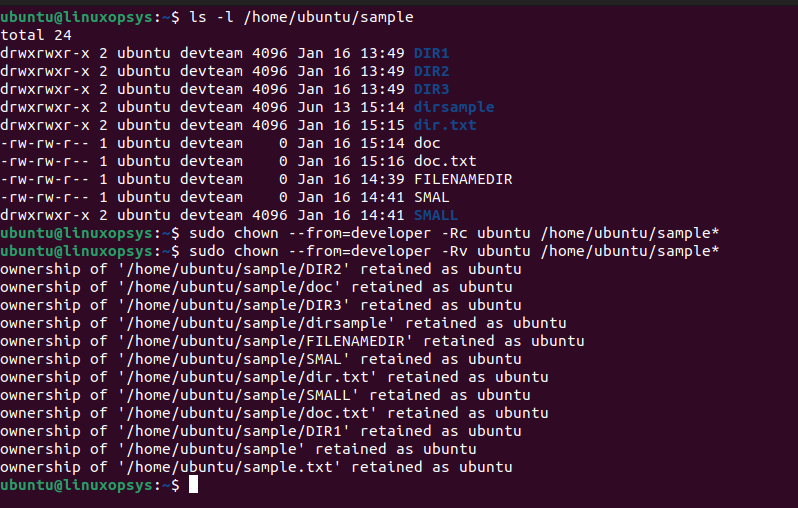
Sometimes you need to change ownership from specific user or group. You can use --from option.
sudo chown --from developer -Rc ubuntu /home/ubuntu/sample/*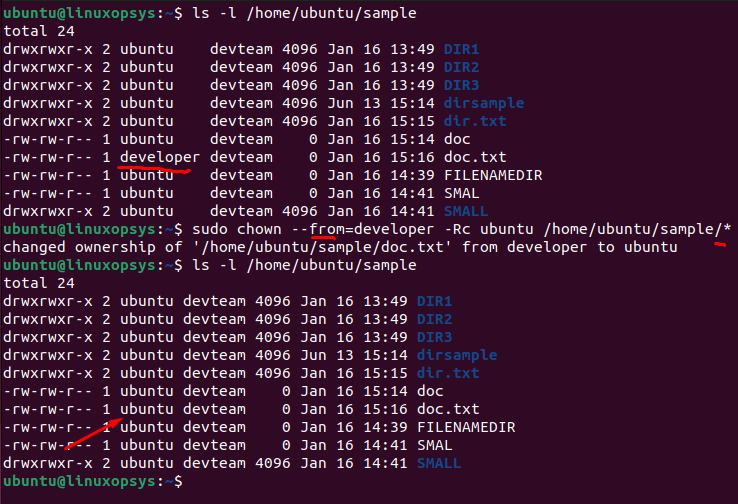
This command change owernership for all files and directores including subdirectories within /home/ubuntu/sample/ which is currently owned by the user "developer" to new user "ubuntu".
Note, if you are changing ownership for specific file types, you can use find -type with -exec to execute the chown command.
Chown Symbolic Links
By default, chown changes the target of the symbolic link. That means the file or directory the link is pointing to is changed.
To change the ownership of the link itself (ie without following), use the -h option. If you attempt to change the user or group of the actual link without -h option, the system gives the following error "cannot dereference ‘symlink1’: Permission denied” error".
Example:
sudo chown -h developer symlink1This change ownership of the symbolic link named symlink1 to a new owner "developer".
Additional Options
Reference File
Using the --reference option chown can replicate ownership of another file. ie no need to specify owner: group.
Syntax
sudo chown --reference=REFERENCE_FILE FILEHere, the reference file file1.txt ownership (owner and group) is matched to the file file2.txt.
sudo chown --reference=file1.txt file2.txt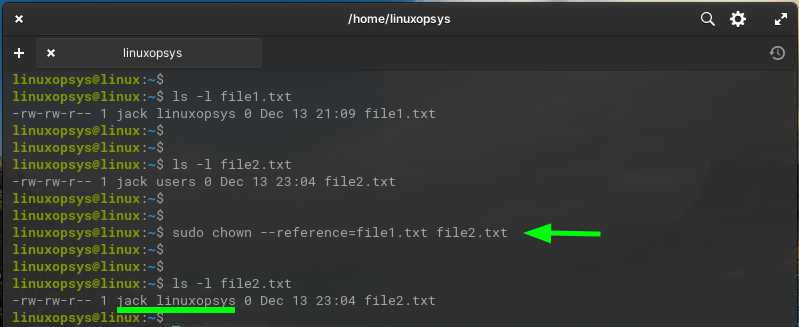
Preserve root
Use --preserve-root to avoid accidentally changing the ownership on the root directory (/). Creating an alias makes life easier (example alias chown="chown --preserve-root")
verbose vs changes
Use -v (verbose) option to see the diagnostic message for each file processed whereas option -c (changes) shows messages when a change is made.
Check Ownership
To check ownership for files or directories use ls command with -l option. The output information will display the ownership details.
Navigate to the path which contains files or directories and then type:
cd /home/ubuntu/sample/
ls -l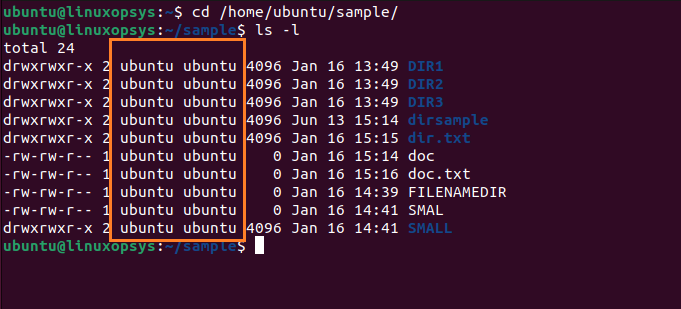


About The Author
Winnie Ondara

Winnie is a Linux technical writer with over 3 years of experience with various Linux distributions and writing technical guides in Linux. She is passionate about FOSS technologies and always endeavor to learn new technologies. During my free time, I watch movies, listen to music, and catch up with tech news.
Comments