
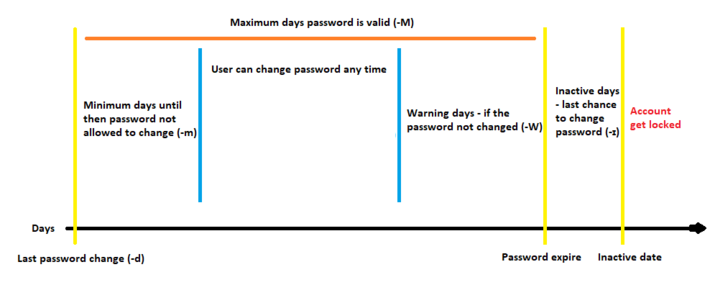
The chage command in Linux is used to manage and view user password expiration policies. The term "chage" is derived from "change age".
When you create a new user (often with useradd or adduser), the defaults from /etc/login.defs are applied to that user. However, chage allows you to modify these settings for individual users, overriding the defaults set in /etc/login.defs.
The basic syntax of chage:
chage [options] [username]Where [options] represents the various command-line options you can use with chage and [username] is the username of the account you want to modify or query.
Listing Password Aging Information
Using the chage command, you can obtain detailed information about password aging for a specific user. This is done using the -l (list) option followed by the username.
Example:
chage -l bob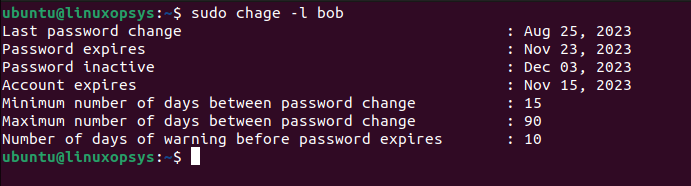
Here's what each line signifies:
- Last password change: The date when bob last changed his password.
- Password expires: The date when bob's current password will expire, and he'll be required to change it.
- Password inactive: After the password expires, if the user doesn't change it, this field determines after how many days the account will be locked due to inactivity. "Never" means the account won't be locked because of password expiration.
- Account expires: The date when the user account will be expired. After this date, the user cannot log in at all. "Never" means the account does not have an expiration date.
- Minimum number of days between password change: This specifies the number of days that must pass before bob is allowed to change his password again.
- Maximum number of days between password change: This is the period after which bob will be required to change his password.
- Number of days of warning before password expires: Before the password expiration, bob will start receiving warnings this many days in advance.
Setting Password Expiration Dates
The -M option followed by a number allows you to set the maximum number of days a password remains valid. Once this duration is reached, the user will be prompted to change their password upon the next login.
Syntax:
chage -M [number_of_days] [username]Example:
To set the password for the user bob to expire every 90 days:
chage -M 90 bob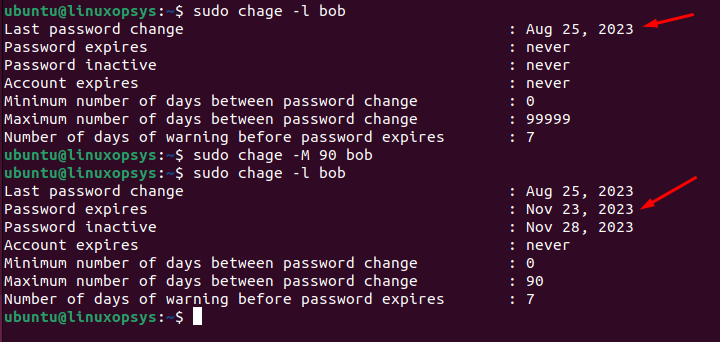
After 90 days, bob will be required to change his password. You can verify by chage -l command, where the password expires row shows the exact date when Bob's password will expire and he will be required to change it. If you take a look at the /etc/shadow file, the fifth field, which is 90, indicates the maximum number of days the password is valid (i.e., the password's lifespan).
If you wish to set the password to never expire, type:
chage -M -1 bobManaging Account Expiry
While the -M option is focused on the password, the -E option allows you to set an absolute expiration date for the user account itself. After the specified date, the account will become inactive, regardless of the password's validity.
Syntax:
chage -E [expiry_date] [username]The [expiry_date] should be in the format YYYY-MM-DD.
Example:
chage -E 2023-11-15 bob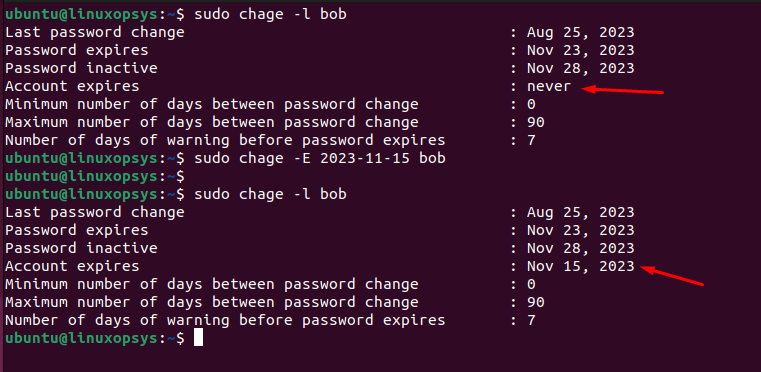
On November 15, 2023, Bob will no longer be able to log in, even if his password is still valid according to the -M setting.
When you set an expiration date using the chage -E command, it gets reflected in the /etc/shadow file in the eighth field of the user's corresponding line.
When you use the chage command with the -E option followed by a 0, it sets the account expiration date for the specified user to the Unix epoch time, which is January 1, 1970. Effectively expires the user account immediately. SSH logins, even with public key authentication, will also be denied if the account is expired.
If you wish to set the account to never expire, type:
chage -E -1 bob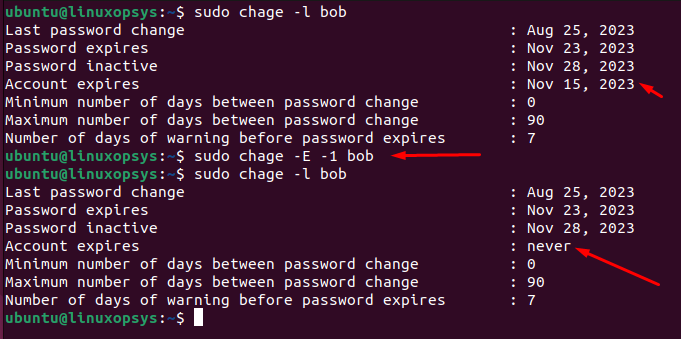
Password Warning Notifications
The -W option of chage sets the number of days of warning before a password expires.
Syntax:
chage -W [number_of_days] [username]Example:
To set a 7-day warning period for the user bob:
chage -W 10 bob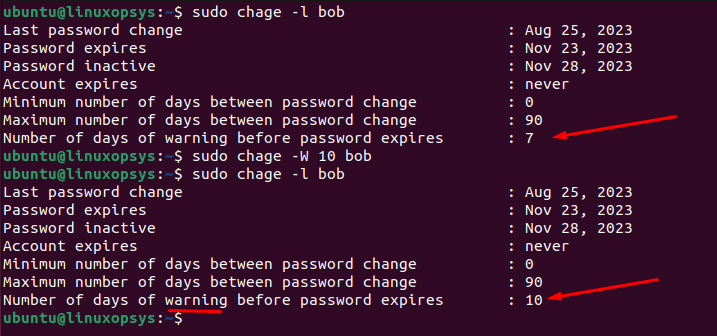
Now, when bob logs in, starting from 7 days before her password expires, she will receive a warning message indicating that her password will expire soon and prompting her to change it. The password warning period is reflected in the sixth field of the user's entry in the /etc/shadow file.
Setting the Minimum Password Age
The -m option of chage sets the minimum password age for a user. This defines how long a user must wait before they're allowed to change their password again after it has been updated.
Syntax:
chage -m [number_of_days] [username]Example:
chage -m 15 bob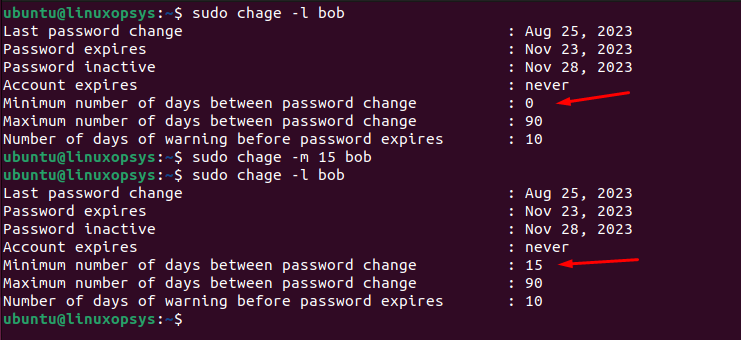
Now, if bob tries to change her password within 15 days of her last change, the system will deny her request. The minimum password age is reflected in the fourth field of the user's entry in the /etc/shadow file.
Set Account Inactivity Period
The -I option of chage allows you to set the account inactivity period. This defines the number of days after a password expires that the account will be automatically locked if the password isn't changed.
Syntax:
chage -I [number_of_days] [username]Example:
chage -I 10 bob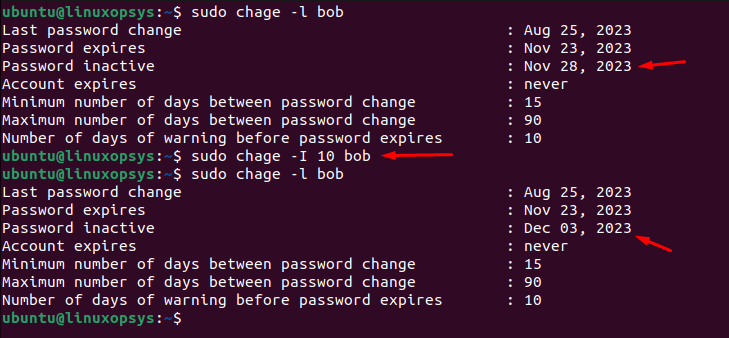
After the set inactivity period (10 days in this case) following the password's expiration, Bob will not be able to log in until an administrator intervenes to unlock the account and reset the password. The account inactivity period is stored in the seventh field of the user's entry in the /etc/shadow file.


About The Author
Subhash Chandra

Subhash Chandra, an Oracle Certified Database Administrator and professional writer, works as a Consulting User Assistance Developer at Oracle, bringing over 15 years of experience to the role. He enjoys sharing his technological passion through how-to articles, simplifying complex concepts in Linux, Windows, Mac OS, and various other platforms and technologies for a wide audience.
Comments