
Ansible is an open-source configuration management and application deployment tool. It helps to reduce managerial overhead by automating the deployment of the app and managing IT infrastructure.
Using ansible we are going to install apache2 web server in Ubuntu 22.04. For this, we need to create a configuration in YAML syntax called Ansible playbooks.
Normally, there is a control node and host nodes. Ansible is installed in the control node and will execute A basic Ansible environment has three main components: control node, managed node, and inventory. Ansible is installed in the control node and will execute the ansible playbook to deploy in managed nodes using the inventory file in the control node that describes the managed nodes to Ansible. In this lab, we are going to install and use it on a single node and it's configurable for multiple nodes as well.
Installing Ansible on Ubuntu
First, update your system (the control node). The following command fetches the latest package:
sudo apt updateAnsible is available in the base repository of Ubuntu (tested on 20.04 and 22.02). To install ansible run the following command:
sudo apt install ansible -y
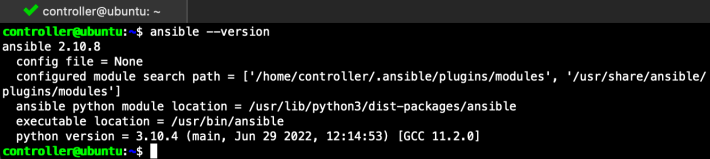
Then, check the installed ansible version using the command
ansible --version
Configure Ansible Inventory
Ansible can use two formats of inventory, INI format (initialization file) or YAML format, you can see both examples below and use it according to your preferred format.
To start configuring the Ansible playbook, create a new directory in /home/controller. Where the controller is my user account in the controller node.
mkdir ansible-apache
cd ansible-apache
Create a new inventory file. You can create INI format or YAML format. Then modify it according to your managed node configuration. Modify the ansible_host to a hostname or IP address of the managed server.
It is recommended to use a pre-define ansible_ssh_user, in this case the ssh user is ansible and has sudo privilege with NOPASSWD configured, this makes it easy for ansible to execute command without asking sudo password all the time. It is recommended to configure a passwordless account for user ansible and use ssh-private-key to log in to the managed node. If you haven’t already done this, look for setting up a passwordless account in the section below.
In the inventory we define server1 as a managed node with group name myservers, you can add more servers by adding more servers lines, there is also ansible node variable like the apache domain name and the apache configuration file and an example of global variable http_port that will be applied to myservers group.
Option 1: Inventory with INI format
Create a new file named hosts:
vi hostsAdd the following content to the file, change the manage.host.tld with ip address or FQDN domain
[myservers]
server1 ansible_host=192.155.94.211 ansible_ssh_user=ansible ansible_ssh_private_key_file=ansible.key http_host=mydomain.local http_conf=mydomain.local.conf

[myservers:vars]
http_port=80
Option 2: Inventory with YAML format.
Create a new file named hosts.yaml
vi hosts.yamlAdd the following content to the file:
myservers:
  hosts:
    server1:
      ansible_host: 192.155.94.211
      ansible_port: 22
      ansible_ssh_user: ansible
      ansible_ssh_private_key_file: ansible.key
      http_host: mydomain.local
      http_conf: mydomain.local.conf
  vars:
    http_port: "80"
Configure Passwordless Account
To configure a passwordless account, ssh to the manage node and create ansible user with the below command, and set the desired password
sudo adduser ansibleAdd the new user to the sudo group as follows:
sudo usermod -aG sudo ansibleOpen sudoers configuration file
sudo visudoAdd the following line into sudoers file
ansible ALL=(ALL:ALL) NOPASSWD:ALLConfigure ssh-key for managing managed node
Configure the ssh-key at the control node, ssh to the control node and create new ssh key with below command, fill in the passphrase (optional)
cd ansible-apachessh-keygen -f ansible.key -t ecdsa -b 521
The command will generate 2 file, the private key ansible.key and the public key ansible.key.pub. Copy the public key to the manage node with the below command, and change the managed.host.tld with the IP address or FQDN of the managed host.
ssh-copy-id -i ansible.key.pub [email protected]Enter the root password, once the public key has been configured on the server, the server will allow ssh connectivity from ansible with the private key created before and configured in the inventory file.
Test the Ansible Inventory
If the inventory file is configured correctly you can test the connectivity to the managed node with the private key created before.
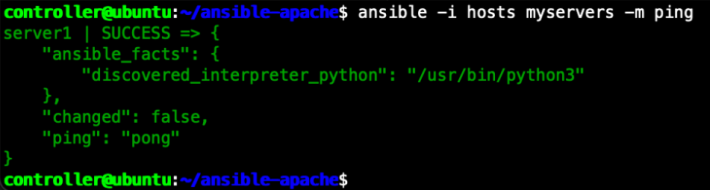
Run the following command from the control node:
ansible -i hosts myservers -m pingOr if you create the inventory using yaml file you can test that with the following command:
ansible -i hosts.yaml myservers -m pingYou should get a pong response similar to the screenshot below.
Creating Ansible Playbook
To create ansible playbook, we can change to the directory we created before and create the ansible playbook yaml file with the following command:
cd ansible-apache
vi install-apache.yaml
Add the following content to the file
- name: Ansible Playbook to Install and Setup Apache on Ubuntu
  hosts: myservers
  become: yes
  tasks:
    - name: Install latest version of Apache
      apt: name=apache2 update_cache=yes state=latest

    - name: Create document root for domain configured in host variable
      file:
        path: "/var/www/{{ http_host }}"
        state: directory
        owner: www-data
        group: www-data
        mode: '0755'

    - name: Copy your index file
      template:
        src: "files/index-template.html"
        dest: "/var/www/{{ http_host }}/index.html"

    - name: Set up virtuahHost
      template:
        src: "files/apache-template.conf"
        dest: "/etc/apache2/sites-available/{{ http_conf }}"

    - name: Enable site
      command: a2ensite {{ http_conf }}
      notify: restart-apache

    - name: "UFW firewall allow HTTP on port {{ http_port }}"
      ufw:
        rule: allow
        port: "{{ http_port }}"
        proto: tcp

  handlers:
    - name: restart-apache
      service:
        name: apache2
        state: restarted
Brief description,
- host: is hostname-group as defined in inventory file (hosts or hosts.yaml)
- become: yes is privilege escalation for being sudo
- tasks: five tasks are defined. Installing latest apache, copying index page, setting up virtual host, enable site, allowing http from UFW firewall if not enabled already.
- handlers: To restart apache if all the other tasks are successful.
Along with playbook, we should define two other files, files/apache-template.conf and files/index.template.html. The step below is to create the index page and the virtual host configuration
(from ansible-apache directory)
(from ansible-apache directory)
mkdir files
cd files
vi index-template.html
Copy the index template below, you can modify as per your requirement:
<html>
   <head>
       <title>{{ http_host }}</title>
   </head>
   <body>
       <h1>Welcome to {{ http_host }}</h1>
   </body>
</html>
Create the virtual host configuration template:
(from ansible-apache/files directory)
vi apache-template.conf
Copy the virtual host configuration template below, can modify it as per your requirement:
<VirtualHost *:{{ http_port }}>
   ServerAdmin webmaster@localhost
   ServerName {{ http_host }}
   ServerAlias www.{{ http_host }}
   DocumentRoot /var/www/{{ http_host }}
   ErrorLog ${APACHE_LOG_DIR}/error.log
   CustomLog ${APACHE_LOG_DIR}/access.log combined
</VirtualHost>
Execute The Ansible Playbook
Now you can execute ansible-playbook with the following command.
ansible-playbook -i hosts.yaml install-apache.yamlIf you are using INI configuration file, you can execute the same command with below command:
ansible-playbook -i hosts install-apache.yamlBelow is the sample of the successful execution of Ansible Playbook on installing apache.
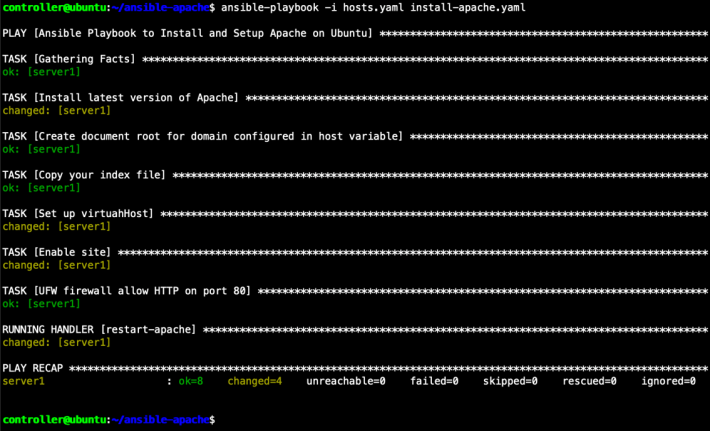
This will also run apache on default port 80, you can verify the browsing server IP or domain name in your favorite browser.
Conclusion
In this tutorial, we learned how to ansible playbook to install-apache on Ubuntu.
Ansible is a helpful tool as it is agentless and writing configuration is easy. You can browse more configurations from ansible official documentation. Please do comment if you have any issues while writing the playbook on ansible.


Comments